Love this? Save it for later!
Share the inspiration with your friends
My nephew took one bite, looked at me with those giant eyes, and said, “Auntie, can I have five more?” I’d barely set the tray down before the first one disappeared. Honestly, that’s when I knew these mummy hot dogs wrapped in crescent dough were a win. I wasn’t trying to be fancy—I just wanted something fun for Halloween that didn’t require me to be in the kitchen for hours.
It was one of those last-minute ideas, you know? I had a can of crescent rolls in the fridge, some hot dogs in the freezer, and a bag of candy eyes I’d bought on a whim. The whole thing came together in less than twenty minutes, and suddenly I was the cool aunt. The best part? They weren’t just cute—they were actually good. The crescent dough gets all golden and flaky, wrapping around the hot dog like a little blanket. And the kids went absolutely nuts for them.
I’ve made these for Halloween parties, school events, and even a random Tuesday when I needed a smile. They’re the kind of recipe that feels like a secret weapon. You don’t need fancy skills or special equipment. Just a little creativity and a willingness to have fun with your food. And if you’ve ever wondered how to make Halloween dinner feel special without losing your mind, this is it.
So grab your ingredients, and let’s make something that’ll make everyone at your table feel like a kid again.
Why You’ll Love This Recipe
I’ve tested this recipe more times than I care to admit—mostly because my kids kept begging for it. After a few trials (and one batch of slightly burnt mummies), I can confidently say this version is the one. Here’s why you’ll love it too:
- Quick & Easy: From start to finish, these mummy dogs take under 20 minutes. Perfect for Halloween night when you’re juggling costumes and candy.
- Simple Ingredients: You probably already have crescent dough and hot dogs in your kitchen. No fancy grocery trips required.
- Perfect for Halloween: Whether it’s a spooky party, classroom treat, or just a fun dinner, these mummies fit right in.
- Crowd-Pleaser: Kids love them. Adults love them. Even picky eaters can’t resist a hot dog wrapped in buttery dough.
- Unbelievably Fun: There’s something magical about food that looks like little monsters. It makes everyone smile.
What sets this recipe apart from other Halloween snacks is how forgiving it is. The crescent dough bakes up perfectly every time—golden, flaky, and just the right amount of buttery. And the hot dogs stay juicy inside. I’ve tried other versions that use puff pastry or homemade dough, but honestly? Crescent rolls are the shortcut that actually works. They’re soft enough to wrap easily and bake up with that perfect texture.
This isn’t just another Halloween recipe. It’s the one that makes your kids say, “Can we make these every year?” And honestly, that’s the best compliment a recipe can get.
What Ingredients You Will Need
This recipe uses simple, everyday ingredients to create something truly fun. You won’t need to hunt down anything weird or expensive—just the basics that make these mummy dogs irresistible.
- Hot dogs (8 standard-sized): Use your favorite brand. I personally like beef hot dogs for their flavor, but turkey or chicken hot dogs work great too. If you’re feeding a crowd, mini hot dogs or cocktail sausages are a fun alternative.
- Crescent roll dough (1 can, 8 count): This is the star of the show. I recommend Pillsbury Original Crescent Rolls for the best texture. The dough is soft, easy to work with, and bakes up perfectly golden. You can also use store-brand versions—just make sure they’re the flaky kind.
- Candy eyes (16-24 small rounds): These are what make your mummies come alive. You can find them at most grocery stores in the baking aisle or online. If you can’t find candy eyes, you can use small dots of mustard or ketchup instead—just add them after baking.
- Egg wash (1 large egg + 1 tablespoon water): This gives the crescent dough that beautiful golden-brown finish. If you don’t have eggs, you can use a little milk or melted butter instead. The color won’t be as deep, but it’ll still look great.
- Optional: Mustard or ketchup for dipping: Not strictly necessary, but highly recommended. The kids in my house love dipping their mummy dogs in ketchup. I’m a mustard person myself.
That’s it. Six ingredients (if you count the dipping sauce) and you’re ready to go. The beauty of this recipe is how flexible it is. You can swap out hot dogs for vegetarian sausages or use gluten-free crescent dough if needed. Just keep an eye on the baking time—different doughs may cook a little faster or slower.
Equipment Needed
You don’t need a lot of fancy tools to make these mummy dogs. Here’s what you’ll need:
- Baking sheet: A standard half-sheet pan works perfectly. Line it with parchment paper for easy cleanup.
- Sharp knife or pizza cutter: You’ll need this to cut the crescent dough into strips. A pizza cutter makes it super fast, but a knife works just fine.
- Pastry brush: For applying the egg wash. If you don’t have one, you can use a clean paintbrush or even your fingers—just wash your hands first!
- Small bowl: To whisk the egg wash.
- Cooling rack (optional): If you want your mummy dogs to stay crispy on the bottom, transfer them to a wire rack after baking.
I’ve made these with just a knife and a baking sheet before, and they turned out perfectly. The pastry brush is nice to have, but it’s not a dealbreaker. Honestly, the most important tool is your creativity—the way you wrap the dough makes each mummy unique.
Preparation Method
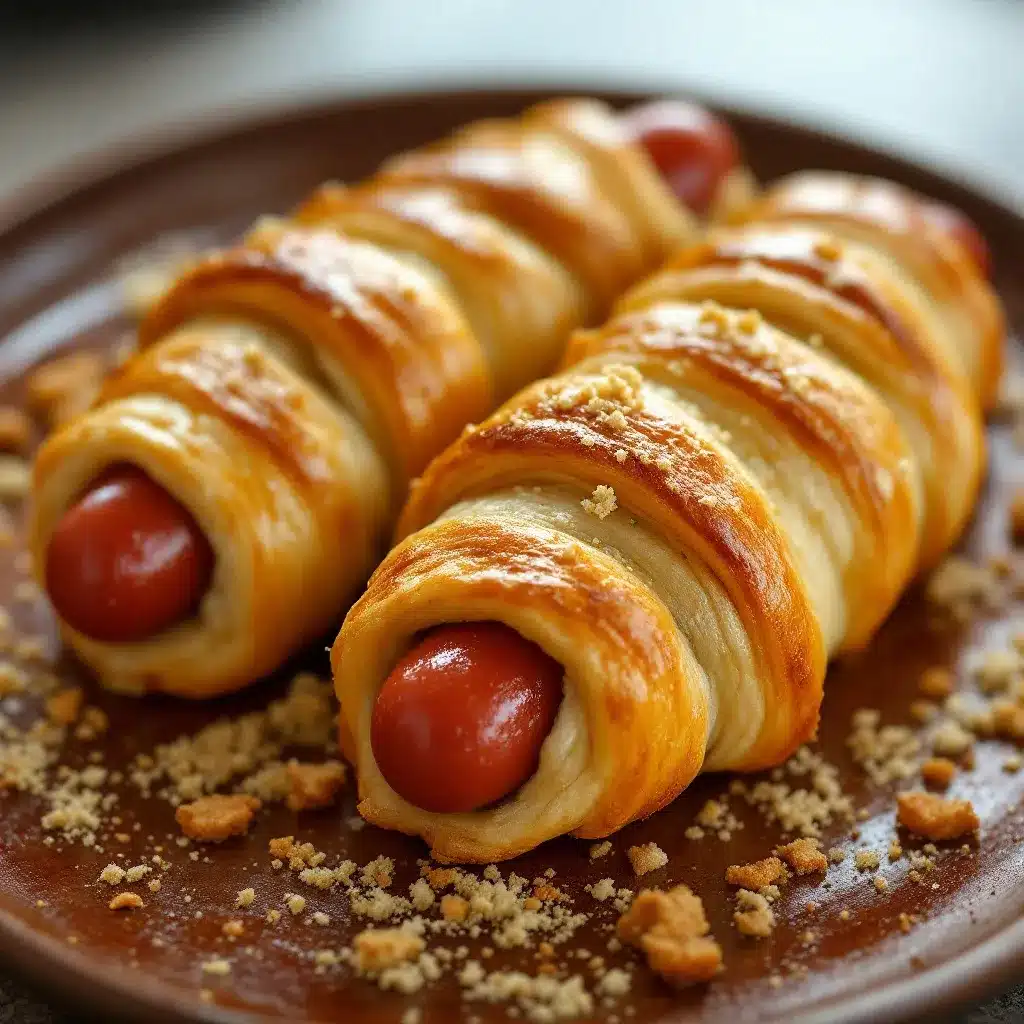
Let’s get to the fun part. Follow these steps, and you’ll have a tray of adorable mummy dogs in no time.
- Preheat your oven to 375°F (190°C). Line a baking sheet with parchment paper. This makes cleanup a breeze and prevents the dough from sticking.
- Unroll the crescent dough. Carefully separate the dough along the perforated lines. You should have 8 triangles. If the dough tears a little, don’t worry—just press it back together.
- Cut each triangle into thin strips. Using a sharp knife or pizza cutter, slice each triangle lengthwise into 3-4 strips. The strips should be about ½ inch wide. Don’t worry about making them perfect—mummies are supposed to look a little messy!
- Wrap the hot dogs. Take one hot dog and start wrapping a strip of dough around it. Leave a small gap near the top for the eyes. Don’t wrap too tightly—the dough will expand as it bakes. Overlap the strips slightly to create that mummy look. You can leave some space between strips to show the hot dog underneath.
- Place the wrapped hot dogs on the baking sheet. Make sure they’re spaced about 2 inches apart. They’ll puff up a bit as they bake.
- Apply the egg wash. In a small bowl, whisk the egg and water together. Using a pastry brush, gently brush the egg wash over the dough strips. This gives them that beautiful golden color.
- Bake for 10-12 minutes. Keep an eye on them toward the end. The dough should be golden brown and the hot dogs should be heated through. If your oven runs hot, check at 10 minutes.
- Add the eyes. Remove the baking sheet from the oven. While the mummy dogs are still warm, gently press the candy eyes onto the exposed hot dog at the top. The heat will help them stick. If the eyes don’t stay, you can use a tiny dab of mustard or ketchup as glue.
- Cool slightly before serving. Let them rest on the baking sheet for 2-3 minutes. The dough will set as it cools, making the mummies easier to handle.
Here’s a tip I learned the hard way: don’t skip the egg wash. The first time I made these, I forgot to brush it on, and the dough came out pale and sad. The egg wash makes all the difference in color and texture. Trust me on this one.
Also, if you’re making a big batch, work in batches. The dough can get sticky if it sits out too long. Keep the unused crescent rolls in the fridge until you’re ready to wrap them.
Cooking Tips & Techniques
After making these mummy dogs more times than I can count, I’ve picked up a few tricks that make the process smoother. Here are my best tips:
- Keep the dough cold. Crescent roll dough is much easier to work with when it’s cold. If it gets too warm, it becomes sticky and hard to cut. Pop it in the fridge for 5-10 minutes if you’re struggling.
- Don’t over-wrap. You want the dough to look like bandages, not a full body cast. Leave some space between the strips so you can see the hot dog underneath. It makes the mummies look more authentic.
- Use a pizza cutter for clean strips. A pizza cutter glides through the dough without pulling or tearing it. If you’re using a knife, make sure it’s sharp.
- Watch the baking time. Every oven is different. Start checking at 10 minutes. The dough should be golden brown, not dark brown. If the edges start to burn, your oven might run hot.
- Press the eyes gently. Candy eyes can be a little stubborn. If they don’t stick, use a tiny dab of mustard or ketchup as edible glue. It works like a charm.
I once made the mistake of wrapping the dough too tightly, and the mummies looked more like sausages than spooky creatures. The dough expanded as it baked, and the hot dogs were completely hidden. Learn from my mistake—loose and uneven is the way to go. It’s supposed to look a little messy. That’s the whole point.
Variations & Adaptations
One of the best things about this recipe is how easy it is to customize. Here are some variations I’ve tried and loved:
- Vegetarian version: Swap the hot dogs for vegetarian sausages or even cheese sticks. Mozzarella sticks work surprisingly well—just make sure they’re the firm kind, not fresh mozzarella.
- Spicy mummies: Use spicy Italian sausages or add a sprinkle of red pepper flakes to the dough before wrapping. It gives them a little kick that adults will love.
- Cheesy mummies: Before wrapping, cut a slit in the hot dog and stuff it with a thin strip of cheddar or pepper jack cheese. The cheese melts inside as it bakes, creating a gooey center.
- Gluten-free option: Use gluten-free crescent dough if you can find it. The texture will be slightly different, but they’ll still be delicious.
- Mini mummies: Use cocktail sausages or mini hot dogs and cut the crescent dough into smaller strips. These are perfect for party platters—and they’re extra cute.
I’ve also made these with different types of dough. Puff pastry works if you roll it thin enough, but it’s not as soft and flaky as crescent dough. Biscuit dough is too thick and doesn’t wrap as nicely. Stick with crescent rolls for the best results—it’s the texture that makes them special.
Serving & Storage Suggestions
These mummy dogs are best served warm, right out of the oven. The dough is at its flakiest, and the hot dogs are perfectly juicy. Here’s how to serve and store them:
- Serving temperature: Serve them warm or at room temperature. If you’re making them for a party, you can keep them warm in a low oven (200°F) for up to 30 minutes.
- Presentation: Arrange them on a platter with a small bowl of dipping sauce in the center. Mustard, ketchup, or even ranch dressing all work great. For a spooky touch, add a few plastic spiders or fake cobwebs around the platter.
- Complementary dishes: These pair perfectly with other Halloween snacks. Try serving them alongside mummy wrapped baked brie with raspberry jam for a sweet and savory combo. Or add a bowl of creamy slow cooker buffalo chicken dip for dipping.
- Storage: Store leftovers in an airtight container in the refrigerator for up to 3 days. The dough will soften slightly, but they’ll still taste great.
- Reheating: To reheat, pop them in a 350°F oven for 5-7 minutes. The microwave works in a pinch, but the dough won’t be as crispy. If you’re using a microwave, wrap them in a paper towel to absorb excess moisture.
I’ve also frozen these before. Just bake them without the eyes, let them cool completely, and freeze them in a single layer on a baking sheet. Once frozen, transfer them to a freezer bag. When you’re ready to serve, reheat them in a 375°F oven for 10-12 minutes, then add the eyes. They’re perfect for last-minute Halloween parties.
Nutritional Information & Benefits
Let’s be honest—these mummy dogs are a treat, not a health food. But here’s a rough idea of what you’re working with per serving (one mummy dog):
- Calories: Approximately 180-200 calories
- Protein: 7-8 grams
- Fat: 12-14 grams
- Carbohydrates: 14-16 grams
- Sugar: 3-4 grams
- Sodium: 450-500 mg
The hot dogs provide a decent amount of protein, which makes these more filling than a typical snack. If you’re using turkey or chicken hot dogs, you’ll save a few calories and grams of fat. The crescent dough adds carbohydrates for quick energy—perfect for fueling little ghosts and goblins before a night of trick-or-treating.
For dietary considerations, this recipe can be made gluten-free with appropriate dough. It’s not suitable for vegans as written, but you can use plant-based hot dogs and a vegan crescent dough alternative. The candy eyes are typically made from sugar and starch, so they’re generally safe for most diets.
I’m not a nutritionist, but I believe in balance. These mummy dogs are a fun, occasional treat that brings joy to the table. Pair them with some veggies or fruit for a more balanced meal, and enjoy the smiles they bring.
Conclusion
These easy mummy hot dogs wrapped in crescent dough are more than just a Halloween recipe—they’re a memory in the making. I’ve made them for spooky parties, classroom celebrations, and quiet nights at home when I wanted to surprise my kids. Every single time, they’ve been a hit.
What I love most about this recipe is how it brings people together. There’s something about food that looks like little monsters that makes everyone laugh and relax. It’s not about perfection—it’s about having fun. So don’t worry if your mummies look a little lopsided or if the dough tears in one spot. That’s what makes them yours.
I’d love to hear how yours turn out. Did you add any fun variations? Did your kids help wrap the dough? Drop a comment below and share your creations. And if you’re looking for more Halloween inspiration, check out my black velvet cupcakes with orange buttercream or these peanut butter rice krispie treats for your next party.
Happy Halloween, and happy cooking!
Frequently Asked Questions
Can I make these mummy dogs ahead of time?
Yes! You can assemble them up to 24 hours in advance. Just wrap the hot dogs, place them on a baking sheet, cover with plastic wrap, and refrigerate. When you’re ready to bake, add the egg wash and pop them in the oven. You may need to add 2-3 minutes to the baking time since the dough will be cold.
Can I use puff pastry instead of crescent dough?
You can, but the texture will be different. Puff pastry is flakier and less soft than crescent dough. If you use puff pastry, roll it out slightly thinner and cut it into strips. The baking time may also be longer—start checking at 12 minutes.
How do I get the candy eyes to stick?
The easiest way is to press them onto the hot dog while it’s still warm from the oven. The heat helps them adhere. If they still won’t stick, use a tiny dab of mustard, ketchup, or even a little bit of the egg wash as edible glue.
Can I freeze these mummy dogs?
Absolutely. Bake them without the eyes, let them cool completely, and freeze them in a single layer. Once frozen, transfer to a freezer bag. To reheat, bake at 375°F for 10-12 minutes, then add the eyes. They’ll taste just as good as fresh.
What other dipping sauces work well?
Mustard and ketchup are classics, but don’t stop there. Ranch dressing, honey mustard, barbecue sauce, or even cheese sauce all pair beautifully. For a spooky twist, try green guacamole or orange cheddar sauce. Let your imagination run wild.
Pin This Recipe!

Easy Mummy Hot Dogs: Best Halloween Crescent Recipe

These easy mummy hot dogs wrapped in crescent dough are a fun and quick Halloween treat that kids and adults love. Ready in under 20 minutes, they’re perfect for parties, school events, or a spooky dinner.
- Prep Time: 10 minutes
- Cook Time: 12 minutes
- Total Time: 22 minutes
- Yield: 8 servings 1x
- Category: Appetizer
- Cuisine: American
Ingredients
- 8 standard-sized hot dogs
- 1 can (8 count) crescent roll dough
- 16–24 small candy eyes
- 1 large egg
- 1 tablespoon water
- Mustard or ketchup for dipping (optional)
Instructions
- Preheat your oven to 375°F (190°C). Line a baking sheet with parchment paper.
- Unroll the crescent dough and separate along the perforated lines to get 8 triangles.
- Using a sharp knife or pizza cutter, cut each triangle lengthwise into 3-4 thin strips (about ½ inch wide).
- Take one hot dog and wrap a strip of dough around it, leaving a small gap near the top for the eyes. Overlap strips slightly for a mummy look, and don’t wrap too tightly.
- Place the wrapped hot dogs on the prepared baking sheet, spacing them about 2 inches apart.
- In a small bowl, whisk the egg and water together to make an egg wash. Brush the egg wash over the dough strips.
- Bake for 10-12 minutes, until the dough is golden brown and the hot dogs are heated through.
- Remove from the oven and immediately press candy eyes onto the exposed hot dog at the top. The heat will help them stick.
- Let cool for 2-3 minutes before serving. Serve warm with mustard or ketchup for dipping, if desired.
Notes
Keep the dough cold for easier handling. Don’t over-wrap the hot dogs; leave some space between strips for a mummy look. If candy eyes don’t stick, use a tiny dab of mustard or ketchup as edible glue. For a gluten-free version, use gluten-free crescent dough.
Nutrition
- Serving Size: 1 mummy dog
- Calories: 190
- Sugar: 3.5
- Sodium: 475
- Fat: 13
- Saturated Fat: 4.5
- Carbohydrates: 15
- Protein: 7.5
Keywords: mummy hot dogs, Halloween recipe, crescent roll hot dogs, easy Halloween snack, spooky appetizer



