Love this? Save it for later!
Share the inspiration with your friends
Grabbing a bag of granny smith apples from the farmers market, I had every intention of making a pie. A beautiful, lattice-topped, showstopper of a pie. But then the afternoon got away from me—kids needed snacks, laundry needed folding, and honestly, my motivation for rolling out pastry dough just evaporated. I stood there, staring at those apples, feeling that familiar pinch of wanting something special but having zero energy for fuss. So I did what any reasonable, slightly tired person would do. I tossed the sliced apples in a pan, threw together a buttery oat topping with my hands, and baked it until the kitchen smelled like October. No rolling pin. No pie weights. Just a baking dish and a deep need for comfort. That first bite of classic apple crisp with vanilla ice cream—warm, cinnamon-spiced fruit under a crunchy golden crust, melting into cold, creamy vanilla—was honestly better than any pie I’ve ever made. And I realized something. Sometimes the best desserts aren’t the ones you plan. They’re the ones you cobble together in a happy, domestic panic.
This is that recipe. The one that saves you when you want homemade dessert but don’t want to work for it. It’s rustic, forgiving, and absolutely delicious. And it’s become my go-to for everything from weeknight cravings to holiday dinners. Let’s make it together.
Why You’ll Love This Recipe
I’ve tested this classic apple crisp with vanilla ice cream more times than I can count—tweaking the topping ratio, trying different apple varieties, adjusting the bake time for that perfect bubbly edge. And I can tell you with complete confidence: this version is the one. Here’s why it works so well:
- Super Simple Ingredients: You probably have most of these in your pantry right now. No obscure extracts or specialty flours. Just real, honest ingredients.
- Ready in Under an Hour: From start to warm-out-of-the-oven bliss, you’re looking at about 50 minutes. Most of that is hands-off baking time.
- No Pastry Stress: Forget rolling, chilling, and crimping. This topping comes together in one bowl with your hands or a pastry cutter. It’s practically foolproof.
- Perfect for Any Occasion: It’s fancy enough for Thanksgiving but easy enough for a random Tuesday. I’ve brought it to potlucks, served it for book club, and eaten it straight from the dish at 10 PM. No judgment.
- Crowd-Pleasing Comfort: Warm fruit, crunchy topping, cold ice cream—it’s a textural symphony that makes everyone happy. Kids love it. Adults love it. Even picky eaters go back for seconds.
- Better Than Pie: I said what I said. The topping-to-fruit ratio is higher, the edges get all caramelized and sticky, and you don’t have to worry about a soggy bottom crust. It’s pie’s more relaxed, more delicious cousin.
This isn’t just another apple dessert. It’s the one that makes you close your eyes after the first bite. The kind of comfort food that feels like a hug in a bowl. And when you top it with a scoop of melting vanilla ice cream? Honestly, it’s pure magic.
What Ingredients You Will Need
This recipe uses simple, wholesome ingredients to deliver bold flavor and satisfying texture without the fuss. Most of these are pantry staples, which is exactly what you want when a dessert craving strikes. Here’s what you’ll need:
For the Apple Filling
- 6 cups apples, peeled, cored, and sliced (about 5-6 medium apples) – I love using a mix of Granny Smith for tartness and Honeycrisp or Fuji for sweetness. The combination gives you a more complex flavor.
- 1/3 cup granulated sugar – Just enough to sweeten the fruit without overpowering it. You can reduce this if your apples are very sweet.
- 1 tablespoon lemon juice – This brightens the flavor and helps prevent the apples from browning. Fresh is best, but bottled works in a pinch.
- 1 tablespoon all-purpose flour – Helps thicken the juices as the apples bake, so you get that luscious, syrupy texture instead of a watery mess.
- 1 teaspoon ground cinnamon – The heart of any apple dessert. It’s warm, aromatic, and essential.
- 1/4 teaspoon ground nutmeg – Adds a subtle, cozy depth. Freshly grated is amazing if you have it.
- Pinch of salt – Sounds weird, but it balances the sweetness and makes everything taste more like itself.
For the Crisp Topping
- 1 cup old-fashioned rolled oats – Not quick oats! The texture is different. Old-fashioned oats give you that perfect chewy-crunchy topping.
- 3/4 cup all-purpose flour – Provides structure and helps the topping get golden and crisp.
- 1/2 cup packed light brown sugar – Adds moisture and a deep, caramel-like sweetness that pairs beautifully with the apples.
- 1/4 cup granulated sugar – A little extra sweetness for balance.
- 1/2 teaspoon ground cinnamon – Because you can never have too much cinnamon in a dessert like this.
- Pinch of salt – Again, balances the sweetness.
- 1/2 cup unsalted butter, cold and cut into small cubes – This is key. Cold butter creates those lovely clumps in the topping that bake up crispy and golden. I use unsalted so I can control the salt level.
For Serving
- Vanilla ice cream – The classic choice. The cold, creamy vanilla against the warm, spiced apples and crunchy topping is a match made in dessert heaven. I prefer a good quality brand like Häagen-Dazs or a local creamery.
- Optional: caramel sauce, whipped cream, or a dusting of cinnamon – For when you want to go all out.
Ingredient Tips: For the best texture, use apples that hold their shape during baking. Granny Smith, Honeycrisp, Braeburn, and Pink Lady are all excellent choices. Avoid Red Delicious—they turn into mush. And if you’re out of lemons, a splash of apple cider vinegar works as a substitute for the lemon juice. I’ve done it, and it’s totally fine.
Equipment Needed
You don’t need a fancy kitchen to make this classic apple crisp with vanilla ice cream. Here’s what I use:
- 9×13-inch baking dish – This size gives you plenty of surface area for topping and ensures even baking. An 8×8 or 9×9 works too, but you’ll need to increase the bake time slightly. A ceramic or glass dish is ideal for even heat distribution.
- Large mixing bowl – For the apple filling.
- Medium mixing bowl – For the topping.
- Sharp knife and cutting board – For peeling and slicing the apples. A good peeler makes this job so much faster.
- Measuring cups and spoons – Accuracy matters in baking, even for a forgiving recipe like this.
- Pastry cutter or two forks – For cutting the butter into the dry ingredients. You can also use your hands, which is what I usually do. Just work quickly so the butter stays cold.
- Rubber spatula or wooden spoon – For mixing the filling and spreading the topping.
- Baking sheet – Place the baking dish on a sheet pan to catch any bubbly overflow. Trust me on this one.
Budget-Friendly Tip: If you don’t have a pastry cutter, two knives work perfectly. Just cut the butter into the flour mixture using a scissor-like motion until it resembles coarse crumbs. Or use your fingertips—just be gentle and quick so the butter doesn’t warm up too much.
Preparation Method
Alright, let’s get to the fun part. This classic apple crisp with vanilla ice cream comes together in a few simple steps. Here’s exactly how I do it:
- Preheat your oven to 350°F (175°C). Position a rack in the center of the oven. While it heats, lightly grease your 9×13-inch baking dish with butter or non-stick spray. I use butter because it adds flavor to the edges.
- Prepare the apples. Peel, core, and slice your apples into 1/4-inch thick slices. Not too thin—you want them to hold their shape during baking. Aim for uniform slices so they cook evenly. You should have about 6 cups. (A pro tip: if you’re short on time, a good apple peeler-corer-slicer is a game-changer. I got one last fall and it’s saved me hours.)
- Make the filling. In a large bowl, toss the sliced apples with the granulated sugar, lemon juice, flour, cinnamon, nutmeg, and salt. Use your hands or a spatula to make sure every slice is coated. Let it sit for about 5 minutes while you make the topping. This helps the apples release some juice, which creates that lovely syrupy sauce as they bake.
- Make the crisp topping. In a medium bowl, whisk together the oats, flour, brown sugar, granulated sugar, cinnamon, and salt. Add the cold cubed butter. Using a pastry cutter, two forks, or your fingertips, cut the butter into the dry mixture until it looks like coarse crumbs with some pea-sized butter pieces remaining. Don’t overmix—those little butter lumps create the crispy, golden clusters you want. I like to squeeze a handful of the mixture together to form a few larger clumps. It adds texture.
- Assemble the crisp. Spread the apple mixture evenly in your prepared baking dish. Sprinkle the topping evenly over the apples. Don’t press it down—you want it loose so it bakes up crispy. Place the dish on a baking sheet to catch any drips. (I learned this the hard way. Burnt sugar on the bottom of the oven is not fun to clean.)
- Bake. Bake for 40-45 minutes, until the topping is golden brown and the filling is bubbling around the edges. The apples should be tender when pierced with a fork. If the topping is browning too quickly, loosely tent the dish with foil for the last 10 minutes. Your kitchen is going to smell incredible right about now.
- Cool slightly. Let the crisp cool on a wire rack for at least 10-15 minutes. This is important—it allows the filling to set up a bit so it’s not runny. I know it’s tempting to dig in immediately, but trust me, those few minutes make a difference.
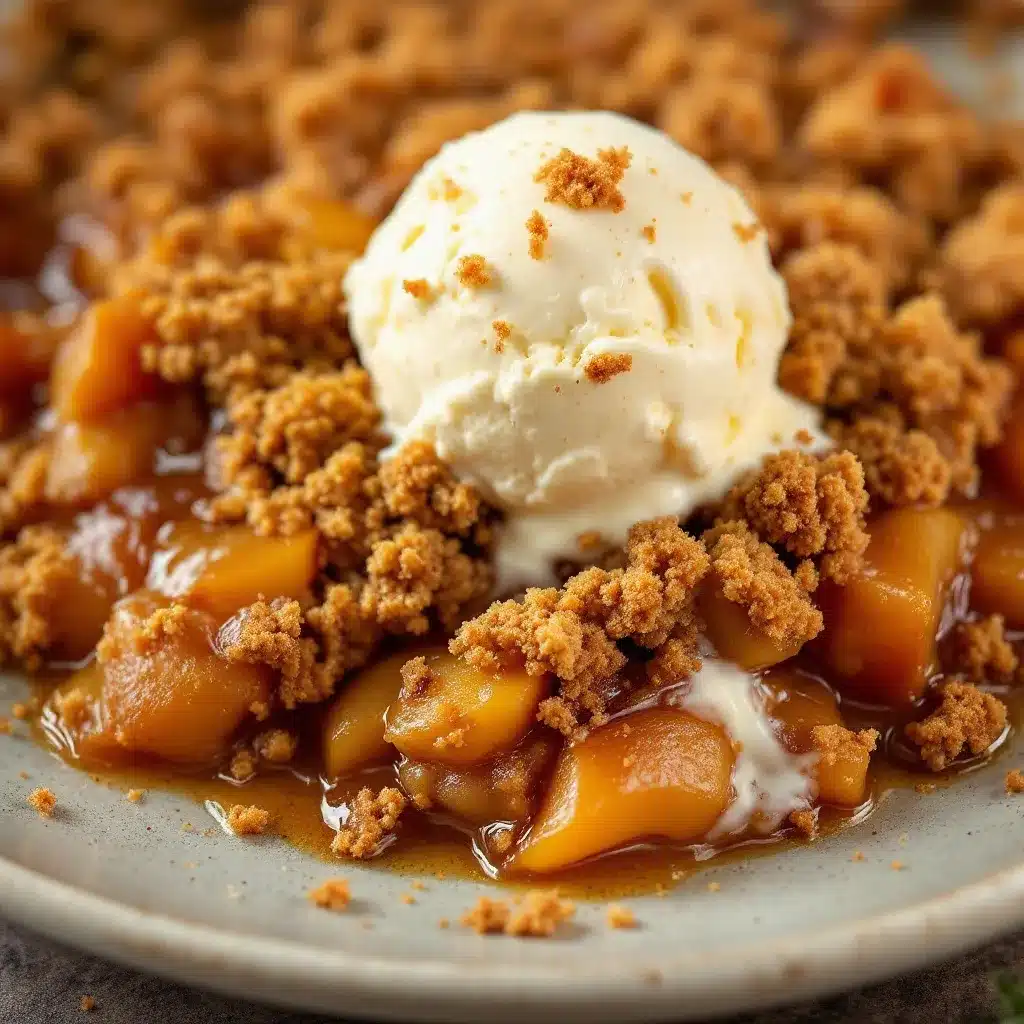
- Serve warm. Scoop generous portions into bowls and top with a scoop of vanilla ice cream. The ice cream will start to melt into the warm apples, creating a creamy, dreamy sauce. Add a drizzle of caramel sauce or a sprinkle of cinnamon if you’re feeling fancy. Then grab a spoon and enjoy every single bite.
Sensory Cue: When the crisp is done, the topping should be a deep golden brown and the apple filling should be bubbling up around the edges with thick, syrupy bubbles. The smell is pure autumn—cinnamon, butter, and baked fruit. It’s the kind of scent that makes everyone wander into the kitchen asking, “What’s for dessert?”
Cooking Tips & Techniques
Over the years, I’ve made this classic apple crisp with vanilla ice cream more times than I can count. And I’ve definitely made my share of mistakes. Here’s what I’ve learned:
- Don’t skip the lemon juice. It’s not just for flavor—it prevents the apples from oxidizing and turning brown. Plus, that little bit of acidity balances the sweetness perfectly.
- Use cold butter for the topping. This is non-negotiable. Warm butter will get absorbed into the flour and oats, giving you a dense, pasty topping instead of a crispy, crumbly one. If your kitchen is warm, pop the butter in the freezer for 10 minutes before cutting it in.
- Mix your apple varieties. A blend of tart and sweet apples gives you the best flavor and texture. I use 3 Granny Smith and 3 Honeycrisp. The Granny Smiths hold their shape, while the Honeycrisps soften slightly and add sweetness. It’s a perfect balance.
- Don’t overbake. The crisp is done when the topping is golden and the filling is bubbly. Overbaking will dry out the apples and make the topping too dark. Start checking at 40 minutes.
- Let it rest. I know, I know—you want to eat it right away. But letting it sit for 10-15 minutes allows the juices to thicken into a beautiful syrup. If you serve it too soon, you’ll have a soupy mess. Patience pays off.
- Double the topping. Honestly, the topping is the best part. I often make 1.5 times the topping recipe because I love that crunchy layer. No one has ever complained about too much crisp topping.
A Personal Failure: The first time I made apple crisp, I used quick oats because that’s what I had. The topping turned out mushy and sad. I learned that day that old-fashioned oats are essential for texture. They hold up better during baking and give you that satisfying chew. So don’t skip them!
Variations & Adaptations
One of the best things about this classic apple crisp with vanilla ice cream is how adaptable it is. Here are some of my favorite variations:
- Gluten-Free Version: Substitute the all-purpose flour with a 1:1 gluten-free baking flour blend. I’ve used Bob’s Red Mill and King Arthur Measure for Measure, and both work great. The topping will be slightly more crumbly but still delicious.
- Vegan Version: Use coconut oil or vegan butter in place of regular butter. The topping won’t be quite as crispy, but it’s still tasty. And serve with a dairy-free vanilla ice cream—I love oat milk-based ones for their creamy texture.
- Add Some Crunch: Toss 1/2 cup of chopped pecans or walnuts into the topping mixture. It adds a lovely nutty flavor and extra texture. I do this when I’m feeling fancy, and it’s always a hit.
- Spice It Up: Add 1/4 teaspoon of cardamom or allspice to the filling for a more complex spice profile. Cardamom and apple are a surprisingly beautiful combination—it’s warm and slightly floral.
- Berry Twist: Swap half the apples for fresh or frozen berries. A mix of apples and blackberries or raspberries is incredible. The berries break down and create a jammy sauce that’s divine with the ice cream.
- Pear Crisp: Replace the apples with ripe but firm pears. Bartlett or Bosc pears work well. Add an extra tablespoon of flour since pears are juicier than apples. This is my go-to in late fall when pears are at their peak.
My Personal Favorite: I once made this with a mix of apples and fresh cranberries during the holidays. The tartness of the cranberries against the sweet topping and creamy ice cream was absolutely incredible. It’s become my Thanksgiving standard now.
Serving & Storage Suggestions
This classic apple crisp with vanilla ice cream is best served warm, but here are my tips for getting the most out of it:
Serving: Scoop the warm crisp into shallow bowls and top with a generous scoop of vanilla ice cream. The contrast between the warm, spiced fruit and the cold, creamy ice cream is the whole point. For extra indulgence, drizzle with caramel sauce or a sprinkle of cinnamon. If you’re serving a crowd, set up a little topping bar with whipped cream, chopped nuts, and extra cinnamon—it’s always a hit.
What to Serve With It: This crisp is amazing on its own, but it pairs beautifully with a cup of hot coffee or a mug of spiced apple cider. For a full fall-themed dessert spread, serve it alongside my cozy small batch pumpkin dump cake with vanilla ice cream for a double-dessert situation. And if you’re hosting a game day gathering, my best slow cooker football chili makes a perfect savory main course before this sweet finish.
Storage: Leftover apple crisp can be stored in the refrigerator, covered, for up to 4 days. The topping will lose some of its crunch, but the flavor will still be wonderful. To reheat, place individual portions in the microwave for 30-45 seconds, or reheat the whole dish in a 350°F oven for 10-15 minutes until warmed through. The oven method helps restore some of the topping’s crispiness.
Freezing: You can freeze the unbaked crisp for up to 3 months. Assemble the crisp in a freezer-safe dish, wrap tightly with plastic wrap and foil, and freeze. To bake, thaw overnight in the refrigerator, then bake as directed, adding 10-15 minutes to the bake time. You can also freeze baked crisp—just let it cool completely, wrap well, and freeze. Thaw in the fridge and reheat in the oven.
Flavor Development: Honestly, this crisp tastes even better the next day. The flavors meld together overnight, and the apples get even more tender and syrupy. So if you can resist eating it all in one sitting, you’re in for a treat.
Nutritional Information & Benefits
While this classic apple crisp with vanilla ice cream is definitely a treat, it does have some redeeming qualities. Here’s a rough estimate per serving (based on 8 servings, without ice cream):
- Calories: Approximately 350-400
- Fat: 14g
- Carbohydrates: 58g
- Fiber: 4g
- Sugar: 38g
- Protein: 4g
Health Benefits: Apples are a great source of dietary fiber and vitamin C. The oats in the topping provide soluble fiber, which is good for heart health. And cinnamon has anti-inflammatory properties. So while this isn’t health food, it’s not completely devoid of nutritional value either.
Dietary Considerations: This recipe contains gluten (from the flour and oats) and dairy (from the butter). For a gluten-free version, use certified gluten-free oats and a gluten-free flour blend. For a dairy-free version, use vegan butter or coconut oil. The vanilla ice cream can be swapped for a dairy-free alternative.
Personal Perspective: I believe in balance. This dessert is meant to be enjoyed in moderation as a special treat. It’s the kind of thing you make for a cozy night in, a holiday gathering, or when you just need a little comfort. And honestly, a little comfort is good for the soul.
Conclusion
This classic apple crisp with vanilla ice cream is more than just a dessert—it’s a moment of pure, uncomplicated joy. It’s the warm, cinnamon-scented hug you need on a chilly evening. It’s the dessert that proves you don’t need fancy techniques or obscure ingredients to create something truly memorable. It’s simple, honest, and absolutely delicious.
I hope you make this recipe your own. Tweak the spices, swap the apples, pile on the ice cream. Make it for a crowd or just for yourself on a quiet Tuesday night. However you choose to enjoy it, I promise it’ll be worth every single bite.
If you try this recipe, I’d love to hear about it! Leave a comment below, share a photo, or tag me on social media. Your feedback and adaptations inspire me every day. And if you’re looking for more easy, comforting desserts, check out my easy one bowl banana bread for another no-fuss favorite.
Happy baking, friends. And don’t forget the ice cream.
Frequently Asked Questions
Can I use quick oats instead of old-fashioned oats?
I really don’t recommend it. Quick oats are more finely processed and will absorb moisture differently, resulting in a softer, mushier topping. Old-fashioned rolled oats give you that perfect chewy-crunchy texture that makes apple crisp so satisfying. If you only have quick oats, you can use them, but expect a different texture.
What are the best apples for apple crisp?
A mix of tart and sweet apples works best. I love using Granny Smith for tartness and structure, combined with Honeycrisp or Fuji for sweetness. Braeburn, Pink Lady, and Jonagold are also excellent choices. Avoid Red Delicious—they break down too much and become mushy.
Can I make apple crisp ahead of time?
Absolutely! You can assemble the crisp (without baking) up to 24 hours in advance. Cover and refrigerate, then bake just before serving. You may need to add 5-10 minutes to the bake time since the dish will be cold. Baked crisp can be stored in the fridge for up to 4 days and reheated in the oven or microwave.
Why is my apple crisp topping not crispy?
There are a few possible reasons. The butter might have been too warm when you mixed it in, which prevents those lovely clumps from forming. Or you might have overmixed the topping. Or the crisp could have been covered while baking, trapping steam and softening the topping. Next time, use cold butter, mix until just combined, and bake uncovered until golden brown.
Can I freeze apple crisp?
Yes! You can freeze it either unbaked or baked. To freeze unbaked, assemble the crisp in a freezer-safe dish, wrap tightly with plastic wrap and foil, and freeze for up to 3 months. Bake from frozen, adding about 15-20 minutes to the bake time. To freeze baked crisp, let it cool completely, wrap well, and freeze. Thaw in the refrigerator and reheat in the oven at 350°F until warmed through.
Pin This Recipe!

Classic Apple Crisp with Vanilla Ice Cream – Easy Homemade Dessert

This classic apple crisp with vanilla ice cream is a rustic, forgiving dessert that comes together in under an hour with simple pantry ingredients. Warm cinnamon-spiced apples under a crunchy golden oat topping, served with cold vanilla ice cream—it’s pure comfort in a bowl.
- Prep Time: 15 minutes
- Cook Time: 45 minutes
- Total Time: 1 hour
- Yield: 8 servings 1x
- Category: Dessert
- Cuisine: American
Ingredients
- 6 cups apples, peeled, cored, and sliced (about 5–6 medium apples)
- 1/3 cup granulated sugar
- 1 tablespoon lemon juice
- 1 tablespoon all-purpose flour
- 1 teaspoon ground cinnamon
- 1/4 teaspoon ground nutmeg
- Pinch of salt
- 1 cup old-fashioned rolled oats
- 3/4 cup all-purpose flour
- 1/2 cup packed light brown sugar
- 1/4 cup granulated sugar
- 1/2 teaspoon ground cinnamon
- Pinch of salt
- 1/2 cup unsalted butter, cold and cut into small cubes
- Vanilla ice cream for serving
- Optional: caramel sauce, whipped cream, or a dusting of cinnamon
Instructions
- Preheat your oven to 350°F (175°C). Lightly grease a 9×13-inch baking dish with butter or non-stick spray.
- Peel, core, and slice the apples into 1/4-inch thick slices. You should have about 6 cups.
- In a large bowl, toss the sliced apples with granulated sugar, lemon juice, flour, cinnamon, nutmeg, and salt. Let sit for 5 minutes.
- In a medium bowl, whisk together oats, flour, brown sugar, granulated sugar, cinnamon, and salt. Add cold cubed butter and cut it in using a pastry cutter, two forks, or your fingertips until the mixture resembles coarse crumbs with some pea-sized butter pieces. Squeeze a handful to form a few larger clumps.
- Spread the apple mixture evenly in the prepared baking dish. Sprinkle the topping evenly over the apples without pressing down. Place the dish on a baking sheet.
- Bake for 40-45 minutes, until the topping is golden brown and the filling is bubbling around the edges. If the topping browns too quickly, tent loosely with foil for the last 10 minutes.
- Let the crisp cool on a wire rack for 10-15 minutes to allow the filling to set.
- Serve warm in bowls topped with a scoop of vanilla ice cream. Optionally drizzle with caramel sauce or sprinkle with cinnamon.
Notes
For best texture, use a mix of tart and sweet apples like Granny Smith and Honeycrisp. Use cold butter for the topping to ensure crispiness. Let the crisp rest for 10-15 minutes after baking to allow the filling to set. The topping can be doubled for extra crunch. Leftovers can be stored in the refrigerator for up to 4 days and reheated in the oven or microwave.
Nutrition
- Serving Size: 1 serving (about 1/8
- Calories: 375
- Sugar: 38
- Sodium: 150
- Fat: 14
- Saturated Fat: 8
- Carbohydrates: 58
- Fiber: 4
- Protein: 4
Keywords: apple crisp, apple dessert, easy apple crisp, classic apple crisp, apple crisp with ice cream, fall dessert, comfort food, homemade dessert



