Love this? Save it for later!
Share the inspiration with your friends
I watched my friend take a bite, and her eyes just went wide. She didn’t say anything, just stared at the cookie in her hand like she was trying to figure out what magic trick I’d pulled. “You made these from a box mix?” she finally asked, almost accusingly. I just shrugged and grabbed another one for myself. That moment—the disbelief, the quiet awe, the immediate request for the recipe—is exactly why I keep making these fudgy red velvet crinkle cookies. They look like you spent hours in the kitchen, but honestly? The secret is almost embarrassingly simple.
I first tried making crinkle cookies years ago, and they always came out too cakey or too flat. I wanted that dense, almost brownie-like center with the perfect crackly top. I wanted the kind of cookie that felt special but didn’t require a trip to a specialty baking store. After a few frustrating batches (and one that I’m pretty sure my dog politely rejected), I stumbled onto this approach. It uses a boxed red velvet cake mix as the base, but with a few tweaks that make the texture absolutely next-level. The result is a cookie that’s deeply chocolatey, perfectly fudgy, and covered in that signature snowy powdered sugar coating.
These aren’t just cookies. They’re the kind of treat that makes people stop and ask questions. They’re for Valentine’s Day, Christmas, a random Tuesday when you need a little color in your life. And the best part? Four ingredients. That’s it. No stand mixer, no chilling the dough for hours, no complicated techniques. Just a bowl, a spoon, and about 20 minutes until warm, fudgy perfection. I’ve made these for cookie exchanges, potlucks, and late-night cravings, and they’ve never let me down.
Why You’ll Love This Recipe
Let me tell you why these fudgy red velvet crinkle cookies are about to become your new favorite go-to dessert. I’ve tested this recipe more times than I can count, tweaking the ratios and baking times until everything was just right. Here’s what makes them stand out:
- Only 4 Ingredients: You don’t need a pantry full of specialty items. Cake mix, eggs, oil, and powdered sugar. That’s the whole list. I promise, you probably already have everything you need.
- No Chilling Required: I know, I know—most cookie recipes tell you to chill the dough for hours. Not this one. Mix, roll, bake. Done in under 25 minutes from start to finish.
- Perfectly Fudgy Texture: These aren’t dry or cakey. They’re dense and chewy in the center with slightly crisp edges. The crinkle top is dramatic and beautiful, making them look bakery-worthy.
- Foolproof for Beginners: If you’ve never baked cookies from scratch, this is the perfect place to start. The box mix does most of the work, and the technique is incredibly forgiving.
- Holiday-Ready in Minutes: Red velvet is perfect for Valentine’s Day, Christmas, or any celebration where you want a pop of color. They’re also amazing for cookie swaps because they travel well and look stunning on a plate.
The first time I brought these to a family gathering, my aunt—who is a notoriously picky baker—asked for the recipe. She couldn’t believe they started with a box mix. That’s the kind of reaction you’re going to get. These cookies are unapologetically delicious, and they prove that you don’t need complicated techniques to create something truly special. They’re comfort food at its finest: quick, easy, and absolutely irresistible.
What Ingredients You Will Need
This recipe uses simple, everyday ingredients to create something that tastes far more complex than it is. The magic happens when the cake mix combines with the oil and eggs, creating a dough that bakes up fudgy and rich. Here’s everything you’ll need:
- 1 box (15.25 oz) red velvet cake mix: This is the backbone of the recipe. I prefer using Duncan Hines or Betty Crocker, but any brand works well. The cake mix already has the perfect balance of flour, sugar, leavening agents, and cocoa powder. Make sure you get the standard size box—not the larger “family size” or the smaller “snack size.”
- 2 large eggs: Eggs provide structure and moisture. They help bind the dough together and give the cookies that chewy texture. Make sure your eggs are at room temperature for best results—just let them sit on the counter for 15 minutes before you start.
- 1/3 cup vegetable oil: Oil keeps these cookies incredibly moist and fudgy. I use canola or vegetable oil because they have a neutral flavor. You can also use melted coconut oil, but make sure it’s cooled slightly before adding it to the mix. Don’t substitute butter here—butter will make the cookies spread too much and lose that signature fudgy texture.
- 1/2 cup powdered sugar (for rolling): This is what creates the beautiful crinkle effect. The powdered sugar absorbs into the dough slightly as the cookies bake, cracking the surface and creating that classic look. You’ll need extra for coating the dough balls generously.
Optional Add-ins: If you want to dress these up, you can add 1/2 cup of white chocolate chips or semi-sweet chocolate chips to the dough. I sometimes add a teaspoon of vanilla extract for extra depth of flavor. For a festive touch, fold in some red or pink sprinkles before baking.
Ingredient Tips: The brand of cake mix matters more than you might think. I’ve tested this with generic store brands, and they work fine, but premium brands tend to produce a slightly richer flavor and better texture. If you’re using a gluten-free red velvet cake mix, this recipe works beautifully—just follow the same instructions. For a dairy-free version, check that your cake mix doesn’t contain dairy (most don’t), and you’re good to go.
Equipment Needed
You don’t need a fancy kitchen to make these cookies. Here’s what you’ll need:
- Large mixing bowl: Any medium-to-large bowl will work. I use a glass or stainless steel bowl.
- Wooden spoon or spatula: For mixing the dough. A sturdy spoon works perfectly—no electric mixer required.
- Measuring cups and spoons: You’ll need these for the oil and powdered sugar.
- Small bowl: For the powdered sugar coating.
- Baking sheet: A standard half-sheet pan works great. Line it with parchment paper or a silicone baking mat for easy cleanup.
- Cookie scoop or tablespoon: For portioning the dough evenly. I use a 1.5-tablespoon cookie scoop for consistently sized cookies.
- Cooling rack: Optional but helpful for letting the cookies cool evenly.
If you don’t have a cookie scoop, just use a regular tablespoon to scoop the dough. The key is making sure all the dough balls are roughly the same size so they bake evenly. I’ve made these with just a bowl and a spoon more times than I can count—they’re incredibly forgiving.
Preparation Method
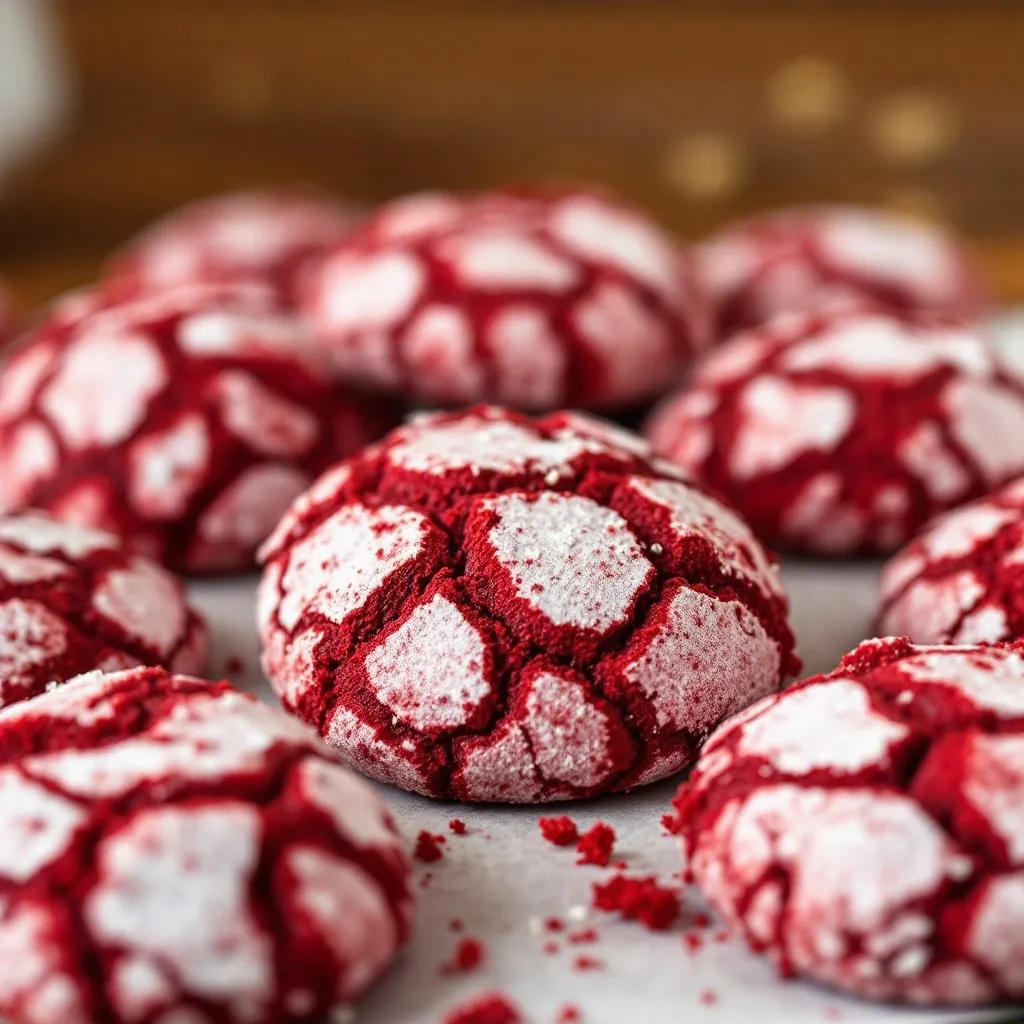
Making these fudgy red velvet crinkle cookies is almost embarrassingly easy. Here’s how to do it step by step:
- Preheat your oven to 350°F (175°C). Line a baking sheet with parchment paper or a silicone baking mat. This prevents sticking and makes cleanup a breeze. If you don’t have parchment, you can lightly grease the pan, but parchment works best.
- In a large mixing bowl, combine the cake mix, eggs, and vegetable oil. Use a wooden spoon or spatula to stir everything together until a thick, cohesive dough forms. It will be quite sticky—that’s normal. Don’t overmix; just stir until no dry streaks of cake mix remain. The dough should be glossy and hold together when you press it.
- Pour the powdered sugar into a small bowl. Use about 1/2 cup to start, and have extra on hand for re-coating. The powdered sugar creates the crinkle effect, so don’t skimp on it.
- Scoop the dough into 1.5-tablespoon portions. Using a cookie scoop or a regular tablespoon, portion the dough into balls. Roll each portion between your palms to form a smooth ball. The dough will be sticky, so lightly oil your hands if needed.
- Roll each dough ball generously in the powdered sugar. Make sure every surface is completely coated. The thicker the coating, the more dramatic the crinkle will be. Don’t be shy—really coat them well.
- Place the coated dough balls on the prepared baking sheet. Space them about 2 inches apart. They will spread slightly, so give them room. I usually fit 9 cookies on a standard half-sheet pan.
- Bake for 10-12 minutes. The cookies should look set around the edges but still slightly soft and puffy in the center. They will continue to set as they cool. For fudgier cookies, bake closer to 10 minutes. For slightly firmer cookies, go to 12 minutes.
- Let the cookies cool on the baking sheet for 5 minutes. This is crucial—they’re delicate right out of the oven. After 5 minutes, transfer them to a cooling rack to cool completely. The crinkle pattern will become more pronounced as they cool.
Sensory Cues: When the cookies are done, the edges will be set and the tops will have a beautiful cracked appearance. The centers should still look slightly underdone—that’s what gives them that fudgy texture. If you press gently on the top, it should spring back slightly. The powdered sugar will have partially absorbed into the dough, creating those iconic white cracks against the red velvet background.
Pro Tip: If you want extra-thick cookies, chill the dough balls for 15 minutes before baking. This helps them spread less and stay taller. I don’t usually bother, but it’s a good trick if you’re after a more dramatic crinkle.
Cooking Tips & Techniques
I’ve made these cookies more times than I can count, and I’ve learned a few things along the way. Here are my best tips for perfect results every time:
Don’t Overmix the Dough: This is the most common mistake. Mix just until the ingredients come together. Overmixing develops the gluten too much, resulting in tougher, less fudgy cookies. Stop as soon as you don’t see any dry cake mix.
Use Generous Coating: The crinkle effect comes from the powdered sugar absorbing into the dough as it bakes. If you skimp on the coating, the cracks won’t be as dramatic. I roll each ball twice—once to coat, then a second time to make sure every nook and cranny is covered.
Watch the Bake Time: Every oven runs slightly differently. Start checking at the 9-minute mark. The cookies should look puffy and slightly cracked on top. The edges should be set but the centers should still look a little underdone. Remember, they continue to bake on the hot pan after you take them out.
Use Parchment Paper: I learned this the hard way. Without parchment, the cookies can stick to the pan, and the bottoms might burn. Parchment paper ensures even baking and easy removal. Silicone baking mats work great too.
Room Temperature Eggs: Cold eggs can make the dough seize up and become harder to mix. Let your eggs sit out for 15-20 minutes before you start. This helps the dough come together more smoothly and evenly.
One Batch at a Time: Don’t try to bake two sheets at once unless you have a convection oven. The heat distribution won’t be even, and you’ll end up with unevenly baked cookies. Bake one sheet at a time in the center of the oven.
I once forgot to add the eggs. I mixed the cake mix and oil, rolled the balls, coated them in sugar, and popped them in the oven. They came out flat, greasy, and completely wrong. It was a disaster. So trust me—don’t skip the eggs. They’re essential for structure and texture.
Variations & Adaptations
One of the best things about this recipe is how versatile it is. Here are some ways to make it your own:
- White Chocolate Chunk Version: Fold in 1/2 cup of white chocolate chips or chopped white chocolate bar pieces into the dough before rolling. The creamy sweetness pairs perfectly with the mild cocoa flavor of the red velvet.
- Cream Cheese Stuffed: This is my absolute favorite variation. Take a small cube of cold cream cheese (about 1 teaspoon) and wrap the dough around it before rolling in powdered sugar. The cream cheese stays soft and tangy in the center—like a red velvet cheesecake cookie.
- Gluten-Free Option: Use a gluten-free red velvet cake mix. Most brands work well, but check the package instructions—some require an extra egg or additional liquid. I’ve used King Arthur’s gluten-free mix with great results.
- Chocolate Overload: Add 1/4 cup of cocoa powder to the dry cake mix for an extra-chocolatey version. You might need to add an extra tablespoon of oil to compensate for the dry cocoa.
- Peppermint Holiday Twist: Add 1/2 teaspoon of peppermint extract to the dough and crush some candy canes to sprinkle on top after baking. These are perfect for Christmas cookie trays.
- Mini Cookie Bites: Use a teaspoon-sized scoop to make mini cookies. Bake for 6-8 minutes instead of 10-12. These are perfect for parties or snacking.
I tried the cream cheese stuffed version for a Valentine’s Day party last year, and they disappeared in minutes. The tangy cream cheese center against the sweet, fudgy cookie is just incredible. If you’re feeling adventurous, give that one a try.
Serving & Storage Suggestions
These cookies are delicious at any temperature, but here’s how to get the most out of them:
Serving: Serve these cookies slightly warm for the ultimate fudgy experience. The centers will be soft and almost gooey. They’re perfect on their own, but you can also serve them with a glass of cold milk, a scoop of vanilla ice cream, or alongside a hot cup of coffee. For a pretty presentation, arrange them on a plate and dust with a little extra powdered sugar.
Storage: Store the cookies in an airtight container at room temperature for up to 5 days. Place a slice of bread in the container to keep them soft—the bread absorbs excess moisture and releases it slowly. Replace the bread slice every couple of days. The cookies actually get fudgier and more flavorful after a day or two.
Freezing Instructions: These cookies freeze beautifully. You can freeze the baked cookies for up to 3 months. Place them in a single layer in a freezer-safe container, separated by parchment paper. Thaw at room temperature for about 30 minutes before serving. You can also freeze the unbaked dough balls—just roll them in powdered sugar, place them on a baking sheet, freeze until solid, then transfer to a freezer bag. Bake from frozen, adding 2-3 minutes to the baking time.
Reheating: To revive that just-baked texture, microwave a cookie for 10-15 seconds. It will be warm and gooey again. You can also reheat them in a 300°F oven for 5 minutes if you’re doing a larger batch.
I’ve found that these cookies are even better the next day. The flavors meld together, and the texture becomes perfectly fudgy. If you can resist eating them all on the first day, you’re in for a treat.
Nutritional Information & Benefits
Here’s the estimated nutritional breakdown per cookie (based on 18 cookies):
| Nutrient | Amount Per Cookie |
|---|---|
| Calories | 160 |
| Total Fat | 7g |
| Saturated Fat | 1.5g |
| Cholesterol | 20mg |
| Sodium | 220mg |
| Total Carbohydrates | 23g |
| Dietary Fiber | 0.5g |
| Sugars | 14g |
| Protein | 2g |
These cookies are a treat, not a health food, but they do offer a few small benefits. The cocoa powder in the cake mix provides antioxidants called flavanols, which can support heart health. The eggs add a small amount of protein and essential vitamins like B12 and D. If you’re looking for a slightly healthier option, try my fudgy protein-packed peanut butter oat bars for a no-bake alternative that’s packed with protein and fiber.
Dietary Considerations: This recipe contains wheat (gluten), eggs, and may contain dairy depending on the cake mix brand. For a gluten-free version, use a certified gluten-free cake mix. For a dairy-free option, check that your cake mix is dairy-free (most are) and you’re good to go. These cookies are not suitable for vegans as written, but you can try using flax eggs (1 tablespoon ground flaxseed + 3 tablespoons water per egg) and a vegan cake mix.
Conclusion
These fudgy red velvet crinkle cookies are proof that you don’t need complicated techniques or a long list of ingredients to create something genuinely impressive. They’re the kind of cookie that makes people stop and ask, “Wait, you made these?” And when you tell them it only took four ingredients and 20 minutes, they won’t believe you—until they take a bite.
I love these cookies because they’re forgiving. They work every single time, no matter how distracted I am or how messy my kitchen gets. They’re the recipe I turn to when I need a guaranteed win—for a holiday party, a bake sale, or just a quiet afternoon when I want something sweet. They’re also the recipe I share with friends who say they can’t bake, because after making these, they realize they absolutely can.
If you try these cookies, I’d love to hear how they turn out. Leave a comment below and let me know if you added any fun variations, or tag me in your photos on social media. And if you’re looking for more easy, foolproof dessert recipes, check out my easy one-bowl banana bread or these perfect pumpkin cream cheese muffins for more baking inspiration.
Happy baking, friends. Go make something delicious.
Frequently Asked Questions
Can I use a different flavor of cake mix?
Absolutely! This recipe works with any standard cake mix flavor. Try chocolate, vanilla, strawberry, or lemon for different variations. Just keep in mind that the crinkle effect works best with darker-colored cakes because the contrast with the powdered sugar is more dramatic.
Why did my cookies come out flat?
Flat cookies usually mean the dough was too warm or the baking sheet was too hot. Make sure your eggs and oil are at room temperature, and let the baking sheet cool completely between batches. You can also chill the dough balls for 15 minutes before baking to prevent excessive spreading.
Can I make these cookies ahead of time?
Yes! You can prepare the dough up to 24 hours in advance and store it in the refrigerator. Roll and coat the dough balls just before baking. You can also freeze the baked cookies for up to 3 months. They thaw beautifully at room temperature.
How do I get a more dramatic crinkle effect?
The key is a generous coating of powdered sugar. Roll each dough ball twice in the sugar, making sure every surface is completely covered. Also, don’t overmix the dough—overmixing can make the cookies spread too much, which reduces the crinkle effect.
Can I use butter instead of oil?
I don’t recommend it. Butter has a higher water content than oil, which can make the cookies spread too much and become less fudgy. Oil keeps the cookies moist and gives them that dense, brownie-like texture. Stick with vegetable or canola oil for best results.
Pin This Recipe!

Fudgy Red Velvet Crinkle Cookies: Easy 4-Ingredient Recipe

These fudgy red velvet crinkle cookies are made with just 4 ingredients and no chilling required. They are dense, chewy, and covered in a snowy powdered sugar coating, perfect for any occasion.
- Prep Time: 10 minutes
- Cook Time: 12 minutes
- Total Time: 22 minutes
- Yield: 18 cookies 1x
- Category: Dessert
- Cuisine: American
Ingredients
- 1 box (15.25 oz) red velvet cake mix
- 2 large eggs, room temperature
- 1/3 cup vegetable oil
- 1/2 cup powdered sugar (for rolling)
Instructions
- Preheat oven to 350°F (175°C). Line a baking sheet with parchment paper or a silicone baking mat.
- In a large mixing bowl, combine the cake mix, eggs, and vegetable oil. Stir with a wooden spoon or spatula until a thick, cohesive dough forms. Do not overmix.
- Pour the powdered sugar into a small bowl.
- Scoop the dough into 1.5-tablespoon portions. Roll each portion into a smooth ball between your palms.
- Roll each dough ball generously in the powdered sugar, ensuring every surface is completely coated.
- Place the coated dough balls on the prepared baking sheet, spacing them about 2 inches apart.
- Bake for 10-12 minutes. The cookies should look set around the edges but still slightly soft and puffy in the center.
- Let the cookies cool on the baking sheet for 5 minutes, then transfer to a cooling rack to cool completely.
Notes
For extra-thick cookies, chill the dough balls for 15 minutes before baking. Use a generous coating of powdered sugar for a more dramatic crinkle effect. Do not substitute butter for oil. Cookies can be stored in an airtight container at room temperature for up to 5 days or frozen for up to 3 months.
Nutrition
- Serving Size: 1 cookie
- Calories: 160
- Sugar: 14
- Sodium: 220
- Fat: 7
- Saturated Fat: 1.5
- Carbohydrates: 23
- Fiber: 0.5
- Protein: 2
Keywords: red velvet crinkle cookies, fudgy cookies, 4-ingredient cookies, easy cookie recipe, no chill cookies



