Love this? Save it for later!
Share the inspiration with your friends
Introduction
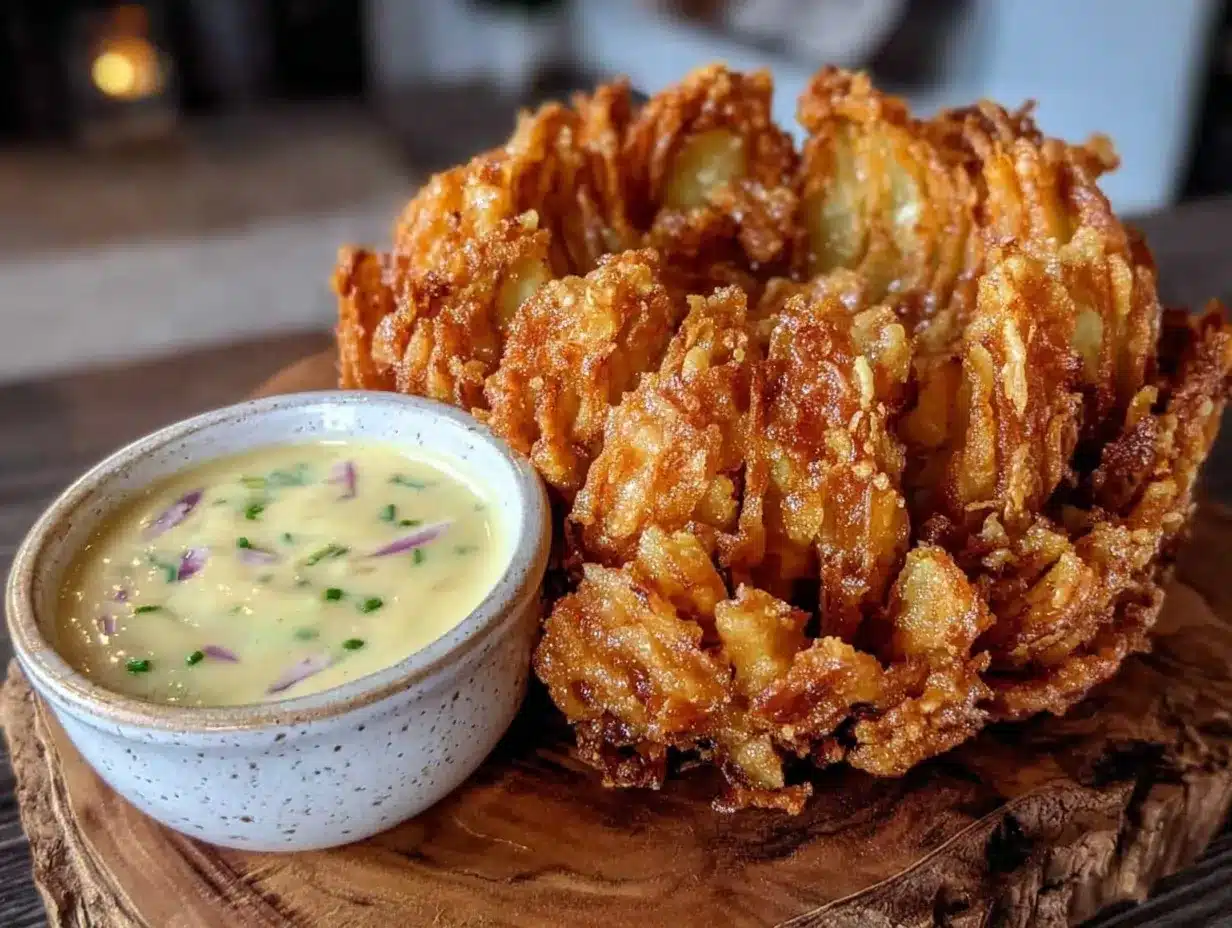
“You know, I never thought I’d be the one making a blooming onion at home,” my buddy Mark said last weekend, as we prepped for his dad’s birthday cookout. It was a Saturday afternoon, and the smell of sizzling oil filled the garage where we’d set up a makeshift fryer. Mark’s dad had always been partial to Outback Steakhouse’s legendary blooming onion, the one that comes golden, crispy, and just begging to be dipped in that tangy sauce. But since the restaurant’s a good hour away, Mark decided to take matters into his own hands.
Honestly, I was skeptical at first. Blooming onions always seemed like a restaurant-only treat—too tricky to get the crispy texture and perfect seasoning at home. But watching Mark slice into that big yellow onion, carefully cut it petal-style, and coat it with a secret mix of spices, I started to get curious. The kitchen chaos — a cracked bowl, a sudden phone call, and a small oil splash on the floor—only made it feel real, not some perfect food blogger set-up.
By the time we bit into that crispy, crunchy masterpiece, I was hooked. Maybe you’ve been there, craving that iconic appetizer but not wanting to leave the house. This blooming onion recipe isn’t just about recreating a restaurant classic; it’s about sharing a moment, making a snack that’s as fun to prepare as it is to eat—especially when it’s for someone as special as Dad. Let me tell you, this recipe has stuck around in my rotation ever since, and I’m sure it’ll become a favorite in your family too.
Why You’ll Love This Recipe
Making a crispy Outback Steakhouse blooming onion at home might sound ambitious, but trust me, it’s easier than it looks, and the payoff is huge. I’ve tested this recipe multiple times (and yes, lost a few onions along the way!), and it always comes out just right—crispy on the outside, tender inside, with that irresistible seasoning blend.
- Quick & Easy: Ready in under 45 minutes, perfect for last-minute celebrations or weekend snacks.
- Simple Ingredients: No exotic spices or hard-to-find items—mostly pantry staples you already have.
- Perfect for Dad’s Day or Any Celebration: This blooming onion steals the show at barbecues, game days, or casual dinners.
- Crowd-Pleaser: Kids and adults alike love pulling apart the crispy petals and dunking them in sauce.
- Unbelievably Delicious: The crispy, golden coating with a hint of spice hits that perfect snack spot.
This isn’t just a copycat recipe; it’s my personal take on the Outback classic with a little extra crunch and a homemade dipping sauce that balances tang and kick. I’ve played with the spice levels to suit different palates, so whether you like a mild snack or something with a punch, this blooming onion has you covered. It’s the kind of recipe that makes you pause and savor that first bite—comfort food with a touch of fun and flair.
What Ingredients You Will Need
This crispy Outback Steakhouse blooming onion recipe uses straightforward, wholesome ingredients that come together to create that bold flavor and signature texture. Most of these are pantry staples, so you probably don’t need a special grocery run. Let’s break it down:
- For the Blooming Onion:
- 1 large yellow onion (about 2 pounds), peeled but with root intact (this helps it hold together)
- 2 ½ cups all-purpose flour (I recommend King Arthur for best crispiness)
- 1 teaspoon paprika (for that smoky warmth)
- 1 teaspoon cayenne pepper (adjust to your heat preference)
- 1 teaspoon garlic powder
- 1 teaspoon salt
- ½ teaspoon black pepper
- 1 cup buttermilk (or whole milk with 1 tbsp lemon juice as a quick substitute)
- Vegetable oil, for frying (enough for deep frying, about 4 cups)
- For the Dipping Sauce:
- ½ cup mayonnaise (Hellmann’s works great)
- 2 tablespoons ketchup
- 1 tablespoon horseradish (adds that signature tangy kick)
- 1 teaspoon paprika
- ½ teaspoon garlic powder
- ½ teaspoon salt
- Dash of hot sauce (optional, for extra heat)
Feel free to swap out all-purpose flour with gluten-free flour blends if needed. For dairy-free options, coconut yogurt or almond milk can replace buttermilk with decent results. The key with the onion is picking a firm, large one that’ll bloom nicely when cut. I like to find them at my local farmers’ market for the freshest flavor.
Equipment Needed
- Sharp chef’s knife or a specialized blooming onion cutter (a sharp knife works just fine if you’re careful)
- Large deep pot or heavy-bottomed Dutch oven for frying
- Cooking thermometer (essential for keeping oil at the right frying temperature around 350°F/175°C)
- Wire rack or paper towels for draining excess oil
- Mixing bowls for flour and buttermilk dips
- Tongs or slotted spoon for safely removing the blooming onion from hot oil
If you don’t have a deep fryer, a deep pot works perfectly well, just be mindful of oil levels and temperature. I’ve tried frying in a cast iron skillet, but it’s a bit shallow and requires more attention to avoid oil splashes. For budget-friendly options, a candy or deep-fry thermometer is a small investment that makes a big difference in frying success and safety. Keeping your knife sharp is a must here—nothing ruins blooming onion prep faster than a dull blade!
Preparation Method
- Prepare the Onion: Start by trimming the top (stem end) of the onion and peeling off the skin, leaving the root end intact. Place the onion cut-side down. Using a sharp knife, make 12-16 vertical cuts from the top down, stopping about ½ inch from the root to keep it together. Gently spread the “petals” outward to form the blooming shape. This step takes patience—don’t rush or the onion will fall apart.
- Make the Flour Mixture: In a large bowl, combine all-purpose flour, paprika, cayenne, garlic powder, salt, and black pepper. Mix well. This seasoned flour is what gives the onion its crispy, flavorful crust.
- Dip in Buttermilk: Pour the buttermilk into a separate bowl. Carefully dunk the onion into the buttermilk, making sure the liquid gets between the petals. Let it soak for a couple of minutes—it helps the flour stick better.
- Coat with Flour: Transfer the onion to the flour mixture, sprinkling flour between each petal and coating the entire onion thoroughly. For an extra crispy crust, you can repeat the buttermilk and flour steps once more.
- Heat the Oil: Pour vegetable oil into a deep pot or Dutch oven to a depth of about 3 inches. Heat over medium-high heat until the oil reaches 350°F (175°C). Use your cooking thermometer to monitor temperature carefully; too hot and the coating burns, too cool and the onion gets greasy.
- Fry the Onion: Using tongs, gently lower the blooming onion into the hot oil, cut side down. Fry for about 3-4 minutes, then carefully flip and fry another 3-4 minutes until golden brown and crispy. Watch for bubbles and listen for the satisfying sizzle! If the petals start to brown too fast, lower the heat slightly.
- Drain and Serve: Remove the onion from oil and place it on a wire rack or paper towels to drain excess oil. Let it cool for a few minutes before serving.
- Make the Dipping Sauce: While the onion fries, mix mayonnaise, ketchup, horseradish, paprika, garlic powder, salt, and hot sauce in a small bowl. Adjust seasoning to taste. This sauce is the perfect tangy complement to the crispy onion.
- Enjoy: Serve the blooming onion warm with the dipping sauce on the side. Watch as everyone pulls apart the crispy petals and dips away!
Cooking Tips & Techniques
One of the trickiest parts is cutting the onion without snapping the root. I use a slow, steady hand and a very sharp knife. If you’re nervous, practice on a smaller onion first. Also, don’t skip soaking the onion in buttermilk; it really helps the flour coating stick and adds moisture for a tender inside.
Keeping your oil temperature steady around 350°F (175°C) is crucial. I learned the hard way that if the oil is too hot, the coating burns before the onion cooks through; too cool, and you end up with soggy, greasy petals. Use a thermometer and adjust the heat as needed.
Another thing—don’t overcrowd the pot. Fry one blooming onion at a time. It might take longer but you’ll get that perfect crunch. And hey, multitasking in the kitchen is an art here: while one onion fries, whip up the sauce and prep your dipping plates to save time.
Variations & Adaptations
- Spicy Blooming Onion: Add extra cayenne or a pinch of chili powder to the flour mix for a fiery kick.
- Gluten-Free Version: Use a gluten-free flour blend instead of all-purpose flour—just be sure it’s suitable for frying.
- Baked Blooming Onion: For a lighter take, try baking the coated onion at 425°F (220°C) for 25-30 minutes, flipping halfway. It won’t be quite as crispy but still delicious.
- Herb-Infused Coating: Mix dried herbs like thyme or oregano into the flour for a fragrant twist.
- I once tried swapping the dipping sauce with a creamy avocado ranch blend—surprisingly good and fresh-tasting, especially for summer gatherings.
Serving & Storage Suggestions
This blooming onion is best served hot and crispy right out of the fryer. It pairs beautifully with cold beers or a crisp soda—perfect for a casual Dad’s Day snack or game day appetizer. For sides, think simple: some crunchy celery sticks or a fresh salad to balance the indulgence.
If you have leftovers (though rare!), store them in an airtight container in the fridge for up to 2 days. To reheat, pop the onion on a baking sheet in a 375°F (190°C) oven for 10-15 minutes to revive the crispiness. Avoid microwaving, or it gets soggy fast.
Interestingly, the flavors of the dipping sauce deepen if made a few hours ahead and chilled, so you can prepare that in advance for convenience.
Nutritional Information & Benefits
One serving of this crispy Outback Steakhouse blooming onion (about 1/6 of the onion with sauce) contains approximately:
| Calories | 320 kcal |
|---|---|
| Fat | 22 g |
| Carbohydrates | 28 g |
| Protein | 4 g |
While this is definitely a treat, onions themselves are rich in antioxidants and vitamin C, which support immune health. Using fresh ingredients and a homemade sauce means you skip preservatives often found in restaurant versions. For those watching carbs or gluten, the suggested substitutions make this snack more accessible.
Conclusion
So there you have it—a crispy Outback Steakhouse blooming onion recipe that you can proudly make for Dad or anyone who loves a good snack. It’s fun to make, satisfying to eat, and a little bit nostalgic with every crispy petal. I love how this recipe turns a simple onion into a centerpiece of any gathering, and I hope you find that same joy in your kitchen.
Go ahead, tweak the spices, try different dipping sauces, or bake it for a lighter option. And when you do, I’d love to hear how your blooming onion turned out. Leave a comment below or share your own twist—because this recipe is as much about sharing good food as it is about making memories.
Here’s to crispy, crunchy moments and homemade snacks that bring everyone together!
Frequently Asked Questions
- Can I use other types of onions for this recipe?
Large yellow onions work best because they hold their shape and bloom nicely. Sweet onions like Vidalia are a good alternative but might be softer. - Is it possible to make this recipe without deep frying?
Yes! Baking is a healthier option, though the texture won’t be quite as crispy as frying. - How do I know when the oil is at the right temperature?
A cooking thermometer is the most accurate way. The oil should be about 350°F (175°C). Without one, drop a small bit of flour into the oil—if it sizzles and rises steadily, it’s ready. - Can I prepare the onion in advance?
You can slice and coat the onion ahead of time but fry it fresh for best crispiness. Keep the coated onion refrigerated for up to an hour before frying. - What can I substitute for buttermilk?
Mix 1 cup of milk with 1 tablespoon of lemon juice or vinegar and let it sit for 5 minutes to create a buttermilk substitute.
Oh, and if you’re interested in other crowd-pleasing appetizers, you might enjoy my take on crispy garlic chicken or the classic homemade honey butter that pairs perfectly with warm bread. These are staples in my kitchen when I want to impress without stress.
Pin This Recipe!
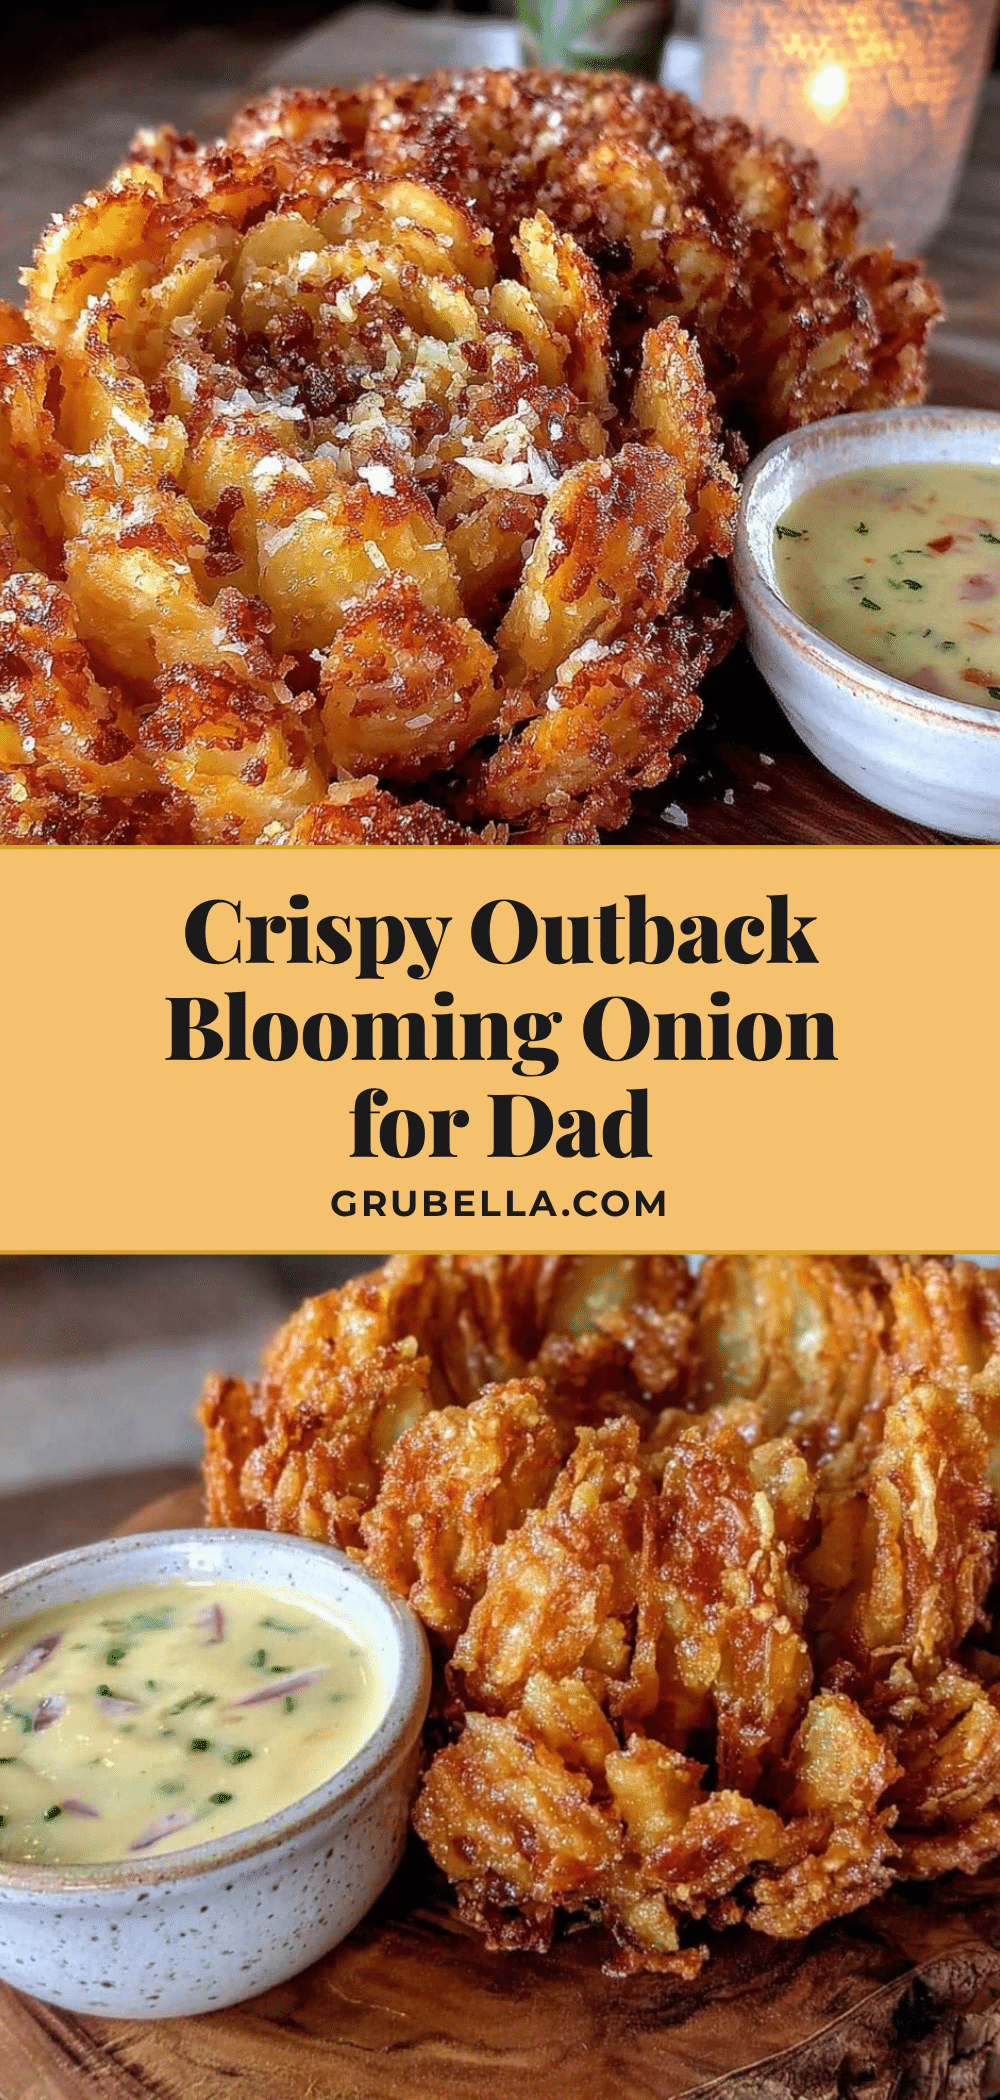
Crispy Outback Steakhouse Blooming Onion Recipe Easy Homemade Snack for Dad

A crispy, golden blooming onion recipe inspired by Outback Steakhouse, perfect for a fun snack or celebration. This homemade version features a flavorful seasoned crust and a tangy dipping sauce.
- Prep Time: 15 minutes
- Cook Time: 15 minutes
- Total Time: 30 minutes
- Yield: 6 servings 1x
- Category: Appetizer
- Cuisine: American
Ingredients
- 1 large yellow onion (about 2 pounds), peeled but with root intact
- 2 ½ cups all-purpose flour
- 1 teaspoon paprika
- 1 teaspoon cayenne pepper
- 1 teaspoon garlic powder
- 1 teaspoon salt
- ½ teaspoon black pepper
- 1 cup buttermilk (or whole milk with 1 tbsp lemon juice as a substitute)
- Vegetable oil, for frying (about 4 cups)
- ½ cup mayonnaise
- 2 tablespoons ketchup
- 1 tablespoon horseradish
- 1 teaspoon paprika
- ½ teaspoon garlic powder
- ½ teaspoon salt
- Dash of hot sauce (optional)
Instructions
- Prepare the Onion: Trim the top of the onion and peel off the skin, leaving the root end intact. Place the onion cut-side down. Make 12-16 vertical cuts from the top down, stopping about ½ inch from the root. Gently spread the petals outward to form the blooming shape.
- Make the Flour Mixture: In a large bowl, combine flour, paprika, cayenne, garlic powder, salt, and black pepper. Mix well.
- Dip in Buttermilk: Pour buttermilk into a separate bowl. Dunk the onion into the buttermilk, making sure the liquid gets between the petals. Let soak for a couple of minutes.
- Coat with Flour: Transfer the onion to the flour mixture, sprinkling flour between each petal and coating the entire onion thoroughly. Repeat the buttermilk and flour steps once more for extra crispiness.
- Heat the Oil: Pour vegetable oil into a deep pot or Dutch oven to a depth of about 3 inches. Heat over medium-high heat until oil reaches 350°F (175°C).
- Fry the Onion: Using tongs, gently lower the onion into the hot oil, cut side down. Fry for 3-4 minutes, then flip and fry another 3-4 minutes until golden brown and crispy.
- Drain and Serve: Remove the onion from oil and place on a wire rack or paper towels to drain excess oil. Let cool for a few minutes.
- Make the Dipping Sauce: Mix mayonnaise, ketchup, horseradish, paprika, garlic powder, salt, and hot sauce in a small bowl. Adjust seasoning to taste.
- Enjoy: Serve the blooming onion warm with the dipping sauce on the side.
Notes
Use a very sharp knife to avoid snapping the root. Keep oil temperature steady at 350°F (175°C) to avoid burning or greasy coating. Fry one onion at a time to maintain crispiness. Soaking the onion in buttermilk helps the flour stick and keeps the inside tender. Leftovers can be reheated in a 375°F oven for 10-15 minutes to restore crispiness. Baking is an alternative for a lighter version but less crispy.
Nutrition
- Serving Size: About 1/6 of the blo
- Calories: 320
- Fat: 22
- Carbohydrates: 28
- Protein: 4
Keywords: blooming onion, Outback Steakhouse, crispy onion, appetizer, snack, homemade, fried onion, dipping sauce