Love this? Save it for later!
Share the inspiration with your friends
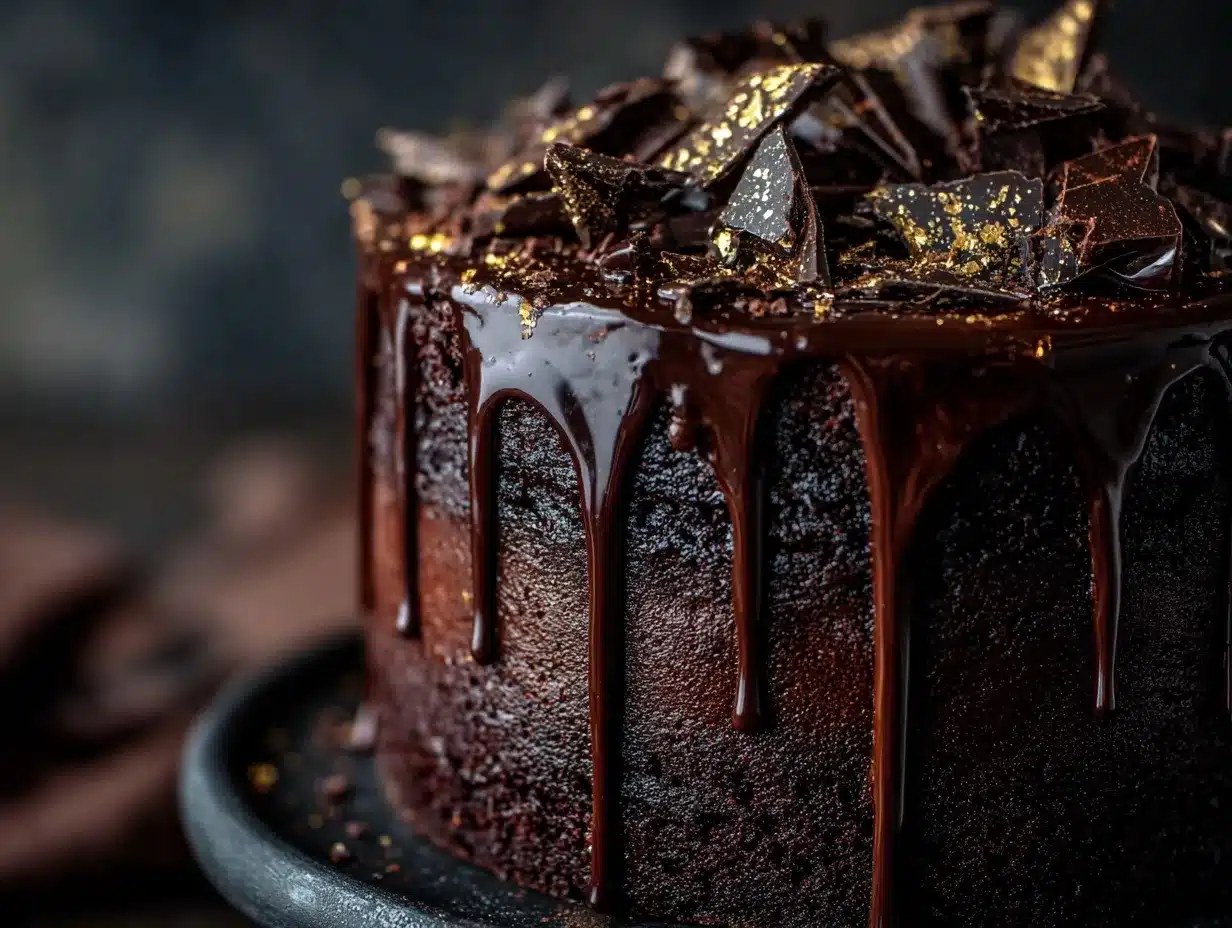
“You won’t believe what happened when I tried to make a simple chocolate cake for Mother’s Day,” my friend Jenna confessed over coffee last spring. She wasn’t aiming for anything fancy—just a little something sweet to celebrate. But somehow, that ‘simple’ idea spiraled into what I now call the Delicious Villain Era Mother’s Day Chocolate Ganache Drip Cake. Honestly, it all started because she grabbed the wrong kind of chocolate—dark instead of milk—and decided to roll with it. The result? A cake so decadently rich, with a glossy ganache dripping just right, it felt like a dramatic scene straight out of a classic villain’s lair, but, you know, the kind that melts your heart.
I remember walking into her kitchen that Sunday afternoon, the air thick with the scent of melted chocolate and a hint of espresso. There was a cracked mixing bowl on the counter, and Jenna was laughing about how her cat had knocked over the cocoa powder just as she was about to start. Maybe you’ve been there—kitchen chaos, last-minute tweaks, and that delicious panic of making something unexpectedly perfect.
This cake has stayed with me ever since. It’s not just any chocolate cake, but one that balances bold flavors and silky textures, perfect for honoring moms with style. If you’re looking for a showstopper that’s surprisingly approachable, this recipe’s going to be your new go-to treat.
Why You’ll Love This Recipe
After testing this recipe multiple times (and yes, eating far too much ganache in the process), I can say it’s truly special. Here’s why you’ll want to give the Delicious Villain Era Mother’s Day Chocolate Ganache Drip Cake a shot:
- Quick & Easy: You can whip this up in just under 1.5 hours, making it perfect for last-minute celebrations.
- Simple Ingredients: No need to hunt for fancy stuff. Most of these are pantry staples, and the chocolate can be tailored to your preference.
- Perfect for Special Occasions: Whether it’s Mother’s Day brunch or a cozy dinner party, this cake impresses without stress.
- Crowd-Pleaser: Kids and adults alike always ask for seconds, partly because of the silky ganache and partly because it looks like a dessert masterpiece.
- Unbelievably Delicious: The rich, smooth ganache dripping down the sides pairs with moist, tender cake layers that melt in your mouth.
This recipe stands out because of the ganache’s texture—smooth enough to drip perfectly but thick enough to hold its shape. The balance between bittersweet chocolate and just the right amount of sweetness makes it feel indulgent but not overwhelming. Honestly, it’s the kind of cake that makes you close your eyes and savor every bite.
What Ingredients You Will Need
This recipe uses straightforward ingredients that come together to create a rich, luscious cake. Most are pantry basics, and if you have a favorite quality chocolate brand, this is where it shines.
- For the Cake:
- 1 ¾ cups (220g) all-purpose flour
- 2 cups (400g) granulated sugar
- ¾ cup (65g) unsweetened cocoa powder (preferably Dutch-processed for deeper flavor)
- 1 ½ teaspoons baking powder
- 1 ½ teaspoons baking soda
- 1 teaspoon salt
- 2 large eggs, room temperature
- 1 cup (240ml) whole milk
- ½ cup (120ml) vegetable oil (neutral flavor like canola or sunflower)
- 2 teaspoons pure vanilla extract
- 1 cup (240ml) boiling water
- For the Chocolate Ganache Drip:
- 8 oz (225g) bittersweet or semisweet chocolate, finely chopped (I love using Ghirardelli for a smooth texture)
- 1 cup (240ml) heavy cream
- 1 tablespoon unsalted butter, softened (adds shine and richness)
- For the Frosting:
- 1 cup (230g) unsalted butter, softened
- 3 ½ cups (440g) powdered sugar, sifted
- ½ cup (45g) unsweetened cocoa powder
- ¼ cup (60ml) heavy cream
- 1 teaspoon vanilla extract
- Pinch of salt
Feel free to swap in almond flour for a gluten-free version, but note the texture will be a bit different. If dairy is a concern, use coconut cream for the ganache and frosting, but the flavor and consistency will shift slightly. For best results, choose fresh eggs and good-quality cocoa powder to get that deep, rich chocolate flavor.
Equipment Needed
- Two 8-inch (20 cm) round cake pans – non-stick or lined with parchment paper
- Mixing bowls – ideally a large and a medium-sized one
- Electric mixer or stand mixer with paddle attachment (hand mixers work too but may take longer)
- Measuring cups and spoons – accurate measurements help a lot here
- Rubber spatula for folding and scraping
- Wire cooling racks – to cool the cakes evenly and prevent sogginess
- Offset spatula or butter knife – for spreading frosting smoothly
- Small saucepan for heating heavy cream (for ganache)
- Heatproof bowl for melting chocolate
- Pastry brush (optional) – handy for brushing crumbs off the cake before frosting
I’ve found that using a stand mixer speeds things up and makes the frosting silky smooth, but a hand mixer works just fine. Also, if you don’t have two cake pans, baking the batter in batches is totally doable. An inexpensive silicone spatula is my go-to for scraping the bowl clean without scratching. Keep your tools clean and dry for best results, especially when working with chocolate.
Preparation Method
- Preheat and Prep: Preheat your oven to 350°F (175°C). Grease two 8-inch (20 cm) cake pans and line the bottoms with parchment paper. This prevents sticking and helps with even baking. I always set the pans on a baking sheet for easy handling and to catch any drips.
- Mix Dry Ingredients: In a large bowl, sift together the all-purpose flour, granulated sugar, cocoa powder, baking powder, baking soda, and salt. This step avoids lumps and ensures even distribution of leavening agents. It’s worth the extra second or two.
- Add Wet Ingredients: In a medium bowl, whisk the eggs, milk, vegetable oil, and vanilla extract until combined. Slowly pour this into the dry ingredients while mixing on low speed to avoid flour flying everywhere (trust me, I learned the hard way!).
- Incorporate Boiling Water: Carefully add the boiling water last. The batter will be thin—don’t worry, that’s how it should be. This step makes the cake extra moist.
- Bake: Divide the batter evenly between the two prepared pans. Bake for 30-35 minutes or until a toothpick inserted comes out clean. The cake should spring back lightly when pressed. Let the cakes cool in pans for 10 minutes, then transfer to wire racks to cool completely.
- Prepare Frosting: Beat softened butter with an electric mixer until creamy. Gradually add sifted powdered sugar and cocoa powder, alternating with heavy cream. Add vanilla extract and salt. Beat on medium-high until fluffy and spreadable. If it’s too thick, add a splash more cream; too thin, add more powdered sugar.
- Assemble Cake: Place one cooled cake layer on your serving plate. Spread a generous layer of frosting on top. Add the second cake layer and apply a thin crumb coat around the entire cake. Chill for 20 minutes to set.
- Make Ganache: Heat heavy cream in a small saucepan until it just begins to simmer. Pour over chopped chocolate in a heatproof bowl. Let sit for 2 minutes, then gently stir until smooth. Stir in the softened butter for shine.
- Drip Ganache: Let ganache cool slightly until it thickens but is still pourable. Using a spoon or piping bag, carefully drip ganache around the edges of the chilled cake, allowing it to drip down the sides naturally. Pour remaining ganache over the top and spread gently.
- Final Chill and Serve: Refrigerate the cake for at least 30 minutes to set the ganache before slicing. Bring to room temperature about 20 minutes before serving for the best texture.
Remember, the key is patience—especially with the ganache. Too hot, and it’ll run off too quickly; too cool, and it won’t drip. Also, don’t rush cooling the cake layers completely before frosting or the frosting melts. A little waiting goes a long way.
Cooking Tips & Techniques
The perfect chocolate ganache drip cake is all about technique and timing. Here are a few tips I’ve picked up:
- Use room temperature ingredients: This helps everything mix together smoothly without lumps or curdling.
- Sift your cocoa powder and powdered sugar: Cocoa tends to clump, and sifting keeps your batter and frosting silky.
- Don’t overmix the batter: Once wet and dry ingredients combine, mix just enough to blend. Overmixing can make the cake tough.
- Test cake doneness early: Ovens vary, so start checking for doneness at 28 minutes to avoid drying out the cake.
- Chill for crumb coat: A crumb coat traps loose crumbs so your final frosting layer is smooth and clean.
- Ganache consistency matters: If it’s too runny, chill for a few more minutes; if too thick, warm gently but don’t overheat.
- Use an offset spatula: It gives better control when spreading frosting and ganache, especially around edges.
- Practice your drip technique: Start with small amounts of ganache to avoid overwhelming drips or uneven edges.
- Keep cake layers cool: Warm layers cause frosting to melt, making a mess. Patience here is a virtue.
Honestly, the first time I tried this, the ganache ran all over the plate, but with a bit of trial and error, it became this elegant drip that looks like it belongs in a bakery window. You’ll get there too!
Variations & Adaptations
Want to put your own spin on this cake? Here are some fun twists and substitutions:
- Flavor Variations: Add a teaspoon of espresso powder to the batter for a mocha twist that deepens the chocolate flavor.
- Fruit Infusion: Layer fresh raspberries or strawberries between the cake and frosting for a tart contrast.
- Dietary Adjustments: Use gluten-free flour blend for a gluten-free cake; swap heavy cream for coconut cream to make it dairy-free and vegan-friendly.
- Chocolate Types: Try white chocolate ganache for a lighter look and sweeter taste, or mix dark and milk chocolate for a balanced ganache drip.
- Decorations: Top with edible gold leaf or chocolate shards for a dramatic villain-era vibe.
I once added a pinch of chili powder to the ganache for a subtle heat that surprised everyone. It’s a bit daring but definitely memorable!
Serving & Storage Suggestions
This cake is best served at room temperature to fully enjoy the ganache’s silky texture and the moist cake layers. Before serving, let it sit out for about 20 minutes after refrigeration.
Pair it with a cup of strong black coffee or a glass of chilled milk to balance the richness. If you’re serving it at a brunch, fresh berries and whipped cream on the side add a lovely fresh touch.
To store, cover the cake loosely with plastic wrap and refrigerate for up to 3 days. The ganache will firm up in the fridge, so warming slices slightly in the microwave (about 10 seconds) before eating helps bring back that luscious mouthfeel.
For longer storage, slice the cake and freeze pieces individually wrapped in foil and plastic wrap. Thaw overnight in the fridge and bring to room temperature before serving. The flavors actually deepen a bit after a day or two, so it’s great for prepping ahead.
Nutritional Information & Benefits
Each serving of this chocolate ganache drip cake (assuming 12 slices) contains approximately:
| Calories | 350-400 kcal |
|---|---|
| Fat | 20g (mostly from butter and cream) |
| Carbohydrates | 45g |
| Protein | 5g |
| Sugar | 35g |
While this cake is a treat, cocoa powder and dark chocolate provide antioxidants and can boost mood thanks to their theobromine content. Using whole ingredients like real butter and fresh eggs adds richness and nutrients you just don’t get in processed desserts.
If you’re mindful of allergens, this recipe contains gluten, dairy, and eggs, but as mentioned earlier, substitutions can be made to accommodate gluten-free or vegan diets.
Conclusion
The Delicious Villain Era Mother’s Day Chocolate Ganache Drip Cake is more than just a dessert. It’s a little drama, a touch of elegance, and a whole lot of love wrapped into one impressive package. I love making it because it turns an ordinary day into a special memory, especially when celebrating moms who deserve a little indulgence.
Feel free to tweak it to your taste—add a twist, adjust the sweetness, or try a new decoration style. I’d love to hear how you make it your own, so don’t hesitate to share your experiences and photos! Let’s keep the chocolate love flowing.
FAQs
Can I make the cake layers ahead of time?
Yes! You can bake the layers up to two days in advance. Wrap them tightly in plastic wrap and store them at room temperature or in the fridge. Just bring them back to room temperature before frosting.
How do I get a smooth ganache drip?
Make sure your ganache is warm but not hot when applying. Let it cool until it thickens slightly to control the drips better. Using a spoon or a piping bag helps with precision.
Can I use a different size cake pan?
Absolutely. If you use a 9-inch pan, the layers will be thinner, so reduce baking time slightly. Adjust frosting and ganache quantities accordingly.
What if my ganache is too thick or too thin?
If too thick, gently warm it in short bursts in the microwave or over a double boiler. If too thin, chill it in the fridge for a few minutes until it thickens to a pourable consistency.
Is this recipe suitable for beginners?
Definitely. The steps are straightforward, and the ingredients are simple. Just take your time with chilling and ganache application, and you’ll get a beautiful cake even if you’re new to baking.
Pin This Recipe!

Delicious Villain Era Mother’s Day Chocolate Ganache Drip Cake

A rich and decadent chocolate cake with a silky ganache drip, perfect for celebrating Mother’s Day or any special occasion. This easy recipe balances bold flavors and smooth textures for a crowd-pleasing dessert.
- Prep Time: 20 minutes
- Cook Time: 35 minutes
- Total Time: 1 hour 30 minutes
- Yield: 12 servings 1x
- Category: Dessert
- Cuisine: American
Ingredients
- 1 ¾ cups (220g) all-purpose flour
- 2 cups (400g) granulated sugar
- ¾ cup (65g) unsweetened cocoa powder (preferably Dutch-processed)
- 1 ½ teaspoons baking powder
- 1 ½ teaspoons baking soda
- 1 teaspoon salt
- 2 large eggs, room temperature
- 1 cup (240ml) whole milk
- ½ cup (120ml) vegetable oil (neutral flavor like canola or sunflower)
- 2 teaspoons pure vanilla extract
- 1 cup (240ml) boiling water
- 8 oz (225g) bittersweet or semisweet chocolate, finely chopped
- 1 cup (240ml) heavy cream
- 1 tablespoon unsalted butter, softened
- 1 cup (230g) unsalted butter, softened
- 3 ½ cups (440g) powdered sugar, sifted
- ½ cup (45g) unsweetened cocoa powder
- ¼ cup (60ml) heavy cream
- 1 teaspoon vanilla extract
- Pinch of salt
Instructions
- Preheat your oven to 350°F (175°C). Grease two 8-inch (20 cm) cake pans and line the bottoms with parchment paper.
- In a large bowl, sift together the all-purpose flour, granulated sugar, cocoa powder, baking powder, baking soda, and salt.
- In a medium bowl, whisk the eggs, milk, vegetable oil, and vanilla extract until combined. Slowly pour this into the dry ingredients while mixing on low speed.
- Carefully add the boiling water last. The batter will be thin.
- Divide the batter evenly between the two prepared pans. Bake for 30-35 minutes or until a toothpick inserted comes out clean. Let the cakes cool in pans for 10 minutes, then transfer to wire racks to cool completely.
- Beat softened butter with an electric mixer until creamy. Gradually add sifted powdered sugar and cocoa powder, alternating with heavy cream. Add vanilla extract and salt. Beat on medium-high until fluffy and spreadable.
- Place one cooled cake layer on your serving plate. Spread a generous layer of frosting on top. Add the second cake layer and apply a thin crumb coat around the entire cake. Chill for 20 minutes to set.
- Heat heavy cream in a small saucepan until it just begins to simmer. Pour over chopped chocolate in a heatproof bowl. Let sit for 2 minutes, then gently stir until smooth. Stir in the softened butter for shine.
- Let ganache cool slightly until it thickens but is still pourable. Using a spoon or piping bag, carefully drip ganache around the edges of the chilled cake, allowing it to drip down the sides naturally. Pour remaining ganache over the top and spread gently.
- Refrigerate the cake for at least 30 minutes to set the ganache before slicing. Bring to room temperature about 20 minutes before serving.
Notes
Use room temperature ingredients for smooth mixing. Sift cocoa powder and powdered sugar to avoid lumps. Avoid overmixing batter. Test cake doneness starting at 28 minutes. Chill cake for crumb coat before final frosting. Adjust ganache consistency by chilling or warming gently. Use an offset spatula for better control. Let cake layers cool completely before frosting to prevent melting.
Nutrition
- Serving Size: 1 slice (1/12th of c
- Calories: 375
- Sugar: 35
- Sodium: 0.25
- Fat: 20
- Saturated Fat: 12
- Carbohydrates: 45
- Fiber: 3
- Protein: 5
Keywords: chocolate cake, ganache drip cake, Mother's Day cake, easy chocolate cake, chocolate ganache, dessert, celebration cake