Love this? Save it for later!
Share the inspiration with your friends
I figured decorating cookies was just a matter of piping black lines until they looked like legs. It took about two hours of squinting and three cups of tea for that to fall apart completely. The reality is that spider legs are surprisingly finicky things. They droop. They snap. They look more like broken toothpicks than creepy crawlies if you rush the icing consistency. I remember staring at my first batch, feeling like a fraud in my own kitchen. The cookies were fine, but the spiders looked like they were having a seizure.
Let’s face it, Halloween baking is supposed to be fun, not a source of mild panic. I wanted these spooky cute Halloween spider sugar cookies to be adorable, not terrifying. There is a big difference. You want the kids to giggle, not run away screaming. So I stopped trying to freehand every single leg and started using a trick that changed everything. It’s not magic, just a little patience with your royal icing.
Now, every time I pull a tray out of the oven, the house smells like vanilla and butter. It’s a specific comfort that only exists in October. I keep these around long after the decorations come down because they are just plain good cookies. Plus, the black and white contrast looks stunning on any fall table. It’s not about being perfect. It’s about having fun with the mess.
Why You’ll Love This Recipe
There is a reason this recipe has become a staple in my house every October. It’s not just because they look festive; it’s because they actually work. I’ve tested enough cookie doughs to know that some recipes are all flash and no substance. This one hits the sweet spot between chewy centers and crisp edges. Here is why this recipe stands out from the rest of the Halloween baking crowd:
- Quick & Easy: The dough comes together in under 15 minutes. You can have cookies in the oven while your family is still getting ready for trick-or-treating.
- Simple Ingredients: You likely have everything you need right now. No exotic flours or hard-to-find spices. Just butter, sugar, eggs, and flour.
- Perfect for Parties: These are small enough for a party favor but substantial enough to be a dessert. They are great for classroom exchanges or office Halloween parties.
- Crowd-Pleaser: Even the pickiest eaters usually love sugar cookies. The black icing makes them look cool, but the taste is pure nostalgia.
- Unbelievably Delicious: The texture is soft and cake-like, which holds up well to the icing without getting soggy too quickly.
What makes this recipe different is the dough itself. I use a slightly higher ratio of brown sugar to white sugar. This gives the cookies a deeper flavor and a chewier texture that pairs perfectly with the sweet royal icing. It’s not just another vanilla sugar cookie. It’s the kind of cookie that makes you close your eyes after the first bite. It’s comfort food reimagined for Halloween. Perfect for impressing guests without stress, or turning a simple Tuesday dinner into something memorable.
What Ingredients You Will Need
This recipe uses simple, wholesome ingredients to deliver bold flavor and satisfying texture without the fuss. The key is quality butter and fresh baking powder. For the icing, food coloring is essential, but you don’t need anything fancy. Here is what you need to gather before you start baking.
For the Spider Cookies
- Unsalted butter: Softened to room temperature. This helps the dough cream properly. I recommend using a high-quality brand like Kerrygold for better flavor.
- Granulated white sugar: 1 cup. This provides the crisp edges.
- Packed brown sugar: ½ cup. This adds moisture and chewiness. Dark brown sugar works well if you want a molasses note.
- Large eggs: 1 large egg, room temperature. Cold eggs can cause the butter to seize up.
- Vanilla extract: 1 teaspoon. Use pure vanilla, not imitation. It makes a huge difference in the aroma.
- All-purpose flour: 2 ½ cups. Do not use cake flour, or they will be too tender.
- Baking powder: 1 teaspoon. This helps them rise slightly so they aren’t flat discs.
- Salt: ½ teaspoon. To balance the sweetness.
For the Royal Icing
- Confectioners’ sugar: 2 cups, sifted. This is crucial to avoid lumps in your icing.
- Meringue powder: 2 tablespoons. This makes the icing safe to eat and helps it dry hard. You can use egg whites, but meringue powder is easier for beginners.
- Water: 3-4 tablespoons. Add gradually to get the right consistency.
- Black food coloring: Gel paste is best. Liquid coloring will make the icing too thin.
- White food coloring: Optional, for highlights on the eyes.
If you are allergic to egg whites, meringue powder is a great alternative. For a vegan version, you can use aquafaba (chickpea water) instead of the meringue powder, though it takes longer to dry.
Equipment Needed
You don’t need a lot of fancy tools to make these. A stand mixer or a hand mixer will save your arms. I prefer a stand mixer because it creams the butter and sugar evenly. You will need two large baking sheets lined with parchment paper. Parchment is better than silicone mats for sugar cookies because it prevents sticking and helps with even baking. For the icing, you need small bowls and toothpicks for mixing color. A piping bag with a small round tip (like a Wilton #2 or #3) makes the legs much easier to pipe. If you don’t have a piping bag, you can use a Ziploc bag with a corner cut off. It’s not as pretty, but it works in a pinch.
Preparation Method
Making these cookies is straightforward if you take your time. Here is how to get from flour to festive spider.
- Cream the butter and sugars: In a large bowl, beat the softened butter, white sugar, and brown sugar together on medium speed. Do this for about 3-4 minutes. You want it to look pale and fluffy. This step incorporates air, which helps the cookies rise.
- Add wet ingredients: Beat in the egg and vanilla extract. Mix until just combined. Scrape down the sides of the bowl with a spatula to ensure everything is mixed evenly.
- Combine dry ingredients: In a separate bowl, whisk together the flour, baking powder, and salt. This ensures the leavening agent is distributed evenly.
- Mix dough: Gradually add the dry ingredients to the wet mixture on low speed. Mix until just combined. Do not overmix, or the cookies will be tough. The dough should come together in a ball.
- Chill the dough: Wrap the dough in plastic wrap and refrigerate for at least 1 hour. This is non-negotiable. Cold dough is easier to roll and cut, and it prevents the cookies from spreading too much.
- Preheat and prepare: Preheat your oven to 350°F (175°C). Line your baking sheets with parchment paper.
- Roll and cut: Roll the dough out on a floured surface to about ¼ inch thickness. Use a round cookie cutter (about 2 inches wide) to cut out circles. Place them on the baking sheets, leaving an inch of space between them.
- Bake: Bake for 10-12 minutes. The edges should be lightly golden, but the centers should still look soft. They will firm up as they cool.
- Cool completely: Let the cookies cool on the baking sheet for 5 minutes, then transfer to a wire rack. They must be completely cool before icing, or the icing will melt.
- Make the icing: Whisk the meringue powder and sugar. Add water gradually until you reach a consistency similar to honey. Divide the icing into two bowls. Leave one white. Add black gel food coloring to the other bowl.
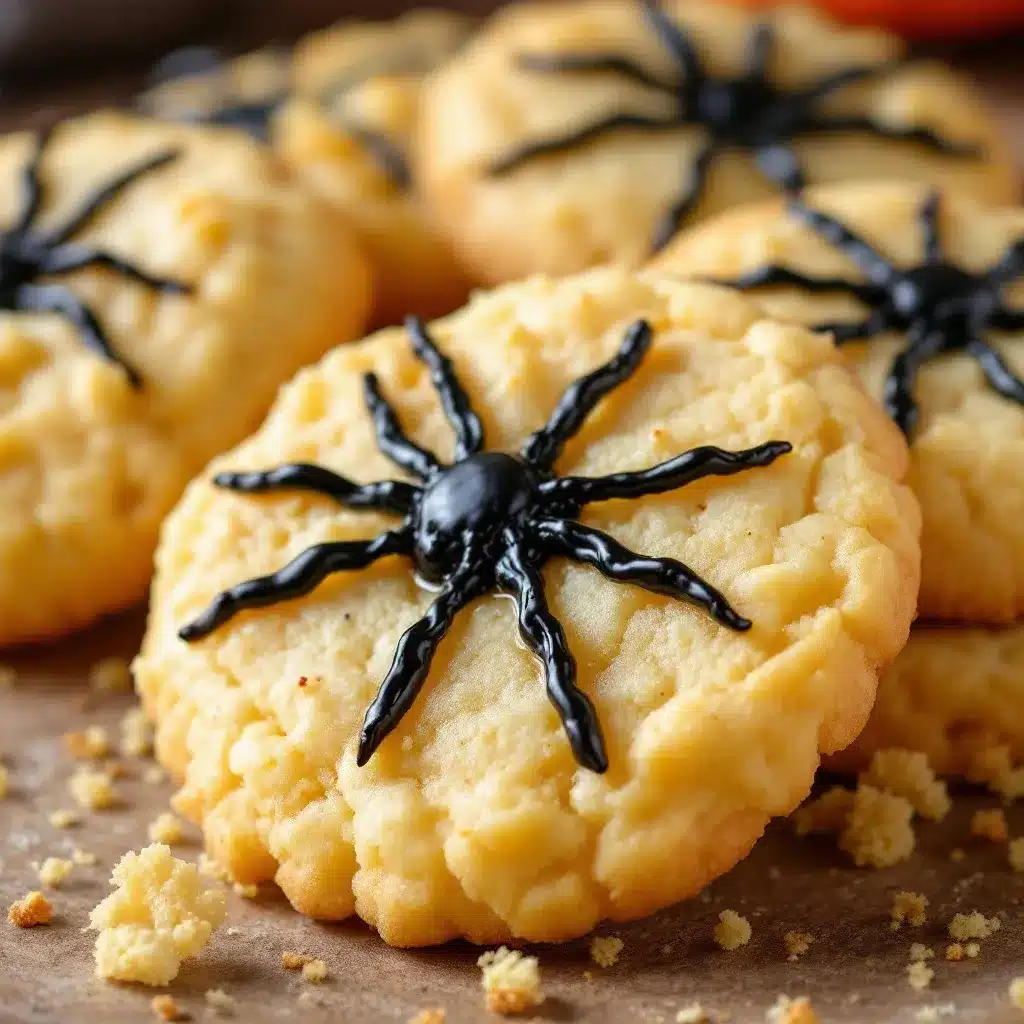
- Pipe the spiders: Fill a piping bag with the black icing. Pipe a round body on the cookie. Then, pipe eight thin legs extending outward. Use a toothpick to adjust any legs that are too thick or uneven. Let the icing dry completely, which takes about 2-4 hours.
How Do I Get the Icing Consistency Right?
The secret is the “ribbon test.” When you lift the whisk or spoon, the icing should fall back into the bowl in a ribbon that disappears after a few seconds. If it sits on top, add more water. If it’s runny, add more sugar. For the legs, you want a slightly thicker consistency so the lines hold their shape.
Cooking Tips & Techniques
I have made my share of burnt cookies and cracked icing. Here are some tips to help you avoid those pitfalls. First, don’t skip the chilling step. I know it’s tempting to bake them right away, but warm dough spreads like crazy. You will end up with a puddle of cookie, not a cute spider. Second, when piping the legs, start from the body and pull outward. Don’t press too hard, or the icing will blob. If a leg breaks while you are piping, just touch the tip back to the body with your finger or a toothpick. It will fuse together as it dries.
Another common mistake is using too much flour when rolling. If the dough sticks to your counter, add a tiny bit more flour, but don’t knead it in heavily. This makes the cookies tough. Also, keep an eye on your oven. Every oven is different. If your cookies are browning too fast on the bottom, move them to a higher rack. And for the icing, work in a low-humidity environment if possible. High humidity can make royal icing sticky and prevent it from drying properly.
Variations & Adaptations
While the classic black and white spider is iconic, you can mix things up. Try adding a sprinkle of orange sanding sugar on the body before the icing dries for a pop of color. For a gluten-free version, use a 1:1 gluten-free flour blend. The texture might be slightly more crumbly, but it still works. You can also change the flavor of the dough. Add 1 teaspoon of pumpkin pie spice to the dry ingredients for a fall twist. Or, use red food coloring in the icing for a “blood spider” theme. I once tried making mini spiders using cookie cutters, and they were adorable for party favors. Just reduce the baking time by 2-3 minutes for smaller cookies.
Serving & Storage Suggestions
These cookies are best served at room temperature. They pair wonderfully with a glass of cold milk or a warm cup of coffee. For a Halloween party, arrange them on a tiered stand with other fall treats. If you need to store them, keep them in an airtight container at room temperature for up to one week. Layer them with parchment paper to prevent the icing from sticking. You can also freeze the un-iced cookies for up to three months. Just thaw them at room temperature before decorating. The icing does not freeze well, so always decorate fresh.
Nutritional Information & Benefits
These cookies are a treat, so enjoy them in moderation. Each cookie contains approximately 120 calories, with most of that coming from the sugar and butter. They provide a quick energy boost, which is nice for a busy day. The vanilla extract adds antioxidants, though in small amounts. They are not inherently healthy, but they are made with simple ingredients you can recognize. If you are watching your sugar intake, consider making them smaller or using a sugar substitute in the dough, though this may affect the texture.
Conclusion
Making spooky cute Halloween spider sugar cookies is a fun way to celebrate the season. It’s a project that brings the family together and results in a delicious snack. Don’t worry about perfection. The charm is in the quirks. Try customizing the icing colors or adding sprinkles to make them your own. I love this recipe because it’s easy, tasty, and totally festive. If you try it, let me know how they turned out. Leave a comment below or share a photo on social media. Happy baking, and enjoy your spooky treats!
FAQs
Can I use store-bought cookie dough?
Yes, you can use store-bought sugar cookie dough to save time. Just roll it out and cut it into circles. The texture won’t be quite as chewy as homemade, but it still works well for decorating.
Why did my spider legs break?
Legs often break if the icing is too thin or if you touch them before they are fully dry. Make sure your icing is thick enough to hold its shape and let the cookies dry in a cool, dry place for at least 2 hours.
Can I make the dough ahead of time?
Absolutely. You can make the dough and keep it in the fridge for up to 3 days. You can also freeze the dough balls for up to 3 months. Just thaw them in the fridge before rolling.
How do I fix cracked royal icing?
Cracks usually happen if the icing is too thick or if the cookie surface is uneven. Add a tiny drop of water to thin the icing slightly. Also, make sure the cookies are completely cool before icing to prevent condensation.
Are these cookies safe for kids to make?
Yes, kids love decorating these! Let them handle the piping bags and the sprinkles. Just supervise them around the oven and with the food coloring, which can stain clothes.
Pin This Recipe!

Spider Sugar Cookies: Easy Halloween Treats
These spooky cute Halloween spider sugar cookies feature a chewy, buttery dough and are decorated with black and white royal icing to create adorable spider shapes. They are perfect for parties, classroom exchanges, or festive fall gatherings.
- Prep Time: 15 minutes
- Cook Time: 10-12 minutes
- Total Time: 45 minutes
- Yield: Approximately 24 cookies 1x
- Category: Dessert
- Cuisine: American
Ingredients
- 1 cup unsalted butter, softened to room temperature
- 1 cup granulated white sugar
- ½ cup packed brown sugar (dark brown sugar recommended)
- 1 large egg, room temperature
- 1 teaspoon pure vanilla extract
- 2 ½ cups all-purpose flour
- 1 teaspoon baking powder
- ½ teaspoon salt
- 2 cups confectioners’ sugar, sifted
- 2 tablespoons meringue powder
- 3–4 tablespoons water
- Black gel paste food coloring
- White food coloring (optional, for eye highlights)
Instructions
- In a large bowl, beat the softened butter, white sugar, and brown sugar together on medium speed for 3-4 minutes until pale and fluffy.
- Beat in the egg and vanilla extract until just combined. Scrape down the sides of the bowl with a spatula.
- In a separate bowl, whisk together the flour, baking powder, and salt.
- Gradually add the dry ingredients to the wet mixture on low speed. Mix until just combined to avoid tough cookies.
- Wrap the dough in plastic wrap and refrigerate for at least 1 hour.
- Preheat your oven to 350°F (175°C) and line two large baking sheets with parchment paper.
- Roll the chilled dough out on a floured surface to about ¼ inch thickness. Cut out circles using a 2-inch round cookie cutter.
- Place cookies on baking sheets, leaving an inch of space between them.
- Bake for 10-12 minutes until edges are lightly golden but centers look soft.
- Let cookies cool on the baking sheet for 5 minutes, then transfer to a wire rack to cool completely.
- Whisk meringue powder and confectioners’ sugar. Add water gradually until consistency is like honey.
- Divide icing into two bowls. Leave one white and add black gel food coloring to the other.
- Fill a piping bag with a small round tip (Wilton #2 or #3) with black icing.
- Pipe a round body on each cooled cookie, then pipe eight thin legs extending outward.
- Use a toothpick to adjust leg thickness or fix breaks. Let icing dry completely for 2-4 hours.
Notes
Chilling the dough is non-negotiable to prevent spreading. Use gel paste food coloring for icing to avoid thinning the consistency. Ensure cookies are completely cool before icing to prevent melting. Work in a low-humidity environment for best icing results. For vegan versions, substitute meringue powder with aquafaba.
Nutrition
- Serving Size: 1 cookie
- Calories: 120
- Sugar: 12
- Sodium: 50
- Fat: 5
- Saturated Fat: 3
- Carbohydrates: 18
- Protein: 1
Keywords: Halloween cookies, spider sugar cookies, royal icing, Halloween treats, easy baking, fall desserts, party favors



