Love this? Save it for later!
Share the inspiration with your friends
The last cookie from the batch disappeared before I could even grab a photo. My husband, who claims he “doesn’t have a sweet tooth,” had eaten three standing at the kitchen counter, and my neighbor texted me at 9 PM asking if I had any left to trade for a cup of sugar. That’s when I knew this chewy chocolate chip cookie recipe had finally cracked the code.
It wasn’t always this way. I spent years pulling trays of flat, greasy discs out of the oven, wondering why my cookies never looked like the ones in the bakery case. I tried chilling the dough for days, using bread flour, browning the butter—all the tricks. And while some of them worked, none of them gave me that perfect balance: a crisp edge, a soft center, and that irresistible chew that makes you reach for another one before you’ve finished the first.
This version came together almost by accident. I was out of granulated sugar (the horror) and had to improvise with what was in the pantry. The result was a cookie that stayed soft for days, didn’t spread into a puddle, and had that deep caramel flavor you usually only get from a bakery. Honestly, it felt like winning the baking lottery.
So here it is—the recipe I’ve made six times in the last month, tweaking and testing until it was absolutely bulletproof. No fussy techniques, no specialty ingredients. Just a cookie that delivers every single time.
Why You’ll Love This Recipe
Let me tell you why this recipe is different from the hundreds of other chocolate chip cookie recipes floating around the internet. I tested this one with my kids’ picky friends, my skeptical father-in-law, and a group of neighbors who weren’t afraid to give honest feedback. The verdict was unanimous.
- Perfectly Chewy Texture: The ratio of brown sugar to white sugar creates that soft, bendy center with just enough crunch on the edges. No cakey, no crispy—just right.
- Simple Pantry Ingredients: You probably have everything you need right now. No hunting for fancy extracts or specialty flours. This is real-people baking at its finest.
- No Chill Time Required: I know, I know—every “perfect cookie” recipe tells you to chill the dough for 24 hours. But sometimes you want cookies in 20 minutes, not tomorrow. This recipe works beautifully straight from the mixing bowl.
- Foolproof for Beginners: If you’ve ever ended up with flat, greasy cookies or hockey pucks, this recipe will restore your confidence. The instructions are detailed enough that even a first-time baker can nail it.
- Freezes Like a Dream: Make a double batch and freeze half the dough. You’re always 15 minutes away from warm cookies. That’s not just convenient—it’s life-changing.
What really sets this recipe apart is the technique. Instead of just creaming butter and sugar, we’re using melted butter for extra moisture and a specific mixing method that builds structure without making the cookies tough. It’s a small change, but it makes all the difference between a good cookie and one that disappears before you can take a picture.
What Ingredients You Will Need
This recipe uses simple, everyday ingredients that work together to create that signature chewy texture. Nothing fancy here—just smart choices and the right proportions.
- Unsalted Butter (1 cup / 2 sticks / 226g), melted: Melting the butter is the secret to chewier cookies. It coats the flour proteins differently than creamed butter, resulting in a denser, softer texture. I use Land O’Lakes or Kirkland brand for consistent results.
- Brown Sugar (1 ¼ cups / 250g), packed: This is your MVP. Brown sugar contains molasses, which adds moisture and that deep, caramel-like flavor. Light or dark brown sugar both work, but dark will give you a richer taste and softer cookie.
- Granulated Sugar (½ cup / 100g): A little white sugar helps with spreading and gives the edges that slight crispness. Too much, and your cookies will flatten out. This ratio is tested and true.
- Large Eggs (2), room temperature: Room temperature eggs incorporate more easily into the melted butter, creating a smoother dough. If you forgot to take them out early, place them in a bowl of warm water for 5 minutes.
- Vanilla Extract (2 teaspoons): Pure vanilla extract makes a noticeable difference here. Imitation vanilla works in a pinch, but the real stuff adds a warmth that complements the brown sugar beautifully.
- All-Purpose Flour (2 ½ cups / 312g), spooned and leveled: This is critical—don’t scoop your flour directly from the bag. Spoon it into the measuring cup and level it off with a knife. Packed flour will give you dry, crumbly cookies.
- Baking Soda (1 teaspoon): This helps the cookies spread just enough and gives them a nice lift. Make sure your baking soda is fresh—test it by dropping a pinch into vinegar; it should fizz immediately.
- Salt (1 teaspoon): Salt isn’t just for flavor—it balances the sweetness and strengthens the gluten structure. I use fine sea salt for the dough and a sprinkle of flaky sea salt on top before baking.
- Chocolate Chips (2 cups / 340g): Use good-quality chocolate chips. I prefer Ghirardelli 60% cacao bittersweet chips for a deep, not-too-sweet flavor. Semi-sweet works beautifully too. Feel free to mix milk and dark chips for variety.
Ingredient Tip: If you only have salted butter, reduce the added salt to ½ teaspoon. And if you want to get fancy, chop a high-quality chocolate bar into chunks instead of using chips—the irregular pieces melt into puddles of chocolate that take these cookies to the next level.
Equipment Needed
You don’t need a professional bakery setup for these cookies. Here’s what you’ll need:
- Large Mixing Bowls (2): One for the wet ingredients, one for the dry. Glass or stainless steel work best—plastic bowls can retain grease and affect your dough.
- Whisk: For combining the dry ingredients and smoothing out the wet mixture.
- Rubber Spatula or Wooden Spoon: For folding the chocolate chips into the dough. A spatula gives you better control and scrapes the bowl clean.
- Baking Sheets (2): Light-colored, rimmed baking sheets work best. Dark sheets absorb more heat and can cause the bottoms to brown too quickly.
- Parchment Paper or Silicone Baking Mat: Parchment paper is my go-to—it prevents sticking and makes cleanup a breeze. Silicone mats work too but can produce slightly less spread.
- Cookie Scoop (1.5 tablespoon size): This ensures uniform cookies that bake evenly. A #40 scoop is perfect. If you don’t have one, use two spoons to portion the dough.
- Cooling Rack: Essential for letting the cookies cool properly. Transferring them to a rack after a few minutes on the sheet prevents the bottoms from over-baking.
- Kitchen Scale (optional but recommended): Weighing your ingredients gives you consistent results every time. I use a simple OXO scale that cost about $20.
Budget Tip: If you’re just starting out, skip the silicone mats and use parchment paper—it’s cheap and works perfectly. A cookie scoop is nice to have, but two spoons will do the job just fine.
Preparation Method
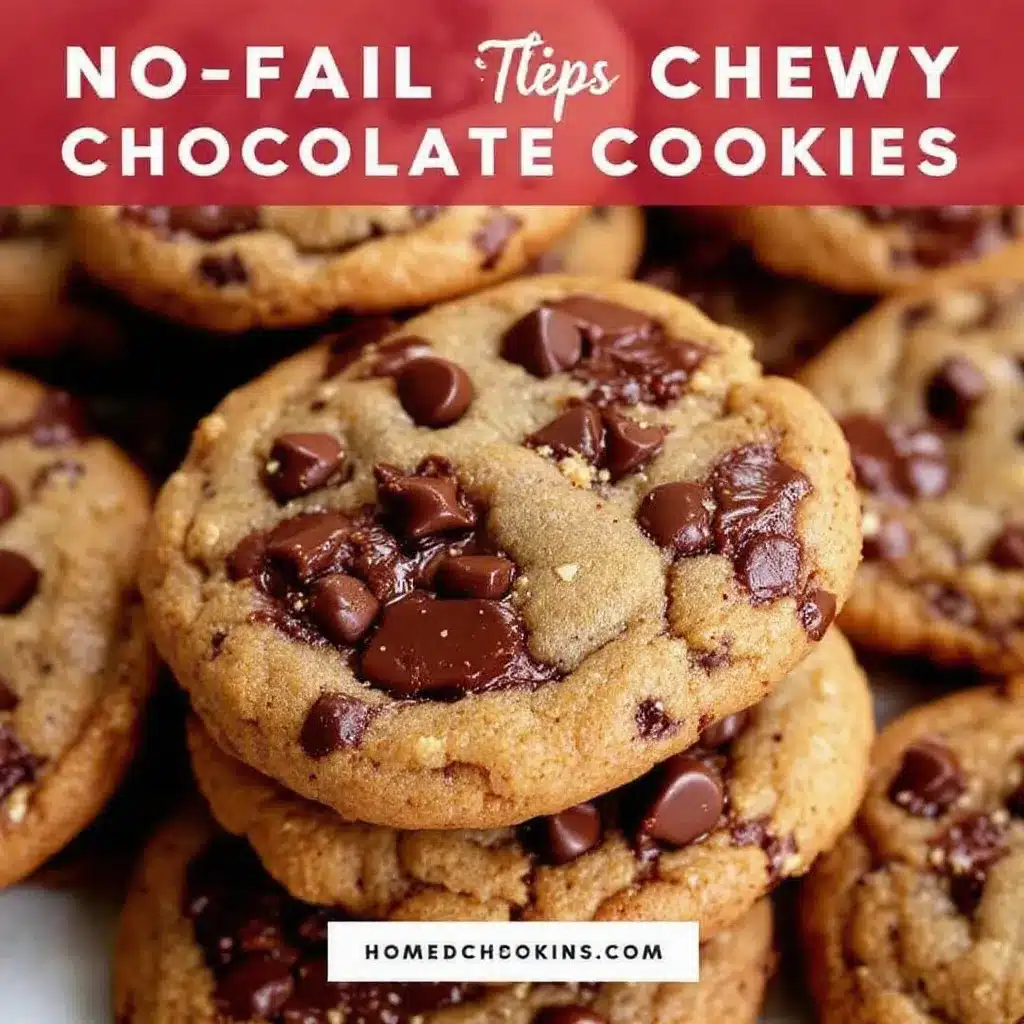
Follow these steps carefully, and you’ll have bakery-quality cookies in under 30 minutes. I’ve included sensory cues so you know exactly what to look for at each stage.
- Preheat your oven to 375°F (190°C). Line two baking sheets with parchment paper. Getting the oven hot before you start mixing ensures even baking from the moment the cookies go in.
- Melt the butter in a small saucepan over low heat or in a microwave-safe bowl in 30-second bursts. Let it cool slightly—you want it warm, not hot. Hot butter can cook the eggs and change the texture.
- In a large bowl, combine the melted butter, brown sugar, and granulated sugar. Whisk vigorously for about 2 minutes until the mixture looks like wet sand and smells amazing. The sugar should be mostly dissolved, and the mixture should be smooth and glossy.
- Add the eggs one at a time, whisking well after each addition. Then add the vanilla extract. The mixture should look thick, pale, and slightly shiny—like a thin caramel sauce. If it looks greasy or separated, you whisked too fast; just keep going and it will come together.
- In a separate bowl, whisk together the flour, baking soda, and salt. Make sure there are no lumps. This step ensures the leavening agent is evenly distributed so your cookies rise uniformly.
- Gradually add the dry ingredients to the wet ingredients, folding gently with a rubber spatula. Stop mixing as soon as you see the last streak of flour disappear. Over-mixing develops gluten and makes tough cookies. The dough should be soft, slightly sticky, and hold together when pressed.
- Fold in the chocolate chips using the spatula. Make sure they’re evenly distributed throughout the dough. If you want picture-perfect cookies, reserve a handful of chips to press onto the tops of the dough balls before baking.
- Scoop the dough into balls using a 1.5-tablespoon cookie scoop (about 30g each). Place them 2 inches apart on the prepared baking sheets. Don’t flatten them—they’ll spread on their own.
- Bake one sheet at a time for 10-12 minutes, rotating the pan halfway through. The cookies are done when the edges are set and golden brown, but the centers still look slightly underdone and puffy. They will continue to bake on the hot pan after you remove them.
- Let the cookies cool on the baking sheet for 5 minutes—this is crucial. The carryover baking sets the structure. Then transfer them to a wire rack to cool completely. If you move them too soon, they’ll fall apart.
Pro Tip: For extra thick cookies, chill the scooped dough balls in the refrigerator for 30 minutes before baking. This solidifies the butter and reduces spreading, giving you taller, bakery-style cookies.
Cooking Tips & Techniques
After dozens of batches (and a few spectacular failures), here’s what I’ve learned about making perfect chewy chocolate chip cookies every single time.
The Melted Butter Mistake I Made (So You Don’t Have To): The first time I tried melted butter cookies, I used it straight from the microwave—piping hot. The result? A greasy, flat mess that spread into one giant cookie pancake. Melted butter needs to cool to room temperature before mixing. Warm butter (around 70-75°F) coats the flour proteins perfectly without making the dough too slack. Let it sit for 5-10 minutes after melting.
Don’t Over-Bake—Seriously: This is the number one mistake I see home bakers make. Cookies continue to bake on the hot sheet after they come out of the oven. If you wait until the centers look fully set, you’ll end up with crunchy cookies. Pull them out when the edges are golden but the middle still looks soft and slightly puffy. Trust the process—they’ll set perfectly as they cool.
Use a Kitchen Scale for Consistency: I resisted this for years, but weighing your ingredients guarantees the same results every time. Flour is especially tricky—one person’s “cup” can vary by 30 grams depending on how they scoop. A $20 scale eliminates the guesswork and makes you a better baker overnight.
Rotate Your Baking Sheets: Most ovens have hot spots. Rotating the pan halfway through baking ensures even browning. If you’re baking two sheets at once, swap their positions and rotate them 180 degrees at the halfway mark.
The Perfect Chocolate-to-Dough Ratio: Two cups of chocolate chips might seem like a lot, but trust me—it’s the sweet spot. You want chocolate in every single bite. If you prefer less chocolate, reduce to 1 ½ cups, but don’t go lower than that or the cookies will feel unbalanced.
Variations & Adaptations
One of the best things about this recipe is how easily it adapts to different tastes and dietary needs. Here are some of my favorite variations:
- Double Chocolate Chip: Replace ¼ cup of the all-purpose flour with unsweetened cocoa powder. Use white chocolate chips or milk chocolate chips for a beautiful contrast. The result is a rich, fudgy cookie that chocolate lovers will obsess over.
- Gluten-Free Option: Substitute the all-purpose flour with a 1:1 gluten-free baking flour blend (I recommend King Arthur or Bob’s Red Mill). Add an extra tablespoon of milk to the dough to compensate for the drier texture. The cookies will be slightly more delicate but still deliciously chewy.
- Nutty Chocolate Chip: Toast ¾ cup of chopped walnuts or pecans and fold them in along with the chocolate chips. Toasting the nuts first brings out their oils and adds a warm, toasty flavor that pairs beautifully with the brown sugar.
- Sea Salt Finish: Sprinkle a pinch of flaky sea salt (like Maldon) on top of each dough ball just before baking. The salt enhances the chocolate flavor and balances the sweetness. This is my personal favorite—it feels fancy with zero extra effort.
- M&M Cookies: Swap the chocolate chips for 1 ½ cups of M&Ms and ½ cup of mini chocolate chips. This is the version I make for birthday parties and bake sales—it’s always the first to disappear.
My Personal Twist: I love making these cookies with a mix of dark chocolate chunks and dried cherries. The tartness of the cherries cuts through the sweetness, and the irregular chocolate chunks create pools of melted chocolate. It’s a grown-up version that still satisfies that childhood craving.
Serving & Storage Suggestions
These cookies are amazing warm, room temperature, or even straight from the freezer (don’t judge me). Here’s how to serve and store them for maximum enjoyment.
Serving: Serve these cookies slightly warm for the ultimate experience. The chocolate will be melty, the edges crisp, and the center soft and gooey. A glass of cold milk is the classic pairing, but they’re also fantastic with a hot cup of coffee or a scoop of vanilla ice cream sandwiched between two cookies.
Storage: Store baked cookies in an airtight container at room temperature for up to 5 days. To keep them soft, add a slice of bread to the container—the cookies will absorb the moisture from the bread and stay chewy. Replace the bread slice every other day.
Freezing Baked Cookies: Place cooled cookies in a single layer in a freezer-safe bag or container. They’ll keep for up to 3 months. Thaw at room temperature for 15 minutes, or microwave for 10-15 seconds for that fresh-from-the-oven taste.
Freezing Cookie Dough: This is my favorite meal-prep hack. Scoop the dough into balls, place them on a parchment-lined baking sheet, and freeze until solid (about 1 hour). Transfer the frozen dough balls to a freezer bag. When you’re ready to bake, place them on a baking sheet and add 2-3 minutes to the baking time. No need to thaw!
Reheating: For that just-baked texture, reheat cookies in a 300°F (150°C) oven for 3-5 minutes. The microwave works in a pinch (10-15 seconds), but the oven restores the crisp edges better.
Flavor Development: Here’s a secret—these cookies actually taste better the next day. The flavors meld together overnight, and the texture becomes even chewier. If you can resist eating them all on day one, you’re in for a treat on day two.
Nutritional Information & Benefits
Let’s be real—chocolate chip cookies are a treat, not a health food. But knowing what’s in them helps you enjoy them mindfully.
Estimated Nutritional Values (per cookie, based on 36 cookies):
- Calories: 185
- Total Fat: 10g
- Saturated Fat: 6g
- Cholesterol: 25mg
- Sodium: 115mg
- Total Carbohydrates: 24g
- Dietary Fiber: 1g
- Sugars: 15g
- Protein: 2g
Health Highlights: Dark chocolate (if you use 60% cacao or higher) contains antioxidants called flavonoids, which can support heart health. The brown sugar provides a small amount of molasses, which contains iron, calcium, and potassium. And let’s not forget the emotional benefits—baking and sharing cookies is a form of self-care that reduces stress and builds connections.
Dietary Considerations: This recipe contains gluten, dairy, and eggs. For a dairy-free version, substitute the butter with a high-quality vegan butter stick (like Earth Balance) and use dairy-free chocolate chips. For an egg-free version, use a flax egg (1 tablespoon ground flaxseed mixed with 3 tablespoons water per egg) and expect a slightly denser texture.
My Take: I believe in enjoying treats without guilt. One cookie with your afternoon coffee won’t derail your health goals—it’ll make your day a little sweeter. Balance is everything, and these cookies are worth every single bite.
Conclusion
This chewy chocolate chip cookie recipe is the one I turn to again and again. It’s reliable, forgiving, and produces cookies that make people close their eyes and sigh with happiness. Whether you’re baking for a crowd, a school event, or just because it’s Tuesday and you deserve something wonderful, this recipe delivers.
I’d love to hear how these turn out for you. Did you add nuts? Swap the chocolate? Bake them a little longer for extra crunch? Drop a comment below and share your version—I read every single one and love seeing how you make this recipe your own.
And if you’re looking for more sweet treats to fill your kitchen with good smells, check out my Perfect Chewy Brown Sugar Pumpkin Spice Blondies for a fall-inspired twist, or these Easy Freezer-Friendly Banana Oat Breakfast Cookies for a healthier option that still hits the sweet spot.
Happy baking, friend. May your cookies always be chewy, your chocolate always melty, and your kitchen always full of warmth.
Frequently Asked Questions
Why did my cookies turn out flat?
Flat cookies usually mean the butter was too warm or the dough wasn’t chilled enough. Make sure your melted butter has cooled to room temperature before mixing. If your kitchen is warm, chill the scooped dough balls for 20-30 minutes before baking.
Can I use margarine instead of butter?
I don’t recommend it. Margarine has a higher water content than butter, which changes the texture and spread of the cookies. Butter gives you the best flavor and texture. If you need a dairy-free option, use a high-quality vegan butter stick.
Why are my cookies cakey instead of chewy?
Cakey cookies happen when there’s too much flour or too much leavening. Make sure you’re measuring your flour correctly (spoon and level, don’t scoop). Also, check that your baking soda is fresh—old baking soda loses its potency and can affect texture.
Can I make this recipe with whole wheat flour?
You can substitute up to half the all-purpose flour with whole wheat flour without changing the texture too much. Using 100% whole wheat flour will result in denser, heartier cookies. Add an extra tablespoon of milk to help with moisture.
How do I get the cookies to look like bakery cookies?
For that picture-perfect look, scoop the dough into tall balls rather than flat discs. Right after baking, use a round cookie cutter or a large glass to gently swirl the cookies while they’re still warm—this creates perfectly round edges. And don’t forget to press a few extra chocolate chips on top before baking for that loaded look.
Pin This Recipe!

Perfect Chewy Chocolate Chip Cookies: Easy Homemade Recipe

This recipe delivers perfectly chewy chocolate chip cookies with crisp edges and soft centers, using simple pantry ingredients and no chill time required. It’s foolproof for beginners and freezes beautifully.
- Prep Time: 15 minutes
- Cook Time: 12 minutes
- Total Time: 27 minutes
- Yield: 36 servings 1x
- Category: Dessert
- Cuisine: American
Ingredients
- 1 cup (2 sticks / 226g) unsalted butter, melted
- 1 ¼ cups (250g) brown sugar, packed
- ½ cup (100g) granulated sugar
- 2 large eggs, room temperature
- 2 teaspoons vanilla extract
- 2 ½ cups (312g) all-purpose flour, spooned and leveled
- 1 teaspoon baking soda
- 1 teaspoon salt
- 2 cups (340g) chocolate chips
Instructions
- Preheat your oven to 375°F (190°C). Line two baking sheets with parchment paper.
- Melt the butter in a small saucepan over low heat or in a microwave-safe bowl in 30-second bursts. Let it cool slightly until warm, not hot.
- In a large bowl, combine the melted butter, brown sugar, and granulated sugar. Whisk vigorously for about 2 minutes until the mixture looks like wet sand and is smooth and glossy.
- Add the eggs one at a time, whisking well after each addition. Then add the vanilla extract. The mixture should look thick, pale, and slightly shiny.
- In a separate bowl, whisk together the flour, baking soda, and salt until no lumps remain.
- Gradually add the dry ingredients to the wet ingredients, folding gently with a rubber spatula. Stop mixing as soon as the last streak of flour disappears. The dough should be soft, slightly sticky, and hold together when pressed.
- Fold in the chocolate chips using the spatula until evenly distributed. Reserve a handful of chips to press onto the tops of the dough balls before baking if desired.
- Scoop the dough into balls using a 1.5-tablespoon cookie scoop (about 30g each). Place them 2 inches apart on the prepared baking sheets. Do not flatten them.
- Bake one sheet at a time for 10-12 minutes, rotating the pan halfway through. The cookies are done when the edges are set and golden brown, but the centers still look slightly underdone and puffy.
- Let the cookies cool on the baking sheet for 5 minutes, then transfer them to a wire rack to cool completely.
Notes
For extra thick cookies, chill the scooped dough balls in the refrigerator for 30 minutes before baking. Cookies can be stored in an airtight container at room temperature for up to 5 days. To keep them soft, add a slice of bread to the container. Baked cookies freeze well for up to 3 months. Cookie dough balls can be frozen for up to 3 months; bake directly from frozen, adding 2-3 minutes to the baking time.
Nutrition
- Serving Size: 1 cookie
- Calories: 185
- Sugar: 15
- Sodium: 115
- Fat: 10
- Saturated Fat: 6
- Carbohydrates: 24
- Fiber: 1
- Protein: 2
Keywords: chewy chocolate chip cookies, easy cookie recipe, homemade cookies, no chill cookies, chocolate chip cookies



