Love this? Save it for later!
Share the inspiration with your friends
It was 11:47 PM on a Tuesday in late January, and I had a sudden, overwhelming need to bake something that looked like I had my life together. I didn’t have any heart-shaped cookie cutters (my kitchen is a disaster zone of mismatched utensils), but I had a bag of red food coloring, a new jar of cocoa powder, and the vague memory of a crinkle cookie recipe I’d seen years ago. That night, fueled by a questionable amount of caffeine and the stubborn idea that I could will a heart shape into existence with a knife and a prayer, I created the first batch of what I now call my Perfect Red Velvet Heart-Shaped Crinkle Cookies. They were lopsided, a little rough around the edges, and absolutely, ridiculously delicious. Honestly, that first misshapen batch was the best one, because it proved the point: this recipe works even when you’re a little bit of a mess. Maybe you’ve been there, staring into the pantry at 11 PM, needing to create something beautiful. These cookies are for that exact moment.
Why You’ll Love This Recipe
Let me tell you, I have tested more red velvet recipes than I care to admit. Some were too cakey, some were too flat, and some just tasted like dyed sugar cookies. This recipe is the Goldilocks of the bunch. It took me three separate attempts to get the texture just right—crispy edges, a soft and fudgy center, and that signature crinkle top that cracks open to reveal the deep red interior. It’s the kind of cookie that makes you close your eyes after the first bite.
- Quick & Easy: From start to finish, these come together in about 35 minutes. The dough needs a quick 20-minute chill, not an overnight wait, so they’re perfect for a spontaneous baking session or a last-minute Valentine’s Day treat.
- Simple Ingredients: You likely have most of these pantry staples already. No need for a special trip to the store for buttermilk or fancy extracts.
- Perfect for Valentine’s Day: The heart shape and the rich, romantic red color make these the star of any Galentine’s party, classroom celebration, or date-night dessert.
- Crowd-Pleaser: I brought a batch to my neighbor, Sarah, and her kids devoured them before I could even get a “thank you.” They are a universal hit with both kids and adults.
- Unbelievably Delicious: The combination of a slight cocoa tang, a hint of vanilla, and the soft, chewy texture is next-level. The powdered sugar coating adds the perfect amount of sweetness and a beautiful contrast.
What makes this recipe different from the rest is the technique. Instead of just rolling a ball of dough, we shape it into a heart. It sounds fussy, but I promise, it’s easier than it looks. And the secret to the perfect crinkle? A generous coating of powdered sugar that you let sit for a minute before baking. It’s a small step that makes a huge difference. This isn’t just another red velvet cookie; it’s the one that will have everyone asking for the recipe.
What Ingredients You Will Need
This recipe uses simple, wholesome ingredients to deliver that classic red velvet flavor and a perfectly soft texture. Most of these are pantry staples, making this a super accessible treat.
- 1 ½ cups (190g) all-purpose flour – Spoon and level your flour for the best results. Too much flour will make the cookies dry.
- ¼ cup (25g) unsweetened cocoa powder – Use a natural cocoa powder, not Dutch-processed. I like the Hershey’s brand for its reliable flavor. This gives the cookies their subtle chocolate base.
- 1 teaspoon baking powder – This helps the cookies puff up and create those beautiful cracks.
- ¼ teaspoon salt – Balances the sweetness and enhances the chocolate flavor.
- ½ cup (115g) unsalted butter, softened – Make sure it’s at room temperature for easy creaming. If you only have salted butter, just omit the added salt.
- ¾ cup (150g) granulated sugar – Adds sweetness and helps with the crinkly texture.
- 1 large egg, room temperature – A room-temperature egg emulsifies better into the batter, creating a smoother dough.
- 1 teaspoon vanilla extract – Pure vanilla extract is best for a rich flavor.
- 1 tablespoon red food coloring – I use liquid gel food coloring (Americolor is my go-to) for a vibrant red without thinning the batter. You can also use 2 teaspoons of a concentrated red paste.
- 1 teaspoon white vinegar – This is the secret to a classic red velvet! It reacts with the cocoa powder to enhance the red color and adds a tiny bit of tang.
- ½ cup (60g) powdered sugar, for rolling – This is what gives the cookies their signature crinkled, snow-capped look.
Ingredient Tips: For a deeper, more complex flavor, you can add ¼ teaspoon of espresso powder to the flour mixture. It won’t make the cookies taste like coffee; it just amplifies the chocolate. If you are gluten-sensitive, you can substitute a 1:1 gluten-free baking flour blend. I’ve tested this with King Arthur Measure for Measure with great results.
Equipment Needed
You don’t need a fancy bakery setup for these cookies, which is part of their charm. Here’s what you’ll need:
- Mixing bowls – Two medium bowls: one for dry ingredients, one for wet.
- Electric hand mixer or stand mixer – A hand mixer works perfectly. A stand mixer is great, but not necessary. You can even cream the butter and sugar by hand with a wooden spoon if you need a quick arm workout!
- Baking sheets – One or two standard baking sheets. Line them with parchment paper for easy cleanup.
- Parchment paper – Honestly, this is non-negotiable. It prevents sticking and makes for perfect cookie bottoms.
- Small offset spatula or butter knife – This is your tool for shaping the dough into hearts. I prefer an offset spatula because it gives you more control.
- Cooling rack – To let the cookies cool completely so the bottoms don’t get soggy.
- Sieve or fine-mesh strainer – For dusting the powdered sugar evenly over the cookies before baking.
If you don’t have an offset spatula, a simple butter knife works just fine. I actually used a plastic knife from a takeout kit on my first attempt, and it still worked! The key is just having something flat to shape the dough.
Preparation Method
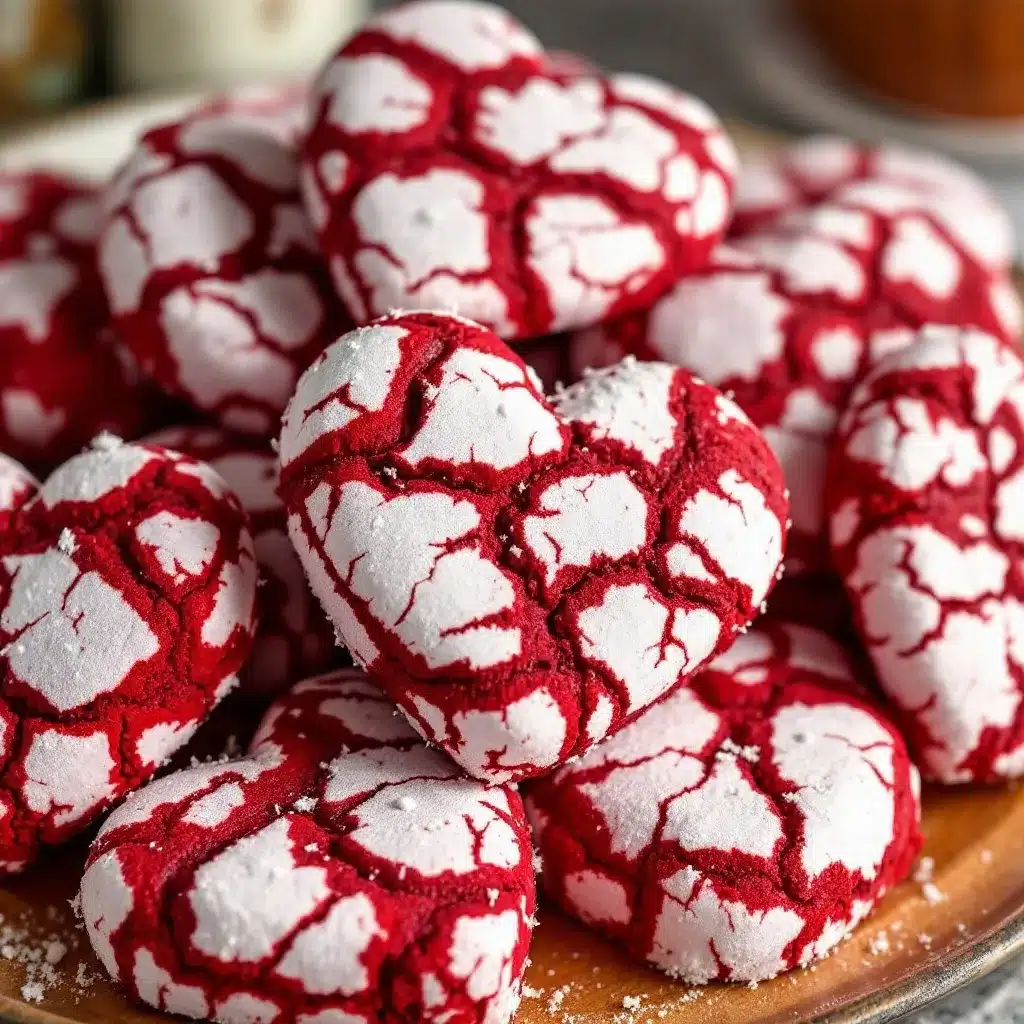
Alright, let’s get to the fun part. Follow these steps, and you’ll have a batch of stunning heart-shaped cookies in no time.
- Preheat and Prep: Preheat your oven to 350°F (175°C). Line your baking sheets with parchment paper. This is a crucial step for preventing the cookies from spreading too much.
- Whisk Dry Ingredients: In a medium bowl, whisk together the all-purpose flour, cocoa powder, baking powder, and salt. Set this aside. Make sure there are no lumps in the cocoa powder.
- Cream Butter and Sugar: In a large bowl, using your hand mixer or stand mixer with the paddle attachment, beat the softened butter and granulated sugar together on medium speed until it’s light and fluffy. This should take about 2-3 minutes. You’re looking for a pale, creamy texture. Scrape down the sides of the bowl with a spatula.
- Add Wet Ingredients: Beat in the egg and vanilla extract until well combined. The mixture might look a little curdled at this point—that’s totally normal. Don’t panic.
- Add Color and Acid: Add the red food coloring and white vinegar. Mix on low speed until the color is evenly distributed. The batter should be a vibrant, uniform red.
- Combine Wet and Dry: Gradually add the dry ingredients to the wet ingredients, mixing on low speed until just combined. Be careful not to overmix. Overmixing develops the gluten and will make the cookies tough. Stop as soon as you don’t see any more streaks of flour. The dough will be soft and slightly sticky.
- Chill the Dough: Cover the bowl with plastic wrap and refrigerate the dough for at least 20 minutes. This is a non-negotiable step. Chilling the dough firms up the butter, which prevents the cookies from spreading into flat puddles in the oven. While the dough chills, you can clean up a bit.
- Shape the Hearts: This is the part that feels like magic. Take about 1.5 tablespoons of dough (a standard cookie scoop is perfect) and roll it into a ball. Place the ball on your prepared baking sheet. Using your offset spatula or butter knife, gently press down on the top of the ball to flatten it slightly. Then, use the tip of the spatula to pinch the top of the disc into a point, creating the top of the heart. Press the bottom of the disc to create the two rounded lobes. Don’t stress if they aren’t perfect—the powdered sugar hides a multitude of sins! Space the shaped cookies about 2 inches apart on the baking sheet.
- The Sugar Coat: This is the secret to the crinkle. Place the powdered sugar in a small, shallow bowl. Gently pick up each shaped dough heart and dip the top and sides into the powdered sugar, making sure it’s completely coated. Don’t be shy with the sugar! Place the sugared dough heart back on the baking sheet, sugared-side up. Let them sit for 5 minutes. This allows the sugar to start dissolving and creating that crackled crust.
- Bake: Bake the cookies for 10-12 minutes. The edges should be set and the tops will look cracked and slightly puffed. The center will still look a little soft and underdone—that’s perfect. They will continue to set on the hot baking sheet. For a softer, fudgier cookie, bake for 10 minutes. For a slightly crispier cookie, go for 12.
- Cool: Let the cookies cool on the baking sheet for 5 minutes. This is critical! If you try to move them right away, they will fall apart. After 5 minutes, carefully transfer them to a wire cooling rack to cool completely. The crinkles will become more pronounced as they cool.
Sensory Cue: When you pull them from the oven, you should smell a rich, buttery chocolate aroma with a hint of vanilla. The tops will be cracked like a desert floor, revealing the brilliant red dough underneath against the white powdered sugar.
Cooking Tips & Techniques
I have made every mistake in the book with these cookies so you don’t have to. Here are my hard-earned lessons:
- Don’t Skip the Vinegar: I know it seems weird, but the white vinegar is essential for the classic red velvet flavor. It reacts with the cocoa powder to enhance the red color and adds that subtle tang that makes red velvet distinct. I once forgot it, and the cookies were just… brown-ish and flat.
- The Chilling is Crucial: I learned this the hard way. On my second attempt, I was impatient and skipped the 20-minute chill. The cookies spread into thin, misshapen discs that looked nothing like hearts. The dough needs that time to firm up so the butter doesn’t melt too fast in the oven.
- Baking Time is a Guideline: Every oven is different. Your cookies might be perfectly done at 9 minutes or need 12. The key is to look for the set edges and the cracked top. Don’t wait for them to look fully “done” in the center; they will continue to bake on the hot sheet.
- Working in Batches: If you only have one baking sheet, let it cool completely between batches. Placing dough on a hot sheet will cause the butter to melt before it even hits the oven, leading to spreading. I usually run my sheet under cold water, dry it, and let it cool for a minute.
- Perfecting the Heart Shape: If the dough is too sticky to shape easily, pop it back in the fridge for 5 more minutes. You can also lightly grease your hands with a tiny bit of butter. The offset spatula method is my favorite because it’s quick and doesn’t warm up the dough too much.
Variations & Adaptations
This recipe is a fantastic base for creativity. Here are a few ways I’ve adapted it over the years:
- Chocolate Lover’s Twist: After shaping the heart, press a few dark chocolate chips or a small piece of a dark chocolate bar into the center of the dough before coating in sugar. It creates a molten, fudgy center that is absolutely divine.
- Gluten-Free Version: As mentioned, a 1:1 gluten-free baking flour blend works beautifully. I’ve also had success with a mix of almond flour and oat flour, but the texture is a bit more delicate. Just make sure your blend contains xanthan gum for structure.
- Peppermint Red Velvet: Add ½ teaspoon of peppermint extract along with the vanilla extract. It gives the cookies a festive, Christmas-y vibe. You can also crush some candy canes and sprinkle them on top of the powdered sugar before baking for a crunchy, minty finish.
- Dairy-Free Option: Simply swap the unsalted butter for a high-quality vegan butter stick (like Miyoko’s or Earth Balance). Make sure it’s in stick form, not a spread, for the right fat content. The recipe works perfectly otherwise.
My personal favorite variation is the “Cream Cheese Stuffed” version. I take a small cube of cold cream cheese and wrap the dough around it before shaping. It’s a little messy, but the tangy cream cheese center with the sweet, chocolatey cookie is a match made in heaven.
Serving & Storage Suggestions
These cookies are best served at room temperature. The texture is perfectly soft and chewy, and the powdered sugar coating stays nice and crisp. They make a gorgeous addition to a Valentine’s Day dessert platter alongside some fresh strawberries and chocolate-dipped pretzels.
For a truly decadent presentation, serve them with a glass of cold milk or a cup of hot coffee. The slight bitterness of coffee is a wonderful contrast to the sweet cookie. I also love to pair them with a scoop of vanilla bean ice cream for a quick and easy ice cream sandwich.
Storage: Store the baked cookies in an airtight container at room temperature for up to 5 days. To keep them from getting stale, I like to add a slice of plain bread to the container. The bread absorbs the excess moisture and keeps the cookies soft. Swap the bread out every other day.
Freezing: These cookies freeze beautifully. You can freeze the baked cookies in a freezer-safe bag for up to 3 months. Thaw them at room temperature for about 30 minutes before serving. For an even better option, freeze the shaped, unbaked dough hearts on a baking sheet. Once frozen solid, transfer them to a freezer bag. You can bake them directly from frozen, just add 2-3 minutes to the baking time.
Flavor Development: Honestly, these cookies are even better the next day. The flavors have a chance to meld together, and the texture becomes even more fudgy and cohesive. So don’t be afraid to make them a day ahead!
Nutritional Information & Benefits
Let’s be real: these are a treat, not a health food. But knowing what’s in them helps you enjoy them mindfully. The following is an estimate per cookie (based on 24 cookies):
- Calories: ~145
- Fat: 6g
- Carbohydrates: 22g
- Protein: 2g
- Sugar: 14g
The cocoa powder in this recipe is a source of antioxidants called flavonoids, which are great for heart health. The small amount of protein from the egg and flour helps provide a little staying power, so you won’t crash right after eating one (or two!).
Dietary Considerations: This recipe is nut-free (as written) and can easily be made gluten-free or dairy-free with the substitutions mentioned above. It does contain gluten, dairy, and eggs, so it is not suitable for those with allergies to those ingredients.
Frequently Asked Questions
Can I use a different shape?
Absolutely! While the heart shape is perfect for Valentine’s Day, you can simply roll the dough into balls for classic crinkle cookies. The baking time remains the same. You can also use a star-shaped cookie cutter for a fun twist.
Why did my cookies spread too much?
This is usually due to one of two things: the dough wasn’t chilled long enough, or the butter was too soft. Make sure you chill the dough for at least 20 minutes. Also, ensure your butter is softened but not melted. If your kitchen is very warm, you can chill the shaped cookies on the baking sheet for an extra 10 minutes before baking.
Can I use natural food coloring?
Yes, you can! Natural red food colorings made from beet juice or vegetable extracts work, but they may not produce as vibrant a red color. The color will be more of a deep, rusty red or pink. You may need to use a bit more to achieve the desired shade. The taste will be slightly different, but still delicious.
How do I get the perfect crinkle top?
The secret is a generous coating of powdered sugar and letting the dough sit for 5 minutes after coating. The sugar begins to absorb moisture from the dough, and as the cookie spreads in the oven, the surface cracks, revealing the red dough underneath. Don’t skimp on the sugar!
Can I double this recipe?
Definitely! This recipe doubles beautifully. Just make sure your mixing bowl is large enough to accommodate the extra volume. You may need to bake the cookies in a few extra batches, but the dough will hold up well in the fridge while you work.
Conclusion
These Perfect Red Velvet Heart-Shaped Crinkle Cookies are more than just a pretty face. They are the result of a late-night craving, a little bit of kitchen ingenuity, and a whole lot of love. They are proof that you can create something beautiful and delicious with simple ingredients and a little patience. Whether you’re making them for a special someone, a group of friends, or just for yourself on a quiet Tuesday night, they are guaranteed to bring a smile to your face.
I absolutely love how forgiving this recipe is. Even if your hearts are a little lopsided, they will taste incredible. That’s the thing about homemade treats—the imperfections are what make them perfect. So go ahead, get a little messy, and enjoy the process. I promise, the reward is worth it.
I’d love to hear how yours turn out! Leave a comment below and let me know if you tried any fun variations. Happy baking!
Pin This Recipe!

Perfect Red Velvet Heart Crinkle Cookies: Easy Valentine’s Recipe

These Perfect Red Velvet Heart-Shaped Crinkle Cookies are soft, fudgy, and beautifully cracked with a vibrant red interior and a snowy powdered sugar coating. They come together in about 35 minutes and are perfect for Valentine’s Day or any occasion that calls for a stunning, delicious treat.
- Prep Time: 15 minutes
- Cook Time: 10-12 minutes
- Total Time: 35 minutes
- Yield: 24 cookies 1x
- Category: Dessert
- Cuisine: American
Ingredients
- 1 ½ cups (190g) all-purpose flour
- ¼ cup (25g) unsweetened cocoa powder
- 1 teaspoon baking powder
- ¼ teaspoon salt
- ½ cup (115g) unsalted butter, softened
- ¾ cup (150g) granulated sugar
- 1 large egg, room temperature
- 1 teaspoon vanilla extract
- 1 tablespoon red food coloring (liquid gel preferred)
- 1 teaspoon white vinegar
- ½ cup (60g) powdered sugar, for rolling
Instructions
- Preheat your oven to 350°F (175°C). Line your baking sheets with parchment paper.
- In a medium bowl, whisk together the all-purpose flour, cocoa powder, baking powder, and salt. Set aside.
- In a large bowl, using an electric hand mixer or stand mixer with the paddle attachment, beat the softened butter and granulated sugar together on medium speed until light and fluffy, about 2-3 minutes.
- Beat in the egg and vanilla extract until well combined. The mixture may look slightly curdled.
- Add the red food coloring and white vinegar. Mix on low speed until the color is evenly distributed.
- Gradually add the dry ingredients to the wet ingredients, mixing on low speed until just combined. Do not overmix. The dough will be soft and slightly sticky.
- Cover the bowl with plastic wrap and refrigerate the dough for at least 20 minutes.
- Take about 1.5 tablespoons of dough and roll it into a ball. Place the ball on the prepared baking sheet. Using an offset spatula or butter knife, gently press down to flatten slightly, then pinch the top into a point and press the bottom to create two rounded lobes, forming a heart shape. Space the shaped cookies about 2 inches apart.
- Place the powdered sugar in a small shallow bowl. Gently dip the top and sides of each shaped dough heart into the powdered sugar, coating completely. Place sugared-side up on the baking sheet. Let them sit for 5 minutes.
- Bake for 10-12 minutes. The edges should be set and the tops cracked and slightly puffed. The center will still look soft.
- Let the cookies cool on the baking sheet for 5 minutes, then carefully transfer to a wire cooling rack to cool completely.
Notes
For a deeper chocolate flavor, add ¼ teaspoon espresso powder to the dry ingredients. For gluten-free, use a 1:1 gluten-free baking flour blend. For dairy-free, use a high-quality vegan butter stick. The cookies are even better the next day. Store in an airtight container at room temperature for up to 5 days. Freeze baked cookies for up to 3 months or freeze unbaked shaped dough for up to 3 months (bake from frozen, adding 2-3 minutes).
Nutrition
- Serving Size: 1 cookie
- Calories: 145
- Sugar: 14
- Sodium: 85
- Fat: 6
- Saturated Fat: 3.5
- Carbohydrates: 22
- Fiber: 1
- Protein: 2
Keywords: red velvet cookies, heart-shaped cookies, Valentine's Day cookies, crinkle cookies, easy cookie recipe



