Love this? Save it for later!
Share the inspiration with your friends
I used to think decorated sugar cookies were a fool’s errand. Honestly. For years, I’d scroll past those impossibly perfect royal-iced creations on social media, feeling a mix of admiration and sheer exhaustion. They looked like tiny edible museums, not something you’d actually bake on a random Tuesday. Then last October, my niece showed up at my door with a Tupperware container and a very specific request. “Auntie,” she said, holding up a crudely drawn picture of a cat, “can we make these for my class party? But cute. Like, Halloween cute.” And that’s how I found myself elbow-deep in black food coloring at 8 PM on a Wednesday, utterly determined to prove her right.
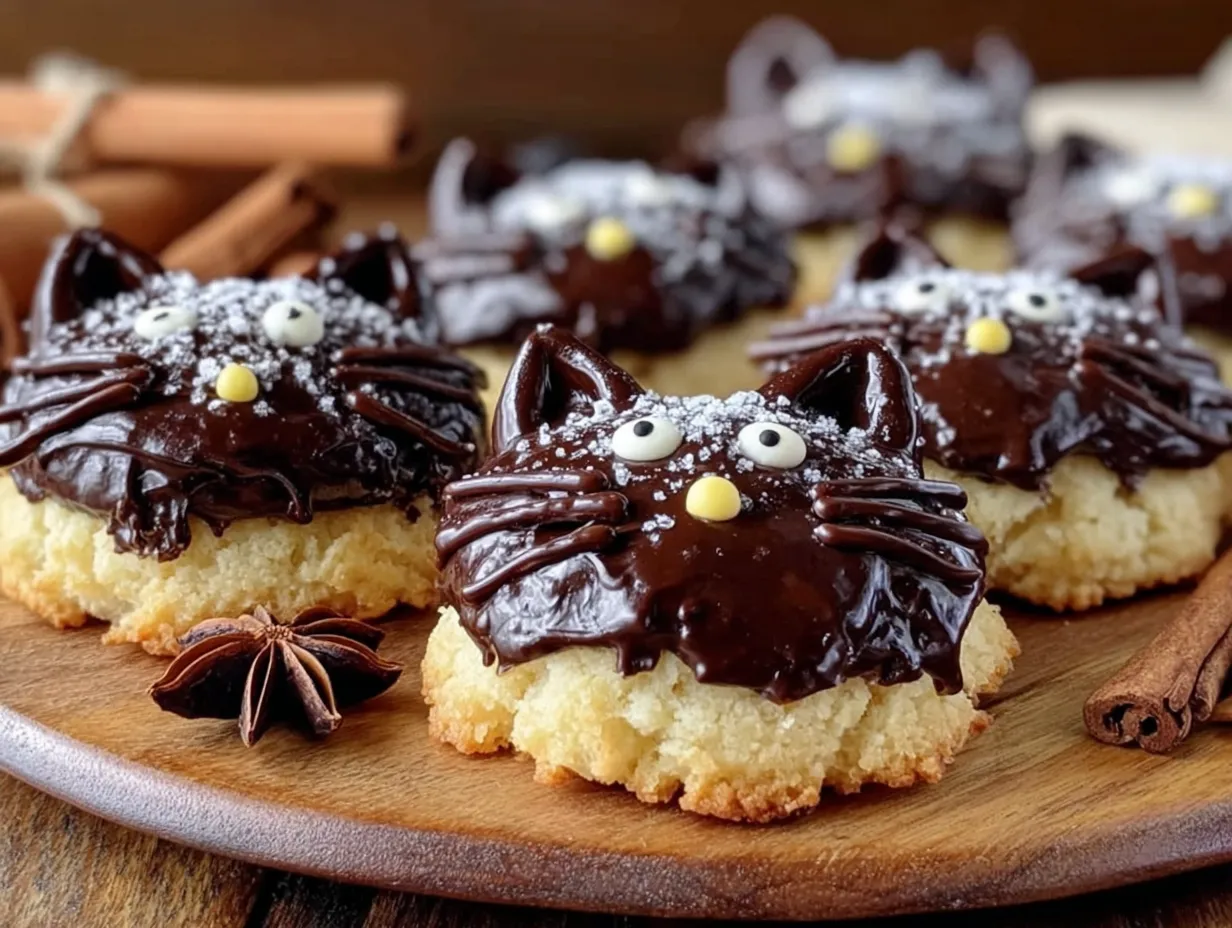
The first batch was a disaster. The dough was too sticky, the cats looked more like blobfish, and I may have used language that would have horrified her mother. But somewhere around batch three, something clicked. I ditched the royal icing for a simpler glaze that set just enough without the fuss. I found the perfect cookie cutter shape that actually looked like a cat, not a deformed potato. And when I pulled that tray out of the oven—golden edges, deep black icing, those little yellow eyes staring back at me—I knew we had something special. My niece declared them “the best cookies in the whole world.” And honestly? She wasn’t wrong.
These Adorable Black Cat Halloween Sugar Cookies are the result of that messy, flour-covered night. They’re the kind of recipe that proves you don’t need a pastry degree or a dozen piping tips to make something genuinely charming. Maybe you’ve been there—intimidated by decorated cookies, convinced they’re beyond your skill level. Let me tell you, if I can make these, you absolutely can. This recipe stays with me because it captured that rare moment when a kitchen disaster turned into a tradition. And now, every October, we make them again.
Why You’ll Love This Recipe
Let me be real with you—I’ve tested this recipe at least a dozen times to get it just right. I wanted cookies that tasted as good as they looked, with a soft, buttery crumb that doesn’t crumble into a million pieces when you bite into them. After tweaking the flour ratio and chilling time, I finally nailed it. These cookies are foolproof, even for beginners.
- Quick & Easy: From start to finish, you’re looking at about 30 minutes of active time. The dough comes together in one bowl, no electric mixer required. Perfect for those “I need cookies NOW” moments.
- Simple Ingredients: Butter, sugar, flour, eggs—the usual suspects. No weird specialty items or trips to three different stores. You probably have everything in your pantry right now.
- Perfect for Halloween Parties: These little guys are showstoppers at school events, office potlucks, or trick-or-treat gatherings. They’re cute without being overly fussy.
- Crowd-Pleaser: Kids love them because they’re fun. Adults love them because they actually taste like a real cookie, not a sugar bomb with frosting.
- Unbelievably Delicious: The secret is browning the butter just slightly before creaming it. It adds this nutty, caramel undertone that makes the cookie itself irresistible—even before the icing goes on.
What makes this recipe different from all the other Halloween cookies out there? It’s the texture. I use a higher ratio of butter to shortening, which gives you a cookie that’s crisp on the edges but soft and tender in the center. Plus, that simple glaze icing I mentioned—it sets in about an hour, so you can decorate and serve on the same day. No waiting overnight for royal icing to harden. This isn’t just another version of a sugar cookie. It’s the version I’d serve to my own family, and honestly, that’s the highest compliment I can give.
This recipe is the kind that makes you close your eyes after the first bite. It’s comfort food reimagined—buttery, sweet, and just a little bit spooky. Perfect for impressing guests without stress, or turning a simple Tuesday night into something memorable.
What Ingredients You Will Need
This recipe uses simple, wholesome ingredients to deliver bold flavor and satisfying texture without the fuss. Most of these are pantry staples you likely already have on hand, which makes these cookies perfect for spontaneous baking sessions.
For the Cookies
- Unsalted butter, softened (1 cup / 2 sticks) — I prefer using Land O’Lakes for consistent results. The butter needs to be truly soft, not just room temperature, for the creaming method to work properly.
- Granulated sugar (1 cup / 200g) — Regular white sugar works best here. Don’t substitute with brown sugar, as it will change the texture and make the cookies spread too much.
- Large egg (1, at room temperature) — Cold eggs can seize the butter mixture, so let yours sit out for about 30 minutes before starting.
- Vanilla extract (2 teaspoons, pure is best) — I’m partial to Nielsen-Massey, but any pure vanilla extract will do. Avoid imitation vanilla if you can—it makes a difference.
- All-purpose flour (2 ½ cups / 312g) — Spoon and level your flour. Scooping directly from the bag packs in too much and makes dry cookies. I learned this the hard way.
- Baking powder (1 teaspoon) — Make sure it’s fresh. If it’s been sitting in your cabinet for two years, toss it and buy new.
- Salt (½ teaspoon) — Fine sea salt or table salt. Don’t skip this—it balances the sweetness.
For the Glaze Icing
- Powdered sugar (2 cups / 240g, sifted) — Sifting is non-negotiable here. Lumps in the icing will ruin the smooth finish.
- Milk (3-4 tablespoons) — Whole milk gives the best consistency, but 2% works fine. Add it slowly—you might need slightly more or less depending on humidity.
- Vanilla extract (½ teaspoon) — Just a touch for flavor.
- Black gel food coloring (about 1 teaspoon) — Gel is crucial. Liquid food coloring will thin the icing too much and give you a watery mess. I recommend Americolor Super Black.
- Yellow gel food coloring (for the eyes) — A tiny dot per cookie goes a long way.
- Black sanding sugar or sprinkles (optional, for extra sparkle) — Totally optional, but my niece insists it makes them “fancier.”
Equipment Needed
You don’t need a professional bakery setup for these cookies, which is exactly how I like it. Here’s what you’ll need:
- Large mixing bowl — Any bowl will do, but a wide one makes creaming easier.
- Wooden spoon or sturdy spatula — You can use a hand mixer, but honestly, I prefer doing this by hand. It gives you more control and less cleanup.
- Rolling pin — I use a simple wooden one I picked up at a garage sale for $3. Works perfectly.
- Cat-shaped cookie cutter — This is the star of the show. I found mine at a craft store in the baking section, but you can also order them online. Look for one with a clear shape—ears, tail, and body all in one piece.
- Baking sheets (2) — Light-colored metal sheets work best. Dark sheets can cause the bottoms to brown too quickly.
- Parchment paper — Absolute must. Silicone mats work too, but parchment is easier to clean up.
- Wire cooling rack — For even cooling and to catch any icing drips.
- Small piping bags or zip-top bags — For the icing. I use disposable piping bags from Wilton, but a zip-top bag with the corner snipped off works just as well.
- Toothpicks — For adding those tiny yellow eyes. Trust me, toothpicks give you way more control than a piping tip.
Preparation Method
Let’s get baking! I’ve broken this down into clear steps so you can follow along without any confusion. Take your time with each stage—rushing is the number one mistake people make with sugar cookies.
- Preheat the oven to 350°F (175°C). Line two baking sheets with parchment paper. Set them aside for now.
- Cream the butter and sugar. In a large bowl, beat the softened butter and granulated sugar together until light and fluffy. This takes about 3-4 minutes if you’re doing it by hand, or 2 minutes with a hand mixer. You’re looking for a pale, airy mixture that holds its shape when you stop stirring. Don’t rush this step—proper creaming is what gives the cookies their tender texture.
- Add the egg and vanilla. Crack the egg into the butter mixture, add the vanilla, and stir until fully combined. The mixture might look a little curdled at this point—that’s normal. Don’t panic.
- Mix the dry ingredients. In a separate bowl, whisk together the flour, baking powder, and salt. Add this to the wet mixture in two additions, stirring gently after each. Stop as soon as the dough comes together. Overmixing develops gluten, which makes cookies tough. You want a soft, slightly sticky dough that holds together when pressed.
- Chill the dough. Flatten the dough into a disk, wrap it in plastic wrap, and refrigerate for at least 30 minutes. I know it’s tempting to skip this, but don’t. Chilling solidifies the butter, which prevents the cookies from spreading into unrecognizable blobs in the oven. If you’re in a hurry, you can pop it in the freezer for 15 minutes.
- Roll and cut. Lightly flour your work surface and rolling pin. Roll the dough to about ¼-inch thickness. Cut out your cat shapes and transfer them to the prepared baking sheets, spacing them about 2 inches apart. Gather the scraps, re-roll, and cut again. You should get about 24-30 cookies, depending on the size of your cutter.
- Bake. Bake for 8-10 minutes, or until the edges are just barely golden. The centers will still look slightly pale—that’s what you want. Overbaking gives you dry, crumbly cookies. Let them cool on the baking sheet for 5 minutes, then transfer to a wire rack to cool completely. Do not ice warm cookies, or the glaze will melt right off.
- Make the glaze. While the cookies cool, sift the powdered sugar into a medium bowl. Add 3 tablespoons of milk and the vanilla, and stir until smooth. Add the black gel food coloring and mix until you reach a deep, even black. If the glaze is too thick, add more milk a teaspoon at a time. If it’s too thin, add more powdered sugar. You want it thick enough to coat the back of a spoon but still pourable.
- Decorate. Transfer the black glaze to a piping bag or zip-top bag and snip a tiny corner off. Outline each cookie, then fill in the center with more glaze. Use a toothpick to spread it evenly into the corners and edges. While the glaze is still wet, add two tiny dots of yellow gel food coloring for the eyes. Use the toothpick to place them precisely—aim for the upper third of the cat’s face. Let the cookies set at room temperature for about 1 hour, or until the glaze is dry to the touch.
- Add finishing touches (optional). If you want extra sparkle, sprinkle black sanding sugar over the wet glaze before it sets. You can also add a tiny pink dot for the nose or whiskers using a separate piping bag with white icing. But honestly, the simple version with just the eyes is adorable on its own.
Cooking Tips & Techniques
I’ve made every mistake in the book so you don’t have to. Here are the lessons I learned the hard way:
Don’t overwork the dough. The first time I made these, I kneaded the dough like it was bread. The result? Hockey pucks. Mix just until the flour disappears, then stop. A few streaks of flour are fine—they’ll incorporate during rolling.
Chill between batches. If you’re making multiple batches, pop the cut-out cookies back in the fridge for 10 minutes before baking. Cold dough spreads less, giving you cleaner edges. I ruined an entire batch by skipping this step once—they turned into amorphous black blobs that looked more like inkblots than cats.
Watch the oven like a hawk. Ovens vary wildly. My ancient oven runs hot, so I check the cookies at 7 minutes. If yours is newer, it might take the full 10. Look for the edges to just start turning golden—that’s your cue. Pull them out even if the centers look soft. They’ll continue baking on the hot sheet.
Master the glaze consistency. This is the trickiest part. If the glaze is too thick, it won’t spread smoothly and will leave streaks. Too thin, and it’ll run off the edges like a sad waterfall. Test it on a spare cookie first. The perfect glaze should flow like thick honey—slow enough to control, but loose enough to self-level.
Timing is everything. I like to bake the cookies one day and decorate them the next. The cookies stay fresh in an airtight container for up to a week, so there’s no rush. This also means you can prep ahead for a party without losing your mind.
Variations & Adaptations
One of the best things about this recipe is how adaptable it is. Here are a few ways I’ve tweaked it over the years:
- Gluten-Free Version: Substitute the all-purpose flour with a 1:1 gluten-free baking flour blend. I’ve used Bob’s Red Mill with great results. Add 1 teaspoon of xanthan gum if your blend doesn’t already include it. The texture will be slightly more delicate, but still delicious.
- Vegan Adaptation: Use vegan butter (like Earth Balance) and a flax egg (1 tablespoon ground flaxseed mixed with 3 tablespoons water, let sit for 5 minutes). The cookies won’t be quite as tender, but they’re still very good. For the glaze, use plant-based milk.
- Different Shapes: Don’t limit yourself to cats! This dough works beautifully with any Halloween cutter—pumpkins, ghosts, bats, or even simple circles decorated as jack-o’-lanterns. I’ve also used a small heart cutter and turned them into “bat wings” by adding a piped body.
- Flavor Twists: Add ½ teaspoon of cinnamon or pumpkin pie spice to the dough for a warm autumn flavor. Or swap the vanilla extract for almond extract—it gives the cookies a subtle marzipan note that pairs beautifully with the black icing.
- No-Food-Coloring Option: If you’re avoiding artificial colors, use cocoa powder in the glaze instead of black food coloring. Mix 2 tablespoons of unsweetened cocoa powder with the powdered sugar and milk. The color will be dark brown rather than true black, but it tastes amazing—like a chocolate cookie with a hint of bitterness that balances the sweetness.
I once tried a version with lavender extract for a “witchy” vibe. It was… interesting. Let’s just say not every experiment is a winner. Stick with vanilla unless you’re feeling very adventurous.
Serving & Storage Suggestions
These cookies are best served at room temperature, which lets the glaze set properly and the cookie soften just slightly. I like to arrange them on a platter with a few fake spiderwebs and some candy corn for a full Halloween display. They’re perfect for classroom parties, office treats, or just snacking while watching Hocus Pocus for the hundredth time.
Storage: Keep the cookies in an airtight container at room temperature for up to 1 week. Layer them between sheets of parchment paper to prevent the glaze from sticking. Do not refrigerate—the cold can cause condensation, which makes the glaze tacky and dull.
Freezing: You can freeze the baked, undecorated cookies for up to 3 months. Wrap them tightly in plastic wrap, then place in a freezer-safe bag. When you’re ready to decorate, thaw them at room temperature for about an hour, then ice as usual. I’ve also frozen the raw dough disks for up to 2 months—just thaw overnight in the fridge before rolling and cutting.
Reheating: Honestly, these cookies don’t need reheating. But if you want that just-baked warmth, pop them in a 300°F (150°C) oven for 3-4 minutes. Let them cool slightly before serving, as the glaze can get soft.
One thing I’ve noticed: the flavors actually improve after a day or two. The butter and vanilla meld together, and the glaze sets into this perfect, snappy shell. So don’t be afraid to make them ahead. They might even be better on day two.
Nutritional Information & Benefits
Let’s be honest—these are cookies, not health food. But a little indulgence now and then is part of a balanced life. Here’s a rough estimate per cookie (based on 24 cookies):
| Nutrient | Amount Per Cookie |
|---|---|
| Calories | 185 |
| Total Fat | 8g |
| Saturated Fat | 5g |
| Carbohydrates | 28g |
| Sugar | 18g |
| Protein | 2g |
| Sodium | 85mg |
That said, there are a few silver linings. The butter provides a small amount of vitamin A, and if you use pure vanilla extract, you get trace amounts of antioxidants. The eggs add protein and choline, which supports brain health. And honestly? The biggest benefit is the joy of creating something with your own hands. Baking is a form of mindfulness, and sharing these cookies with loved ones is good for the soul.
If you’re watching your sugar intake, you can reduce the glaze sugar by half or skip the sanding sugar. But I say: Halloween comes once a year. Enjoy the treat.
Conclusion
These Adorable Black Cat Halloween Sugar Cookies are more than just a recipe—they’re a little piece of Halloween magic you can hold in your hand. They’re the cookies that turned me from a skeptic into a believer, and I have a feeling they’ll do the same for you. Whether you’re baking with kids, impressing coworkers, or just treating yourself, this recipe delivers every single time.
Don’t be afraid to make them your own. Add extra sprinkles. Use purple icing instead of black. Give your cats silly faces or fancy hats. The best part of baking is the freedom to experiment. And honestly? Even if they don’t turn out perfect, they’ll still taste amazing.
I’d love to hear how yours turn out! Drop a comment below and tell me about your decorating adventures. Did you add whiskers? Give them bow ties? Make a whole cat family? Share your photos and tag me—I can’t wait to see what you create. Happy Halloween, and happy baking!
Frequently Asked Questions
Can I use a different cookie cutter shape?
Absolutely! This dough works with any Halloween-themed cutter. Just adjust the baking time slightly if your shapes are significantly larger or smaller than a standard cat cutter.
Why did my cookies spread too much?
This usually happens if the dough wasn’t chilled long enough, or if the butter was too soft. Make sure to chill the dough for at least 30 minutes, and if your kitchen is warm, pop the cut cookies in the fridge for 10 minutes before baking.
How do I get the glaze perfectly black?
Use gel food coloring, not liquid. Start with about ½ teaspoon and add more until you reach the desired shade. The color will deepen as the glaze sets, so don’t panic if it looks slightly gray at first.
Can I make these cookies ahead of time?
Yes! You can bake the cookies up to a week in advance and store them undecorated in an airtight container. Decorate them the day you plan to serve for the freshest look.
My glaze is too thick/thin. How do I fix it?
If it’s too thick, add milk one teaspoon at a time until it reaches a pourable consistency. If it’s too thin, sift in more powdered sugar a tablespoon at a time. The perfect glaze should coat the back of a spoon but still flow slowly.
Pin This Recipe!

Adorable Black Cat Halloween Sugar Cookies: Easy 30-Min Recipe

These adorable black cat Halloween sugar cookies are soft, buttery, and decorated with a simple black glaze and yellow eyes. Perfect for Halloween parties, they come together in just 30 minutes of active time and require no special skills.
- Prep Time: 30 minutes
- Cook Time: 10 minutes
- Total Time: 1 hour 40 minutes (includes chilling and setting)
- Yield: 24-30 cookies 1x
- Category: Dessert
- Cuisine: American
Ingredients
- 1 cup (2 sticks) unsalted butter, softened
- 1 cup (200g) granulated sugar
- 1 large egg, at room temperature
- 2 teaspoons pure vanilla extract
- 2 ½ cups (312g) all-purpose flour
- 1 teaspoon baking powder
- ½ teaspoon fine sea salt
- 2 cups (240g) powdered sugar, sifted
- 3–4 tablespoons whole milk
- ½ teaspoon vanilla extract
- 1 teaspoon black gel food coloring
- Yellow gel food coloring (for eyes)
- Black sanding sugar or sprinkles (optional)
Instructions
- Preheat the oven to 350°F (175°C). Line two baking sheets with parchment paper.
- In a large bowl, cream the softened butter and granulated sugar together until light and fluffy, about 3-4 minutes by hand or 2 minutes with a hand mixer.
- Add the egg and vanilla extract, and stir until fully combined. The mixture may look slightly curdled.
- In a separate bowl, whisk together the flour, baking powder, and salt. Add to the wet mixture in two additions, stirring gently until just combined. Do not overmix.
- Flatten the dough into a disk, wrap in plastic wrap, and refrigerate for at least 30 minutes (or 15 minutes in the freezer).
- Lightly flour a work surface and rolling pin. Roll the dough to ¼-inch thickness. Cut out cat shapes and transfer to prepared baking sheets, spacing 2 inches apart. Gather scraps, re-roll, and cut again.
- Bake for 8-10 minutes, until edges are just barely golden. Let cool on baking sheet for 5 minutes, then transfer to a wire rack to cool completely.
- For the glaze: Sift powdered sugar into a medium bowl. Add 3 tablespoons milk and ½ teaspoon vanilla, and stir until smooth. Add black gel food coloring and mix until deep black. Adjust consistency with more milk or powdered sugar as needed.
- Transfer black glaze to a piping bag or zip-top bag with a tiny corner snipped off. Outline each cookie, then fill in with glaze. Use a toothpick to spread evenly. While wet, add two tiny dots of yellow gel food coloring for eyes using a toothpick.
- Let cookies set at room temperature for about 1 hour, until glaze is dry. Optionally, sprinkle with black sanding sugar before glaze sets.
Notes
Chill the dough thoroughly to prevent spreading. Use gel food coloring for the glaze, not liquid. The cookies can be baked a day ahead and decorated the next day. Store in an airtight container at room temperature for up to 1 week.
Nutrition
- Serving Size: 1 cookie
- Calories: 185
- Sugar: 18
- Sodium: 85
- Fat: 8
- Saturated Fat: 5
- Carbohydrates: 28
- Protein: 2
Keywords: Halloween cookies, black cat cookies, sugar cookies, easy Halloween recipe, decorated cookies, 30-minute recipe



