Love this? Save it for later!
Share the inspiration with your friends
It was 9:47 PM on a random Wednesday, and I was staring into the open fridge like it owed me money. The craving hit me out of nowhere—something warm, something melty, something with a little smoke and a little kick. I didn’t have any fancy cheese blends or gourmet peppers, but I had a block of generic white American cheese from the deli counter, a can of evaporated milk that had been lurking since last Thanksgiving, and a bag of frozen Hatch chiles I’d stashed away after a summer trip to New Mexico. Let me tell you, that moment of desperation turned into something I still think about. I grabbed a cast iron skillet, threw caution to the wind, and started melting things together without a plan. Honestly, I was half expecting to ruin the pan. But what came out of that late-night experiment was so good I texted a picture to my friend Maria at 10:15 PM, and she called me immediately to ask if I was okay. I mean, who makes queso at ten o’clock on a Wednesday? Apparently, I do. And I’ve been making it ever since. That first batch was a little lumpy and I definitely oversalted it, but the smoky roasted flavor of those Hatch chiles was undeniable. It’s the kind of recipe that proves you don’t need a perfect kitchen or a perfect plan—you just need a craving and the guts to follow it. This Smoky Roasted Hatch Chili Queso Dip is the result of that weird, wonderful night, and it’s become my go-to for game days, taco nights, and quiet evenings when I need a little comfort.
Why You’ll Love This Recipe
This isn’t just another queso recipe you’ll find floating around the internet. This is the one you’ll come back to again and again, and here’s why it stands out from the crowd.
- Quick & Easy: From fridge to table in under 10 minutes. No roux, no complicated steps, no hovering over a double boiler. You can literally make this while the tortilla chips are hitting the bowl.
- Simple Ingredients: You won’t need to hunt down obscure cheeses or specialty stores. Most of what you need is probably in your kitchen right now, especially if you keep evaporated milk and a solid melting cheese on hand.
- Perfect for Any Occasion: Game day? Yes. Taco Tuesday? Absolutely. A random Wednesday night when you just need something good? This is your dip. It’s versatile enough for parties but easy enough for a solo snack session.
- Crowd-Pleaser: I’ve brought this to potlucks and watched people hover around the bowl like it was the last food on earth. Kids love it, adults love it, and even your friend who claims they don’t like spicy food will go back for seconds. The smokiness from the roasted chiles is more about depth than heat.
- Unbelievably Delicious: The texture is what gets me every time. It’s creamy without being gluey, smooth without being thin. The smoky, slightly sweet flavor of the roasted Hatch chiles cuts through the richness of the cheese in a way that feels balanced and intentional. This isn’t just melted cheese—it’s an experience.
What makes this different from every other queso recipe is the technique. Instead of using processed cheese blocks packed with stabilizers, I rely on a simple trick with evaporated milk and a good melting cheese to create that ultra-smooth, velvety texture without any graininess. The roasted Hatch chiles add a complexity that you just don’t get from canned green chiles or jalapeños. It’s comfort food that feels a little bit special, a little bit elevated, but still totally approachable. You’ll close your eyes after that first bite, I promise you that.
What Ingredients You Will Need
This recipe uses a handful of simple, wholesome ingredients to deliver that bold, smoky flavor and perfectly creamy texture. No fuss, no nonsense. Just good stuff that works together.
- 1 pound white American cheese, cut into small cubes (from the deli counter, not the individually wrapped slices—it melts better)
- 1 cup evaporated milk (whole milk works too, but evaporated gives it that signature creaminess)
- 1 cup roasted Hatch chiles, chopped (fresh or frozen, mild or hot—your call)
- 1/2 teaspoon smoked paprika (adds that extra layer of smoky depth)
- 1/4 teaspoon garlic powder (don’t skip this—it rounds out the flavor)
- 1/4 teaspoon onion powder
- 1/4 teaspoon ground cumin (trust me on this one, it’s magic with the chiles)
- 1/2 teaspoon kosher salt, or to taste
- 1 tablespoon unsalted butter (optional, but adds richness)
- Fresh cilantro, chopped, for garnish (optional)
- Pickled jalapeños, for serving (optional, for extra heat)
When it comes to the cheese, I really recommend getting a block of white American cheese from the deli counter at your grocery store. Brands like Boar’s Head or Land O’Lakes melt beautifully and have the right texture. Pre-shredded cheese often has anti-caking agents that can make your queso grainy, so stay away from that. For the Hatch chiles, if you can’t find them fresh or frozen, you can substitute with roasted Anaheim chiles or even canned green chiles in a pinch—just know the flavor won’t be quite as complex. The smoked paprika is non-negotiable in my book, though. It really brings that campfire, roasted quality that makes this dip sing. If you’re looking for a dairy-free option, you can try using a plant-based melting cheese and full-fat oat milk, but I can’t guarantee the same results. This recipe really shines with the real deal.
Equipment Needed
You don’t need a professional kitchen to make this dip. A few basic tools will get the job done beautifully.
- Medium saucepan or small pot (a heavy-bottomed one works best to prevent scorching)
- Wooden spoon or silicone spatula for stirring
- Cutting board and knife for chopping the chiles
- Measuring cups and spoons
- Small bowl for holding the chopped chiles and spices
If you don’t have a heavy-bottomed pan, that’s fine—just keep the heat low and stir more frequently. I’ve made this in a non-stick skillet before and it worked perfectly. A cast iron skillet also works great if you want to serve the dip directly in it for a rustic presentation. For the stirring, avoid using metal utensils on non-stick surfaces if you want to keep your pans in good shape. Honestly, a good silicone spatula is your best friend here because it can scrape the corners and get every last bit of that delicious queso out of the pan. If you’re making a double batch for a party, a small slow cooker on the warm setting is perfect for keeping it melty and ready to serve.
Preparation Method
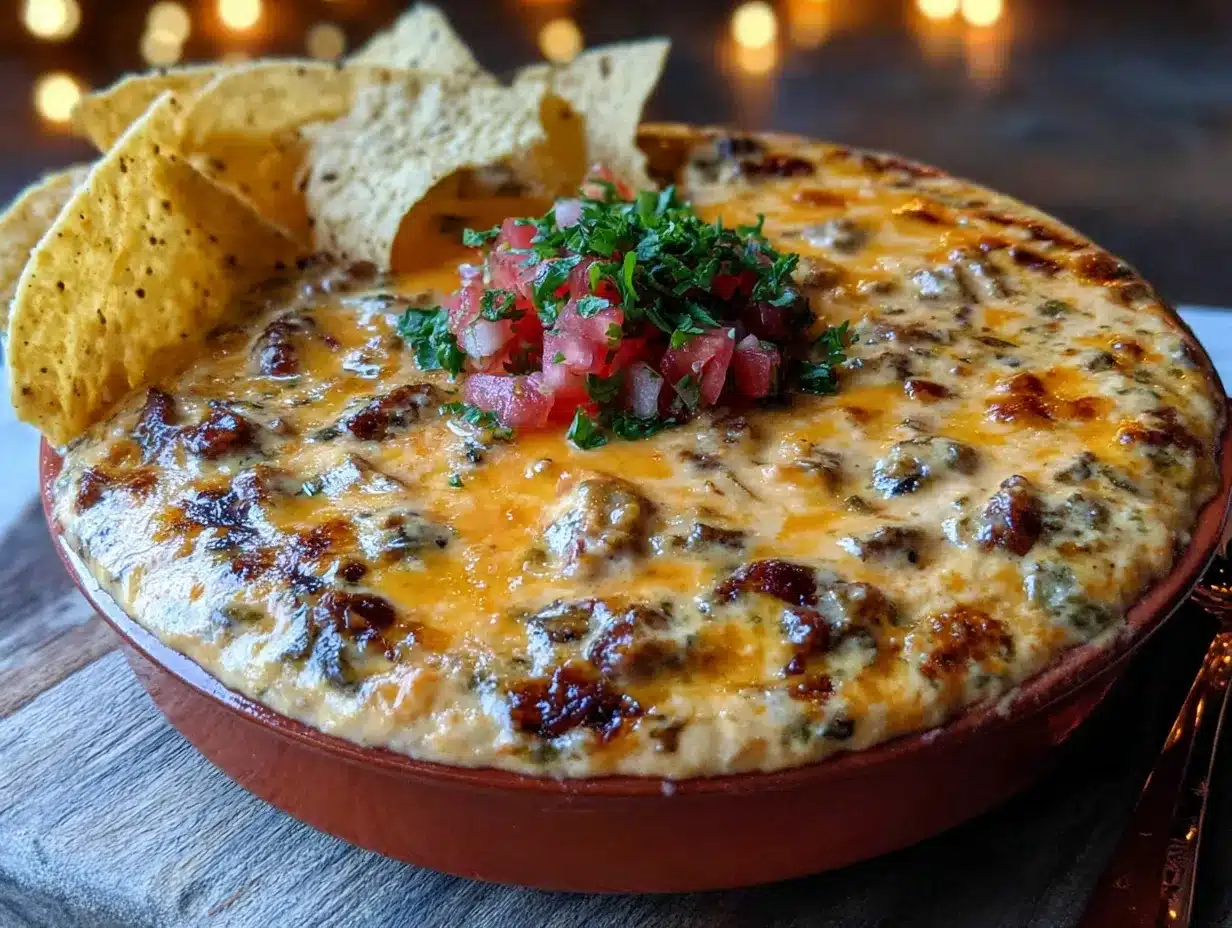
This comes together fast, so have everything prepped and ready before you turn on the heat. Trust me, you don’t want to be chopping chiles while your cheese is melting.
- Prep the chiles: If you’re using frozen roasted Hatch chiles, let them thaw slightly and then roughly chop them into small, bite-sized pieces. If they’re fresh, roast them under the broiler until the skin is blackened, then steam them in a covered bowl for 10 minutes before peeling and chopping. Set them aside in a small bowl with the smoked paprika, garlic powder, onion powder, cumin, and salt.
- Start melting: Place your medium saucepan over low heat. Add the evaporated milk and the butter (if using). Let it warm up for about 2 minutes, stirring occasionally. You want it warm but not simmering.
- Add the cheese gradually: Start adding the cubed white American cheese to the warm milk, a handful at a time. Stir constantly in a slow, steady motion. Let each addition melt almost completely before adding the next. This takes patience, but it’s the secret to a smooth, non-grainy queso. The whole process should take about 4-5 minutes.
- Incorporate the chiles and spices: Once all the cheese is melted and the mixture is smooth and glossy, add your bowl of chopped chiles and spices. Stir everything together until it’s evenly distributed. Cook for another 1-2 minutes, just until the chiles are heated through and the flavors have melded.
- Taste and adjust: Dip a chip in and taste it. Need more salt? Add it now. Want more heat? Stir in a little bit of the liquid from pickled jalapeños or a pinch of cayenne. Remember, the flavors will continue to develop as it sits.
- Serve immediately: Transfer the queso to a serving bowl if you want to be fancy, or keep it in the saucepan if you’re keeping it casual. Garnish with fresh cilantro and a few pickled jalapeño slices if you like. The queso will stay smooth and dippable for about 20-30 minutes at room temperature.
One thing I learned the hard way: don’t let the mixture boil. If the heat is too high, the cheese will separate and you’ll end up with a greasy, grainy mess. Low and slow is the way to go. The mixture should look like a thick, velvety soup when it’s ready. If it seems too thick, you can stir in an extra tablespoon or two of evaporated milk or even a splash of water to thin it out.
Cooking Tips & Techniques
I’ve made this queso more times than I can count, and I’ve definitely had my share of failures along the way. Here are the things I wish someone had told me from the start.
The biggest mistake is rushing the heat. I once tried to speed things up by cranking the burner to medium-high, and within minutes I had a pan full of separated, oily cheese that looked like a science experiment gone wrong. Cheese sauce is a patient person’s game. Keep the flame low, stir constantly, and don’t try to multitask during the melting phase. Your phone can wait.
Cut your cheese into uniform cubes. If some pieces are bigger than others, they’ll melt at different rates, and you’ll end up with lumps. I like to cut the block into roughly 1/2-inch cubes. It takes an extra minute, but it makes a noticeable difference.
Use room temperature cheese if you can. Cold cheese straight from the fridge takes longer to melt, which increases the risk of it seizing or becoming grainy. Let it sit on the counter for about 15-20 minutes before you start cooking. Same goes for the evaporated milk—if it’s cold, the temperature shock can cause the cheese to clump.
If your queso does get grainy, don’t panic. You can sometimes rescue it by whisking in a teaspoon of cornstarch dissolved in a tablespoon of cold water. This won’t fix severely broken cheese, but it can smooth out minor graininess. I’ve also had success adding a splash of evaporated milk and whisking vigorously over very low heat.
For the smoothest queso of your life, use an immersion blender. After everything is melted and combined, take the pot off the heat and give it a quick blitz with an immersion blender. This breaks down any tiny lumps and creates an ultra-smooth, restaurant-quality texture. Just be careful not to splatter hot cheese everywhere—I speak from experience.
Variations & Adaptations
One of the best things about this queso is how adaptable it is. You can tweak it to fit your mood, your diet, or whatever you have in the fridge.
Spicy Chorizo Queso: Brown 1/2 pound of Mexican chorizo in a skillet, drain the excess fat, and stir it into the finished queso. The spicy, savory crumbles add texture and a whole new layer of flavor. This version disappears fastest at parties, I’ve noticed.
Smoky Black Bean Queso: Stir in 1/2 cup of drained and rinsed black beans along with the chiles. The beans add fiber, protein, and a nice earthy flavor that pairs beautifully with the smoky chiles. This is my go-to when I want something a little more substantial.
Dairy-Free Adaptation: While I can’t promise the exact same texture, I’ve had good results using a high-quality dairy-free melting cheese (like Violife or Daiya) and full-fat oat milk. Add an extra tablespoon of nutritional yeast to boost the cheesy flavor, and be prepared for a slightly different consistency. It’s still delicious, just not quite as silky.
Extra Smoky Version: If you’re a smoke fiend like me, add 1/2 teaspoon of liquid smoke along with the spices. It intensifies the roasted, campfire quality of the Hatch chiles and makes the dip incredibly aromatic. Just go easy—liquid smoke is potent stuff.
Mild and Kid-Friendly: Use mild Hatch chiles (or substitute with roasted bell peppers) and skip the pickled jalapeño garnish. The smoked paprika still gives it a lovely depth without any heat. My niece devours this version by the bowlful.
Serving & Storage Suggestions
This queso is at its absolute best when it’s warm and freshly made, but there are ways to enjoy it beyond that first glorious dip.
Serving: Serve the queso hot, directly from the pot or transferred to a warmed serving bowl. I like to set it out with a big platter of sturdy tortilla chips (the scoop-shaped ones are perfect for this), along with bowls of fresh pico de gallo, guacamole, and pickled jalapeños for people to customize their own bites. It also works wonders as a nacho topping, drizzled over tacos, or even as a sauce for roasted vegetables. If you’re feeling extra, crumble some cotija cheese and sprinkle chopped cilantro on top right before serving.
Storage: If you have leftovers (which is rare in my house), let the queso cool completely, then transfer it to an airtight container. It will keep in the refrigerator for up to 4 days. The texture will thicken significantly as it cools, almost like a cheese spread. Don’t worry—that’s normal.
Reheating: The best way to reheat queso is in a small saucepan over very low heat, stirring constantly. Add a splash of evaporated milk or water to loosen it up as it warms. You can also microwave it in 30-second bursts, stirring between each interval, but be careful not to overheat it or it will separate. I’ve found that a low-and-slow stovetop reheat gives the most reliable results. The flavor actually deepens overnight, so leftovers can taste even better the next day—if you can resist eating it all in one sitting.
Nutritional Information & Benefits
Let’s be real: this is a cheese dip, not a salad. But that doesn’t mean it can’t fit into a balanced lifestyle. Here’s the breakdown for a standard serving size (about 1/4 cup).
| Nutrient | Amount per Serving |
|---|---|
| Calories | 180 |
| Total Fat | 14g |
| Saturated Fat | 9g |
| Cholesterol | 45mg |
| Sodium | 520mg |
| Total Carbohydrates | 5g |
| Dietary Fiber | 0g |
| Sugars | 3g |
| Protein | 9g |
| Calcium | 250mg (20% DV) |
The Hatch chiles themselves are a great source of vitamin C and capsaicin, which has anti-inflammatory properties. The cheese provides a solid amount of protein and calcium, which is good for bone health. If you’re watching your sodium, you can use a low-sodium cheese and skip the added salt—just know the flavor will be a little less punchy. This recipe is naturally gluten-free and can be made low-carb by serving it with celery sticks or cucumber slices instead of chips. For a lighter option, you can use reduced-fat cheese and swap the evaporated milk for a lower-fat version, though the texture won’t be quite as luxurious.
Conclusion
This Smoky Roasted Hatch Chili Queso Dip is more than just a recipe—it’s the kind of thing that turns a regular night into something a little more fun. It’s forgiving, it’s fast, and it delivers way more flavor than a 10-minute dip has any right to. I love how it brings people together, how everyone huddles around the bowl with a chip in hand, talking and laughing and reaching for just one more scoop. That’s the magic of good queso, and this one delivers every single time. I encourage you to make it your own—tweak the heat level, add your favorite mix-ins, serve it with whatever you love. And when you do, come back and let me know how it turned out. Drop a comment below, share a photo, tell me if you added chorizo or kept it classic. I genuinely love hearing about your kitchen victories. Now go grab those chips and get melting—you’ve got a bowl of something amazing waiting for you.
Frequently Asked Questions
Can I use pre-shredded cheese for this recipe?
I really don’t recommend it. Pre-shredded cheese is coated with anti-caking agents like cellulose or potato starch, which prevent it from melting smoothly. You’ll end up with a grainy, clumpy queso instead of that silky texture we’re after. Buy a block and shred it yourself—it takes two extra minutes and makes a world of difference.
Where can I find Hatch chiles if I don’t live near New Mexico?
Many major grocery stores now carry frozen Hatch chiles in the freezer section, especially during the late summer harvest season. You can also find them online from retailers like Amazon or specialty Southwest food stores. If you absolutely can’t find them, roasted Anaheim chiles or canned green chiles are acceptable substitutes, though the flavor won’t be quite as complex.
How do I keep my queso from getting thick and clumpy as it sits?
Queso naturally thickens as it cools because the cheese proteins tighten up. The best way to keep it dippable for longer is to serve it in a small slow cooker or a fondue pot set to the lowest warm setting. You can also stir in a splash of evaporated milk or water every 15-20 minutes to maintain the right consistency.
Can I make this queso in a slow cooker?
Absolutely. Add all the ingredients to a small slow cooker and cook on low for about 1 hour, stirring occasionally until everything is melted and smooth. This is a great hands-off method for parties. Just keep it on the warm setting for serving, and stir it every 30 minutes or so to prevent a skin from forming on top.
My queso turned out grainy. What went wrong?
Grainy queso is usually caused by one of three things: the heat was too high and the cheese proteins seized, the cheese was pre-shredded, or you added the cheese too quickly. If this happens, try whisking in a teaspoon of cornstarch dissolved in a tablespoon of cold water over very low heat. You can also try blending it with an immersion blender to smooth out the texture.
Pin This Recipe!

Smoky Roasted Hatch Chili Queso Dip: Easy 10-Min Recipe

This Smoky Roasted Hatch Chili Queso Dip is a quick and easy 10-minute recipe that delivers a creamy, smoky, and slightly spicy flavor. Perfect for game days, taco nights, or any occasion, it uses simple ingredients and a foolproof technique for a smooth, velvety texture.
- Prep Time: 5 minutes
- Cook Time: 5 minutes
- Total Time: 10 minutes
- Yield: 4 servings 1x
- Category: Appetizer
- Cuisine: Mexican-American
Ingredients
- 1 pound white American cheese, cut into small cubes (from the deli counter, not individually wrapped slices)
- 1 cup evaporated milk (whole milk works too, but evaporated gives signature creaminess)
- 1 cup roasted Hatch chiles, chopped (fresh or frozen, mild or hot)
- 1/2 teaspoon smoked paprika
- 1/4 teaspoon garlic powder
- 1/4 teaspoon onion powder
- 1/4 teaspoon ground cumin
- 1/2 teaspoon kosher salt, or to taste
- 1 tablespoon unsalted butter (optional, but adds richness)
- Fresh cilantro, chopped, for garnish (optional)
- Pickled jalapeños, for serving (optional, for extra heat)
Instructions
- Prep the chiles: If using frozen roasted Hatch chiles, let them thaw slightly and roughly chop into small, bite-sized pieces. If fresh, roast under broiler until skin is blackened, steam in covered bowl for 10 minutes, then peel and chop. Set aside in a small bowl with smoked paprika, garlic powder, onion powder, cumin, and salt.
- Start melting: Place medium saucepan over low heat. Add evaporated milk and butter (if using). Warm for about 2 minutes, stirring occasionally, until warm but not simmering.
- Add cheese gradually: Add cubed white American cheese to warm milk, a handful at a time, stirring constantly. Let each addition melt almost completely before adding next. This takes about 4-5 minutes.
- Incorporate chiles and spices: Once all cheese is melted and mixture is smooth and glossy, add bowl of chopped chiles and spices. Stir until evenly distributed. Cook for another 1-2 minutes until chiles are heated through and flavors meld.
- Taste and adjust: Dip a chip and taste. Add more salt if needed. For more heat, stir in liquid from pickled jalapeños or a pinch of cayenne.
- Serve immediately: Transfer to serving bowl or keep in saucepan. Garnish with fresh cilantro and pickled jalapeño slices if desired. Queso stays smooth and dippable for about 20-30 minutes at room temperature.
Notes
Do not let the mixture boil; low heat is essential to prevent separation. Cut cheese into uniform 1/2-inch cubes for even melting. Use room temperature cheese and evaporated milk if possible. If queso becomes grainy, whisk in 1 teaspoon cornstarch dissolved in 1 tablespoon cold water over very low heat, or use an immersion blender to smooth. For a dairy-free version, use plant-based melting cheese and full-fat oat milk, but results may vary.
Nutrition
- Serving Size: 1/4 cup
- Calories: 180
- Sugar: 3
- Sodium: 520
- Fat: 14
- Saturated Fat: 9
- Carbohydrates: 5
- Protein: 9
Keywords: queso, Hatch chile, cheese dip, smoky, easy, 10-minute, appetizer, game day, taco night



