Love this? Save it for later!
Share the inspiration with your friends
“You know that feeling when your kid comes home from school, and instead of the usual energy burst, they’re dragging their feet, complaining about their joints?” That was my Tuesday afternoon last fall. I was packing what I thought was a normal lunchbox for my daughter, Mia, who’s been dealing with juvenile arthritis for a couple of years now. Honestly, I was frustrated—there’s so much conflicting advice out there about what foods actually help with inflammation, especially for kids.
One afternoon, while grabbing groceries at a local co-op, I struck up a conversation with a kindly nutritionist named Lisa. She didn’t just preach the usual “eat your veggies” spiel. Instead, she shared some surprisingly simple tips about anti-inflammatory foods that could be packed right into a lunchbox. I wasn’t expecting a quick fix, but I figured, why not try?
Fast forward a few weeks of trial and error—sometimes forgetting the olives, sometimes accidentally swapping blueberries for grapes—and I noticed a small but steady change. Mia’s energy was up, and those afternoon complaints were fewer. These healthy anti-inflammatory lunch boxes became my secret weapon, balancing kid-friendly flavors with arthritis relief benefits. So, let me tell you about these 5 easy recipes that could make a difference in your child’s day, too.
Why You’ll Love This Recipe
After testing numerous combos and adjusting ingredients to suit picky palates, these healthy anti-inflammatory lunch boxes have become a staple in my kitchen. Whether you’re juggling work, school runs, or just looking for a way to support your child’s joint health, these recipes hit the sweet spot between nutrition and kid-friendly taste.
- Quick & Easy: Each lunchbox idea comes together in under 20 minutes, making them perfect for busy mornings or last-minute packing.
- Simple Ingredients: You don’t need to hunt for exotic items—most ingredients are pantry staples or found in your local supermarket.
- Perfect for School Days: These lunch boxes keep well and are designed to stay fresh until lunchtime, making them ideal for busy school schedules.
- Crowd-Pleaser: Kids love the familiar flavors with a subtle twist, so you won’t hear complaints about “weird” ingredients.
- Unbelievably Delicious: The combination of textures and flavors is comforting yet vibrant, balancing health benefits without sacrificing taste.
What sets these recipes apart? A special focus on anti-inflammatory ingredients like turmeric-spiced hummus, omega-3 rich walnuts, and antioxidant-packed berries. Plus, the careful balance of flavors means kids won’t feel like they’re eating “medicine.” Honestly, it’s the kind of lunch that makes you close your eyes after the first bite and say, “Yes, please!”
What Ingredients You Will Need
This recipe collection features wholesome, natural ingredients that support inflammation reduction while being tasty and familiar to kids. You’ll find many staples here, along with some easy-to-find superfoods.
- For the Protein:
- Cooked chicken breast, shredded or cubed (great for lean protein)
- Chickpeas, cooked or canned (a fiber-rich plant-based option)
- Salmon flakes or canned wild-caught salmon (rich in omega-3 fatty acids)
- Plain Greek yogurt (I recommend Fage or Chobani for creaminess)
- For the Veggies & Fruits:
- Baby carrots, sliced cucumbers, and cherry tomatoes (fresh, crunchy choices)
- Blueberries, strawberries, or pomegranate seeds (seasonal berries add antioxidants)
- Avocado, mashed or sliced (adds healthy fats and creamy texture)
- Spinach or kale leaves (mild flavor, packed with vitamins)
- For the Grains & Snacks:
- Whole-grain pita bread or whole-wheat wraps (fiber-rich and filling)
- Brown rice cakes or quinoa (gluten-free options)
- Walnuts or almonds (anti-inflammatory nuts; chop finely for easy eating)
- Hummus, ideally homemade or store-bought with minimal additives
- For Flavor Boosters & Seasonings:
- Turmeric powder (helps reduce inflammation; blend with a pinch of black pepper for absorption)
- Fresh lemon juice (brightens flavors and adds vitamin C)
- Ground cinnamon (adds subtle sweetness and antioxidant properties)
- Extra virgin olive oil (use for drizzling or mixing into dips)
Substitution tips: If your kiddo has nut allergies, swap walnuts for pumpkin seeds or sunflower seeds. For dairy-free options, coconut yogurt works well in place of Greek yogurt. And if fresh berries aren’t in season, frozen berries thawed gently still pack plenty of punch.
Equipment Needed
Luckily, packing these healthy anti-inflammatory lunch boxes doesn’t require fancy kitchen gear. Here’s what you’ll want on hand:
- A sharp chef’s knife and a sturdy cutting board – these are essential for quick veggie prep and slicing fruits.
- Mixing bowls for tossing salads or blending hummus. I prefer glass or stainless steel for easy cleanup.
- Measuring spoons and cups to keep your seasoning balanced, especially when working with turmeric and spices.
- A small food processor or blender if you want to make your own hummus or creamy dressings (optional but handy).
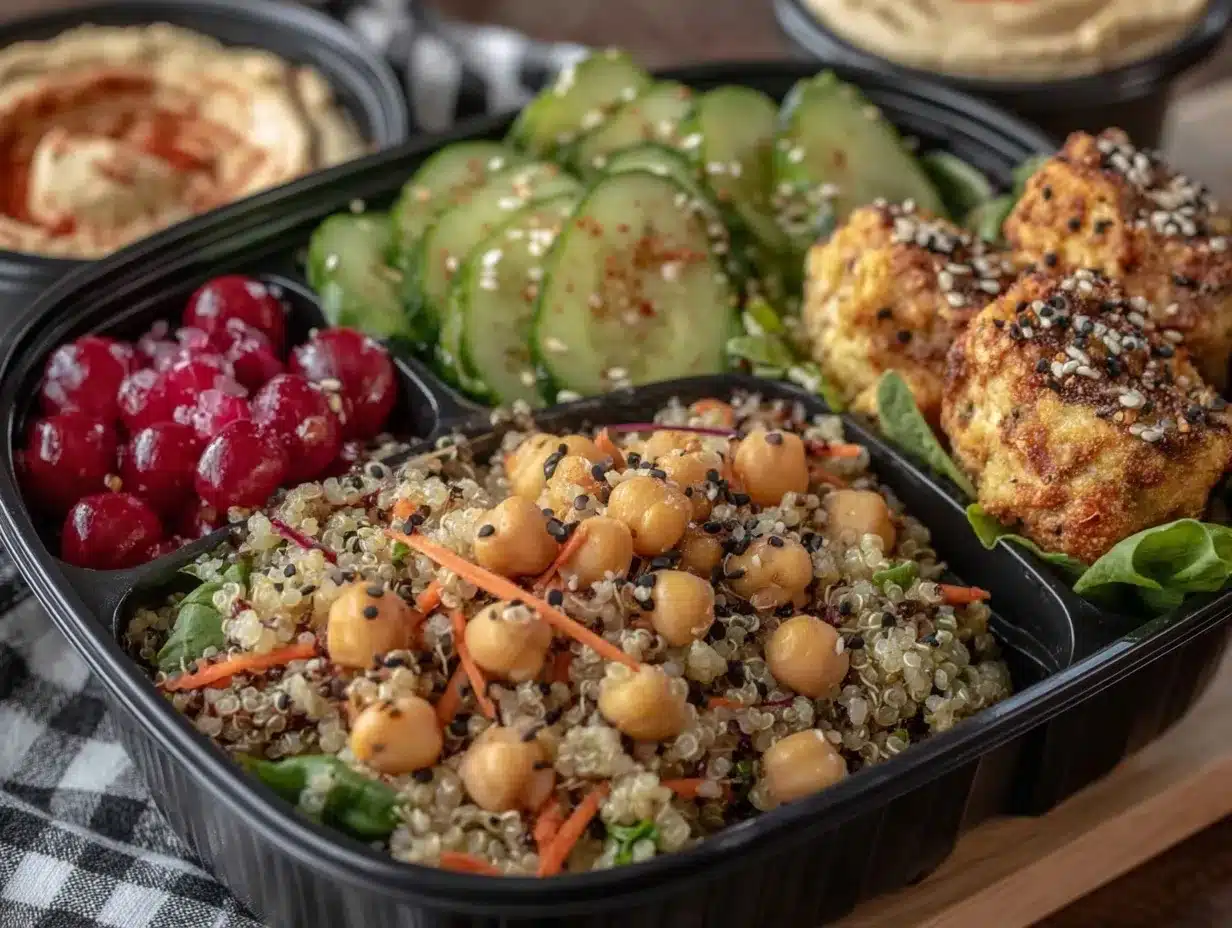
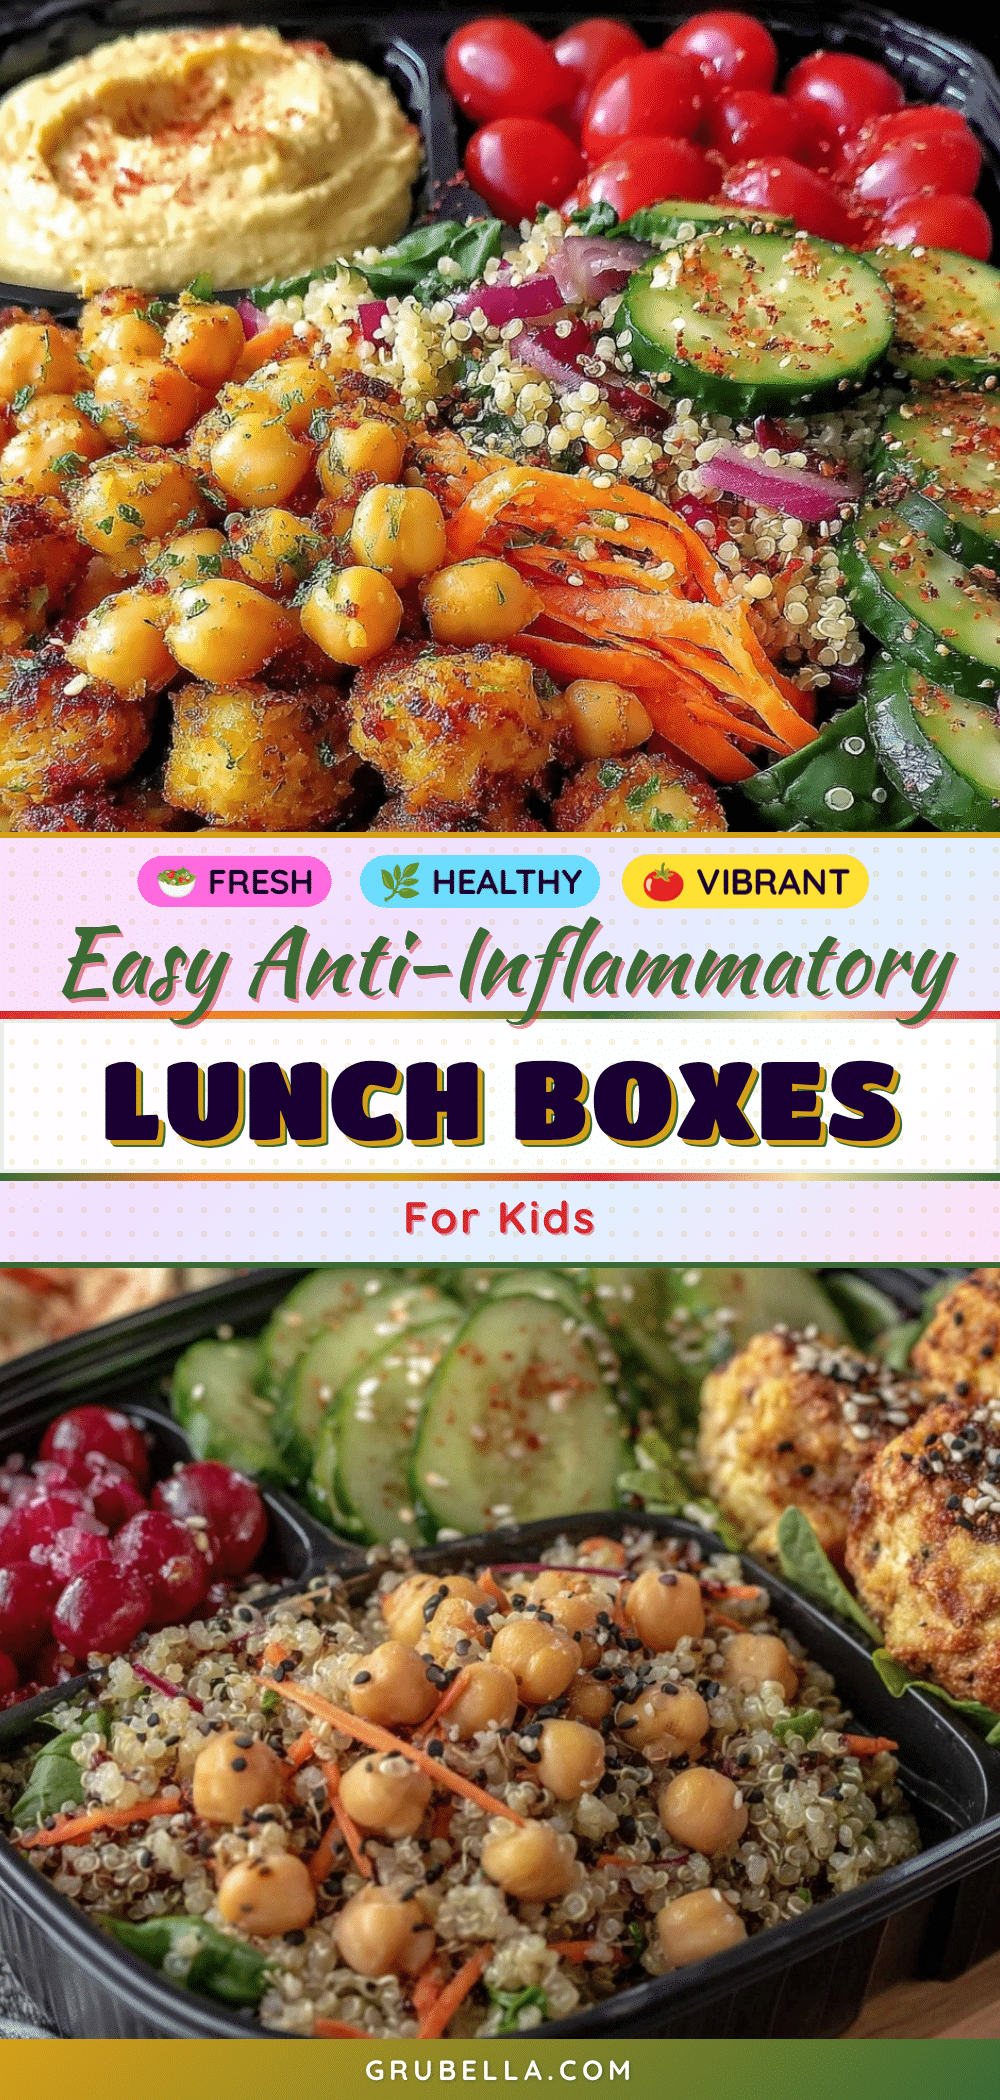
- Lunch containers with compartments or bento boxes to keep ingredients separate and fresh until lunchtime.
For budget-friendly options, simple plastic containers with tight-fitting lids work great. I’ve found that investing in a good quality insulated lunch bag helps maintain freshness, especially during warmer months. And don’t forget a reusable ice pack to keep those berries and greens crisp!
Preparation Method
- Cook and Prep Proteins (15 minutes):
Start by shredding cooked chicken breast or draining and rinsing chickpeas. If using canned salmon, remove any large bones and flake the fish gently. This step ensures your protein is ready to mix or pack. - Prepare Veggies and Fruits (10 minutes):
Wash baby carrots, cherry tomatoes, and berries thoroughly. Slice cucumbers into sticks and halve the cherry tomatoes. For greens like spinach or kale, remove tough stems and gently pat dry. - Make Turmeric Hummus (optional, 10 minutes):
In a food processor, blend 1 can of chickpeas (drained), 2 tablespoons olive oil, 1 teaspoon turmeric, 1 tablespoon lemon juice, 1 garlic clove, and a pinch of salt until smooth. Add water 1 tablespoon at a time if needed for creaminess. This adds a lovely anti-inflammatory twist. - Assemble Lunch Boxes (5-7 minutes):
Layer the components in your lunch container: a scoop of turmeric hummus or Greek yogurt dip, a handful of fresh veggies, a serving of protein (chicken, salmon, or chickpeas), some berries or fruit, and a small portion of nuts or seeds. - Add Grains and Wraps:
Include a whole-grain pita pocket or wrap filled with avocado and greens, or a rice cake topped with almond butter and sliced strawberries to round out the meal. - Final Touches and Storage:
Drizzle a little olive oil over greens or sprinkle cinnamon on fruit for extra flavor. Seal containers tightly and store with an ice pack to keep everything fresh until lunchtime.
Tip: If you’re prepping for the week, keep dressings or dips separate and add them just before eating to avoid sogginess. I learned this the hard way after a soggy spinach fiasco—lesson definitely learned!
Cooking Tips & Techniques
One trick I swear by is mixing turmeric with a pinch of black pepper to boost absorption—kids won’t even notice the difference, but their joints just might thank you.
When making homemade hummus, don’t overblend; you want a bit of texture for a fun mouthfeel rather than a paste that feels too heavy. If texture is tricky for your child, smooth it out with a little extra olive oil or water.
Keep berries and delicate fruits chilled until packing time to prevent them from turning mushy. For that crisp snap in veggies, soak carrot sticks in ice water for 10 minutes before packing.
And here’s a personal tip: always double-check your lunchboxes before sealing. I once forgot the protein in a rush, and the disappointment was real. Now, I have a mental checklist, and it saves me from those mini panics.
Lastly, multitasking helps—while chicken is cooking, prep your veggies and make the hummus. It cuts down total time and keeps the kitchen less chaotic.
Variations & Adaptations
Kids’ tastes and dietary needs vary, so here are some ways to switch things up:
- Gluten-Free Option: Swap whole-grain wraps for gluten-free tortillas or lettuce leaves as wraps. Quinoa salad replaces grains nicely.
- Vegan Adaptation: Use chickpeas or lentils as the protein base, replace Greek yogurt with coconut yogurt, and use nut or seed butters instead of dairy-based spreads.
- Seasonal Flavors: In summer, swap pomegranate seeds for watermelon cubes or fresh peaches, and in winter, opt for roasted root vegetables like sweet potatoes.
- Spice Level: For older kids who enjoy a little kick, add a dash of mild smoked paprika or cumin to the hummus or chicken seasoning.
- Personal Favorite Variation: I once made a “rainbow lunchbox” with layers of colorful veggies, turmeric hummus, and grilled chicken strips that Mia proudly took to school and beamed about all day. It’s a fun way to encourage picky eaters!
Serving & Storage Suggestions
Serve these lunch boxes chilled or at room temperature, depending on your child’s preference. The flavors actually deepen after resting a bit, especially the turmeric hummus and lemon-dressed greens.
Pair the lunch box with a refreshing drink like infused water with cucumber or lemon slices to keep hydration up without added sugar. If you want a sweet finish, a small container of fresh berries or a homemade chia pudding works wonders.
Store lunch boxes in the refrigerator overnight or use an insulated lunch bag with an ice pack for daytime freshness. Most components hold well for up to 24 hours, but avocado may brown; a squeeze of lemon juice helps slow this down.
For reheating, if using warm grains or proteins, a quick zap in the microwave (about 30 seconds) works. Avoid reheating delicate veggies or yogurt-based dips to keep textures intact.
Nutritional Information & Benefits
Each lunch box is thoughtfully balanced to provide essential nutrients:
- Protein: Supports growth and repair, crucial for active kids managing arthritis.
- Omega-3 Fatty Acids: Found in salmon and walnuts, these fats help reduce inflammation naturally.
- Antioxidants: Berries and leafy greens provide vitamins A, C, and E, which benefit immune function and joint health.
- Fiber: Whole grains and legumes aid digestion and help maintain steady energy levels throughout the day.
These lunch boxes are naturally gluten-free (when using gluten-free grains) and low in added sugars, making them suitable for kids with various dietary needs. Avoiding processed ingredients helps reduce inflammatory triggers and supports overall wellness.
Conclusion
These healthy anti-inflammatory lunch boxes are more than just meals—they’re small daily acts of care for your child’s well-being. I love how easy they are to prepare and how they bring a little extra comfort and strength to Mia’s school days. You might find yourself tweaking the ingredients to match your kid’s favorites or kitchen stock, and that’s the beauty of it—flexibility without compromise.
Give these recipes a try and see if they bring a bit more ease to your afternoons. And hey, if you adapt them or have your own twists, I’d love to hear about it in the comments. After all, we’re all in this journey together, making meals that nourish both body and soul.
Now, time to pack that lunchbox with a little love and a lot of goodness!
FAQs
Can these lunch boxes be made ahead for the whole week?
Yes, most components can be prepped a day or two in advance. Keep dressings and avocado separate until serving to maintain freshness.
Are these recipes suitable for kids with nut allergies?
Definitely! You can substitute nuts with seeds like pumpkin or sunflower seeds to keep the anti-inflammatory benefits without the allergy risk.
How can I make these lunches more appealing to picky eaters?
Try involving your child in choosing fruits or veggies and use fun containers or colorful presentations. Mixing familiar flavors with a slight twist often helps too.
Is turmeric safe for children to eat regularly?
In moderate amounts like those used in these recipes, turmeric is generally safe and beneficial. However, if your child is on medication, check with a healthcare provider first.
Can I freeze any of these lunch box components?
Cooked proteins like chicken or salmon can be frozen ahead of time. Fresh fruits and veggies don’t freeze well for lunch use, but frozen berries can be thawed safely before packing.
Pin This Recipe!
Healthy Anti-Inflammatory Lunch Boxes for Kids

These easy-to-prepare lunch boxes combine kid-friendly flavors with anti-inflammatory ingredients to support joint health and energy for children, especially those managing arthritis.
- Prep Time: 15 minutes
- Cook Time: 0 minutes
- Total Time: 20 minutes
- Yield: 1 lunch box
- Category: Main Course
- Cuisine: American
Ingredients
- Cooked chicken breast, shredded or cubed
- Chickpeas, cooked or canned
- Salmon flakes or canned wild-caught salmon
- Plain Greek yogurt
- Baby carrots, sliced cucumbers, and cherry tomatoes
- Blueberries, strawberries, or pomegranate seeds
- Avocado, mashed or sliced
- Spinach or kale leaves
- Whole-grain pita bread or whole-wheat wraps
- Brown rice cakes or quinoa
- Walnuts or almonds, chopped finely
- Hummus (homemade or store-bought with minimal additives)
- Turmeric powder
- Fresh lemon juice
- Ground cinnamon
- Extra virgin olive oil
- Garlic clove
- Salt
- Black pepper (for turmeric absorption)
Instructions
- Cook and prep proteins: shred cooked chicken breast or drain and rinse chickpeas. Remove bones and flake canned salmon if using.
- Prepare veggies and fruits: wash baby carrots, cherry tomatoes, and berries. Slice cucumbers into sticks and halve cherry tomatoes. Remove tough stems from spinach or kale and pat dry.
- Make turmeric hummus (optional): blend 1 can chickpeas (drained), 2 tablespoons olive oil, 1 teaspoon turmeric, 1 tablespoon lemon juice, 1 garlic clove, and a pinch of salt until smooth. Add water 1 tablespoon at a time if needed for creaminess.
- Assemble lunch boxes: layer turmeric hummus or Greek yogurt dip, fresh veggies, protein (chicken, salmon, or chickpeas), berries or fruit, and nuts or seeds in lunch containers.
- Add grains and wraps: include whole-grain pita or wrap filled with avocado and greens, or a rice cake topped with almond butter and sliced strawberries.
- Add final touches and store: drizzle olive oil over greens or sprinkle cinnamon on fruit. Seal containers tightly and store with an ice pack to keep fresh until lunchtime.
Notes
Mix turmeric with a pinch of black pepper to boost absorption. Avoid overblending hummus for better texture. Keep berries and delicate fruits chilled until packing. Soak carrot sticks in ice water for 10 minutes before packing for crispness. Store dressings separately to avoid sogginess. Use lemon juice to prevent avocado browning. Reheat grains or proteins briefly if desired; avoid reheating delicate veggies or yogurt dips.
Nutrition
- Serving Size: 1 lunch box
- Calories: 40050
- Sugar: 8
- Sodium: 350
- Fat: 18
- Saturated Fat: 3
- Carbohydrates: 40
- Fiber: 8
- Protein: 25
Keywords: anti-inflammatory, kids lunch, arthritis relief, healthy lunch box, easy recipes, turmeric hummus, omega-3, gluten-free options, kid-friendly