Love this? Save it for later!
Share the inspiration with your friends
Introduction
“You know that feeling when you stumble upon something so simple yet so powerful it changes the way you think about food?” That was me on a drizzly Thursday afternoon at the local farmer’s market. I wasn’t hunting for anything specific, just a bag of carrots for a soup. But then I overheard a conversation—an elderly vendor chatting animatedly about the magic of fermented vegetable pickles for gut health. Honestly, I usually skim past pickles in the grocery aisle, but her passion was contagious.
She handed me a little jar, cracked open the lid, and the tangy, earthy scent hit me like a revelation. It wasn’t your typical vinegary pickle; this was alive, bubbling quietly with probiotics. That cracked ceramic pot on her stall reminded me of the cracked bowl I’d once dropped in my own kitchen, making a mess but learning something important about patience and transformation. I tucked that jar into my bag, thinking maybe this was exactly the gut reset I needed.
Since then, I’ve played around with my own versions of healthy fermented vegetable pickles, adjusting the salt, experimenting with spices, and watching the jars bubble on the windowsill. Maybe you’ve been there, curious but intimidated by the idea of fermenting at home. Let me tell you, it’s less science lab, more kitchen alchemy—easy, rewarding, and honestly, a bit addictive. This recipe stayed with me because it’s not just about pickles; it’s about nourishing your body, honoring tradition, and enjoying the kind of tangy crunch that feels like a celebration in your mouth.
Why You’ll Love This Recipe
From my kitchen trials and countless tastings, I can say this recipe is a keeper. It’s been tested by friends, family, and my own sometimes impatient self. Here’s why it’s so worth your time:
- Quick & Easy: The prep takes under 20 minutes, and then you just let nature do its thing while you get on with life.
- Simple Ingredients: No mysterious additives or weird powders—just fresh veggies, salt, and a few spices you probably already have.
- Perfect for Gut Health: Loaded with naturally occurring probiotics that support digestion and overall wellness.
- Crowd-Pleaser: Whether it’s a potluck or a family dinner, these pickles bring a bright, crunchy pop everyone asks about.
- Unbelievably Delicious: That perfect balance of tangy, salty, and a hint of spice makes these pickles a standout side or snack.
What makes this recipe different? It’s the little touches—the way the salt is measured to encourage the right fermentation, the choice of vegetables that create a colorful, textured jar, and the patient wait that brings out a complex flavor you won’t find in store-bought versions. I mean, it’s comfort food with a probiotic punch.
Plus, it’s flexible! You can tweak it based on what you have or your taste buds’ mood. I keep coming back to this recipe because it’s reliable, satisfying, and honestly, it feels like a small, daily act of self-care.
What Ingredients You Will Need
This recipe uses simple, wholesome ingredients to deliver bold flavor and a satisfying crunchy texture without fuss. Most are pantry staples or easy to find at your local market.
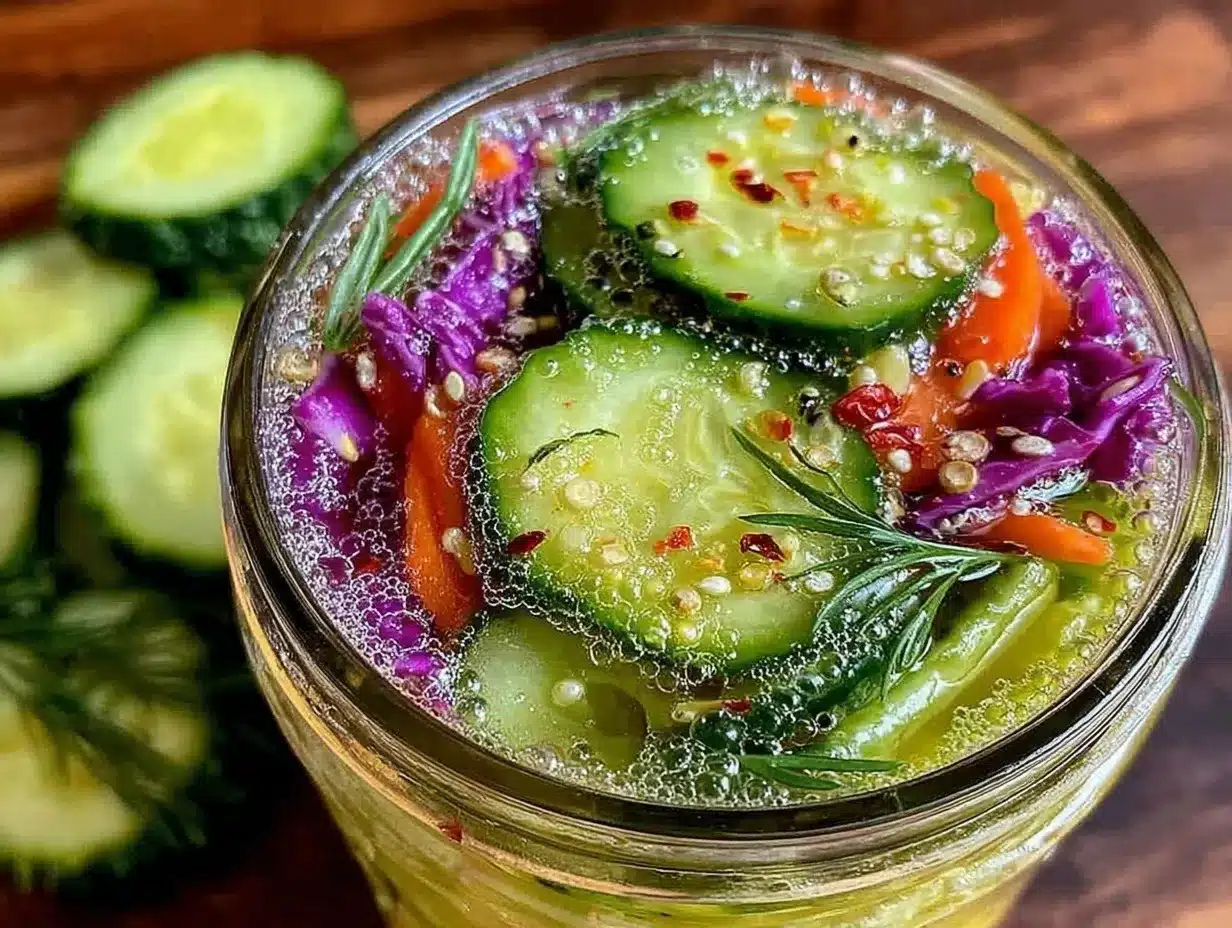
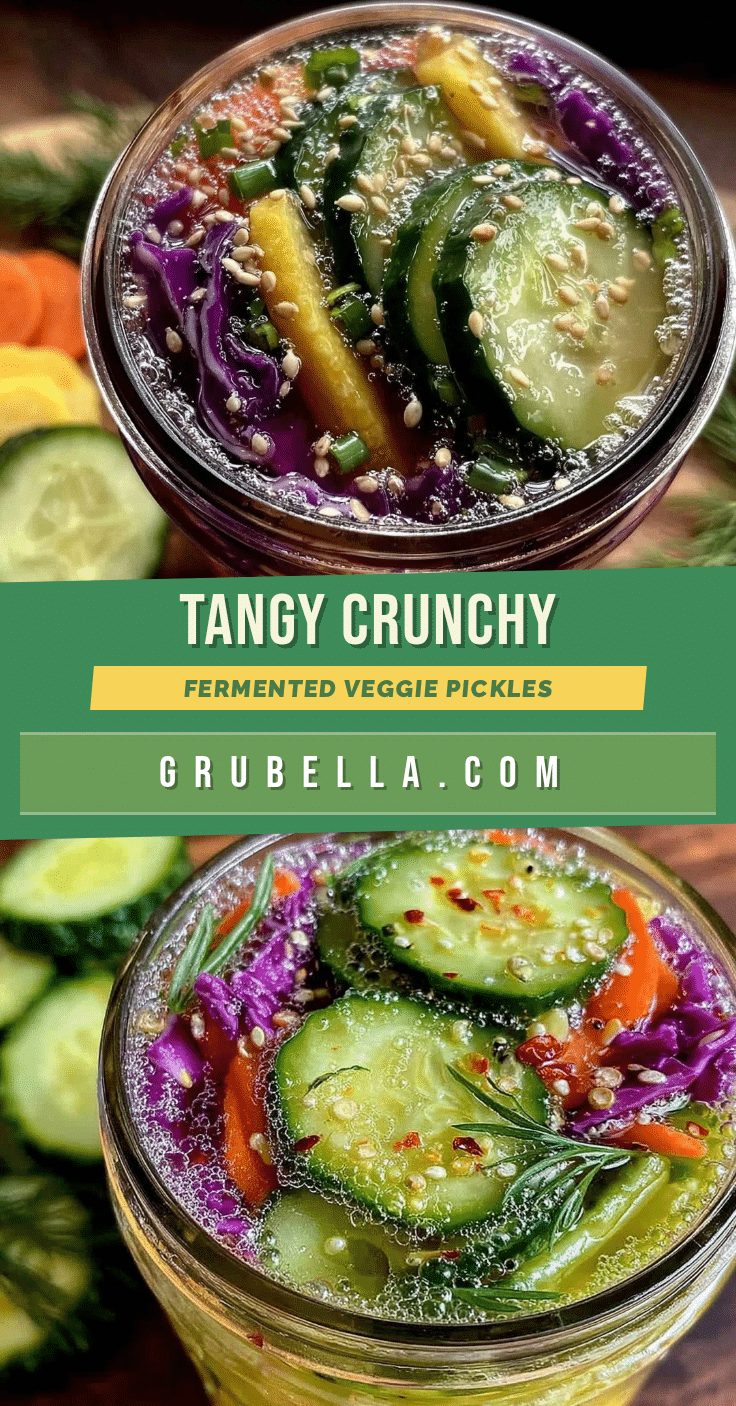
- Vegetables (about 1.5 pounds / 700 grams total):
- Carrots, peeled and cut into sticks (adds natural sweetness and crunch)
- Cucumber, sliced into spears (use firm, fresh cucumbers like Kirby)
- Cauliflower florets (small bites for texture contrast)
- Green beans, trimmed (optional for extra snap)
- Sea salt or kosher salt: 2 tablespoons (non-iodized salt is best for fermentation; I prefer Maldon when I can find it)
- Filtered water: 4 cups (950 ml) – chlorine-free water is important as chlorine can inhibit fermentation
- Garlic cloves: 3, smashed (for flavor depth and antimicrobial benefits)
- Dill sprigs: 3-4 (fresh is best, but dried works in a pinch)
- Black peppercorns: 1 teaspoon (whole, for gentle spice)
- Mustard seeds: 1 teaspoon (adds a subtle tang)
- Red pepper flakes: 1/4 teaspoon (optional, for a gentle heat kick)
Substitution tips: Feel free to swap any veggies with what’s in season—radishes, bell peppers, or even shredded cabbage work great. For a low-sodium option, reduce salt to 1 tablespoon but keep an eye on fermentation progress. If you want to exclude garlic, add a pinch of dried herbs like thyme or oregano for complexity.
Equipment Needed
- Glass fermentation jar: A 1-quart (1-liter) jar with a wide mouth is ideal. I’ve used both mason jars and specialized fermentation crocks. Mason jars with airlock lids are great for beginners.
- Weight: Something to keep veggies submerged—like a fermentation weight or a small, clean glass jar filled with water. Without this, your pickles can spoil.
- Mixing bowl: To toss vegetables and salt evenly before packing.
- Measuring spoons and cups: Precision matters when it comes to salt and spices.
- Clean cloth or coffee filter and rubber band: For covering the jar during the initial fermentation if you don’t have an airlock lid.
Personally, I started with basic mason jars because they’re budget-friendly and multipurpose, but if you plan to ferment often, investing in a set of glass weights and airlock lids makes the process smoother and less hands-on. Just remember to keep everything scrupulously clean to avoid unwanted bacteria.
Preparation Method
- Prepare your vegetables: Wash and dry all vegetables thoroughly. Cut carrots into sticks about 3 inches long, slice cucumbers into spears, break cauliflower into small florets, and trim green beans if using. This should take about 10 minutes.
- Make the brine: In a mixing bowl, dissolve 2 tablespoons (30 grams) of sea salt into 4 cups (950 ml) of filtered water. Stir until fully dissolved. This salt concentration creates the perfect environment for beneficial bacteria to thrive.
- Mix vegetables with salt: Place the chopped veggies in a large bowl, sprinkle with a pinch more salt (about 1/2 teaspoon), and toss gently. Let them sit for 5-10 minutes; this draws out excess water and starts softening the veggies slightly.
- Pack the jar: Firmly pack the vegetables into the glass jar, layering in garlic cloves, dill sprigs, peppercorns, mustard seeds, and optional red pepper flakes along the way. Press down with a wooden spoon or tamper to remove air pockets.
- Add the brine: Pour the salted water over the packed veggies until they are completely submerged. Leave at least 1 inch (2.5 cm) of headspace at the top of the jar.
- Weigh down the vegetables: Place a fermentation weight or a smaller jar filled with water on top to keep everything underwater. This is crucial to prevent mold growth.
- Cover and ferment: Cover the jar loosely with a cloth secured with a rubber band or use an airlock lid. Keep the jar at room temperature (65-75°F / 18-24°C) away from direct sunlight.
- Wait and watch: Fermentation will start within 2-3 days. You’ll notice bubbles and a tangy aroma. Taste the pickles daily after day 3; when the flavor hits your preferred balance of sour and crunchy (usually 5-10 days), transfer to the fridge.
Pro tip: If you see white scum (kahm yeast) on the surface, skim it off—it’s harmless. Avoid any fuzzy mold, which means something went wrong with the seal or salt ratio.
Cooking Tips & Techniques
Fermenting vegetables is part science, part art. Here are some tips that I’ve learned the hard way:
- Use non-iodized salt. Iodine can inhibit fermentation and lead to unpleasant flavors. Sea salt or kosher salt works best.
- Keep vegetables submerged. This is the #1 rule. Air exposure invites bad bacteria. I once forgot this step and ended up with a fuzzy top on my jar—lesson learned!
- Temperature matters. Too cool, and fermentation slows to a crawl. Too warm, and it speeds up too fast, risking mushy veggies. Aim for a cozy spot in your kitchen, like a cupboard away from heat sources.
- Patience pays off. Don’t rush the process. I know it’s tempting to open the jar early, but waiting at least 5 days gives that complex, tangy flavor.
- Experiment with spices. Once you get comfortable, try adding coriander seeds, bay leaves, or ginger slices for unique flavor profiles.
- Cleanliness is key. Wash your hands, jars, and tools thoroughly before starting. Contamination is rare but can spoil your batch.
Variations & Adaptations
This recipe is a great base to customize. Here are a few ways to switch things up:
- Spicy Kick: Add sliced jalapeños or increase red pepper flakes for a fiery version.
- Seasonal Veggie Swap: Use shredded cabbage and carrots for a quick sauerkraut-style pickle or add beets for color and earthiness.
- Low-Sodium Option: Reduce salt to 1 tablespoon and ferment longer, tasting often. Just be mindful of potential texture changes.
- Allergen-Friendly: The recipe is naturally gluten-free and vegan. For a probiotic boost, add a small amount of whey or use a starter culture if you want to speed fermentation.
- My personal twist: I sometimes add a handful of fresh ginger slices and a splash of apple cider vinegar post-fermentation for an extra zing and digestive aid.
Serving & Storage Suggestions
These fermented vegetable pickles are best enjoyed chilled or at room temperature. Serve them as a crunchy side with grilled meats, tossed into salads, or as a tangy snack on their own. They pair wonderfully with creamy dishes like creamy garlic hummus or alongside a hearty grain bowl.
Store your pickles in the refrigerator once fermentation reaches your preferred taste. They’ll keep well for up to 2 months, and the flavor will deepen over time—sometimes I find the pickles even more delicious after a couple of weeks. When reheating isn’t needed since these are eaten cold or room temp, just give the jar a good shake before serving to redistribute flavors.
Nutritional Information & Benefits
Fermented vegetable pickles are a fantastic source of probiotics, which support gut flora balance and digestion. They are low in calories, rich in vitamins A and C, and packed with fiber from the fresh veggies. This recipe is naturally gluten-free, vegan, and low-carb.
The garlic and dill add antioxidants and antimicrobial properties, while the fermentation process increases bioavailability of nutrients. Personally, I’ve noticed improved digestion and more regularity since making these a kitchen staple. Just keep in mind the sodium content if you’re watching salt intake.
Conclusion
Healthy fermented vegetable pickles are one of those recipes that feel like a small miracle—simple ingredients transformed into a delicious, gut-friendly powerhouse. Whether you’re new to fermentation or looking for a reliable recipe that balances flavor and health benefits, this one’s got you covered.
Feel free to customize it with your favorite veggies and spices, and don’t be afraid to experiment. I love this recipe because it connects me to a tradition that’s both ancient and totally relevant today—food that heals. If you try this recipe, I’d love to hear how it turned out or what twists you added. Share your experience and spread the crunchy, tangy love!
FAQs
- How long does it take to ferment vegetable pickles?
Usually 5-10 days at room temperature, depending on your taste preference and ambient temperature. - Can I use tap water for the brine?
It’s best to use filtered or distilled water since chlorine in tap water can slow fermentation. - What if I see mold on my pickles?
If it’s fuzzy or colored mold, discard the batch. White film (kahm yeast) is harmless and can be skimmed off. - Do I need special jars for fermenting?
No, a clean glass mason jar works great. Airlock lids or fermentation weights help but aren’t mandatory. - Can I ferment other vegetables using this method?
Absolutely! Most fresh veggies can be fermented similarly. Just adjust size and salt if needed.
Pin This Recipe!
Healthy Fermented Vegetable Pickles Recipe for Perfect Gut Health Boost
A simple and rewarding recipe for homemade fermented vegetable pickles that support gut health with natural probiotics, featuring fresh veggies and easy fermentation.
- Prep Time: 15 minutes
- Cook Time: 5 to 10 days (fermentation time)
- Total Time: 5 to 10 days and 15 minutes
- Yield: About 4 servings 1x
- Category: Side Dish
- Cuisine: Fermented / Gut Health
Ingredients
- 1.5 pounds (700 grams) mixed vegetables: carrots (peeled and cut into sticks), cucumber (sliced into spears), cauliflower florets, green beans (optional)
- 2 tablespoons sea salt or kosher salt (non-iodized, e.g., Maldon)
- 4 cups (950 ml) filtered, chlorine-free water
- 3 garlic cloves, smashed
- 3–4 dill sprigs (fresh or dried)
- 1 teaspoon black peppercorns (whole)
- 1 teaspoon mustard seeds
- 1/4 teaspoon red pepper flakes (optional)
Instructions
- Wash and dry all vegetables thoroughly. Cut carrots into 3-inch sticks, slice cucumbers into spears, break cauliflower into small florets, and trim green beans if using (about 10 minutes).
- In a mixing bowl, dissolve 2 tablespoons (30 grams) of sea salt into 4 cups (950 ml) of filtered water. Stir until fully dissolved to create the brine.
- Place chopped vegetables in a large bowl, sprinkle with about 1/2 teaspoon additional salt, and toss gently. Let sit for 5-10 minutes to draw out excess water and soften slightly.
- Firmly pack the vegetables into a clean glass fermentation jar, layering in garlic cloves, dill sprigs, peppercorns, mustard seeds, and optional red pepper flakes. Press down to remove air pockets.
- Pour the salted water brine over the packed vegetables until fully submerged, leaving at least 1 inch (2.5 cm) of headspace at the top of the jar.
- Place a fermentation weight or a smaller jar filled with water on top to keep vegetables submerged and prevent mold growth.
- Cover the jar loosely with a cloth secured with a rubber band or use an airlock lid. Keep the jar at room temperature (65-75°F / 18-24°C) away from direct sunlight.
- Fermentation will start within 2-3 days with bubbles and tangy aroma. Taste daily after day 3; when flavor reaches desired sourness and crunch (usually 5-10 days), transfer to refrigerator.
- If white scum (kahm yeast) appears, skim it off. Discard batch if fuzzy mold develops.
Notes
Use non-iodized salt to avoid inhibiting fermentation. Keep vegetables fully submerged to prevent mold. Maintain room temperature between 65-75°F (18-24°C). Patience is key; wait at least 5 days for best flavor. Skim off harmless kahm yeast if it appears. Customize with seasonal vegetables or spices like coriander, bay leaves, or ginger. For low sodium, reduce salt to 1 tablespoon and ferment longer.
Nutrition
- Serving Size: Approximately 1/2 cu
- Calories: 25
- Sugar: 2
- Sodium: 600
- Carbohydrates: 5
- Fiber: 2
- Protein: 1
Keywords: fermented pickles, vegetable pickles, gut health, probiotics, homemade pickles, fermented vegetables, healthy pickles, easy fermentation