Love this? Save it for later!
Share the inspiration with your friends
Introduction
“You won’t believe how I stumbled upon this crispy fried chicken recipe,” my friend Mark said one Saturday afternoon as we tackled a barbecue at his place. It wasn’t your usual kitchen chat; Mark is more into grilling steaks than frying anything. But that day, between the sizzle of burgers and the clink of cold drinks, he confessed that this fried chicken recipe came from an unlikely source—an old diner he used to work at during college. I remember watching him toss those golden pieces into the fryer, the crackling sound filling the air, and thinking, “This might actually be the best fried chicken I’ve ever seen.”
Honestly, I was skeptical at first. Fried chicken? At a diner known for pancakes? But as soon as I bit into that perfectly crispy, extra-crunchy coating that never turned soggy, I was hooked. The secret wasn’t just the seasoning, but the technique—five simple steps that anyone can follow to get that unmistakable crunch every single time. You know that feeling when you want fried chicken but dread the greasy, soggy aftermath? Well, this recipe changes the game.
Maybe you’ve been there—craving that crispy crunch but ending up with something limp and disappointing. Let me tell you, this recipe stayed with me because it’s foolproof and delivers exactly what fried chicken lovers dream about: crispy, juicy, and never soggy. So, if you’re ready to impress your next dinner guests or just treat yourself on a lazy weekend, stick around. I promise this recipe will become your new go-to for crispy fried chicken perfection.
Why You’ll Love This Recipe
This crispy fried chicken recipe is honestly a game changer. I’ve tried a dozen versions, and this one nails the balance between crunch and juiciness without that dreaded soggy coating. Here’s why it stands out:
- Quick & Easy: Comes together in under 45 minutes, perfect for busy weeknights or last-minute cravings.
- Simple Ingredients: No fancy or hard-to-find items. You likely already have everything in your pantry.
- Perfect for Gatherings: Whether it’s a casual family dinner or a weekend cookout, this crispy fried chicken steals the show.
- Crowd-Pleaser: Kids and adults rave about the crunch and flavor combo every time.
- Unbelievably Delicious: The secret 5-step method ensures a coating so crispy it practically sings when you bite into it.
What makes this recipe different from the rest? The layering of flavors and the double-dredge technique create a thicker, extra-crispy crust that locks in moisture. I’ve played around with many coatings, from cornflakes to panko, but this method uses a blend of seasoned flour and a light buttermilk soak that makes the chicken juicy inside but crispy all over. It’s comfort food done right—no soggy disappointments here.
Honestly, after that first bite, I found myself closing my eyes and savoring the crunch and tenderness. This isn’t just any fried chicken; it’s the kind that makes you want to keep coming back for more. Whether you’re a seasoned cook or a beginner, this recipe will become your trusty staple.
What Ingredients You Will Need
This recipe uses simple, wholesome ingredients to deliver bold flavor and satisfying texture without the fuss. Most of these are pantry staples, and substitutions are easy if needed.
- Chicken pieces: 3 pounds (about 1.4 kg) of bone-in, skin-on thighs and drumsticks (for best flavor and juiciness)
- Buttermilk: 2 cups (480 ml) (helps tenderize and adds tang)
- All-purpose flour: 2 cups (240 g) (forms the crispy coating)
- Cornstarch: 1/2 cup (60 g) (for extra crispiness)
- Seasoning blend:
- 2 teaspoons salt
- 1 teaspoon black pepper
- 1 teaspoon garlic powder
- 1 teaspoon onion powder
- 1/2 teaspoon smoked paprika (adds a subtle smoky depth)
- 1/2 teaspoon cayenne pepper (optional, for a mild kick)
- Vegetable oil or peanut oil: for frying (enough to fill your fryer or skillet about 2 inches deep)
- Baking powder: 1 teaspoon (helps the crust puff up and crisp)
Tip: I prefer King Arthur’s all-purpose flour for its consistent texture, but any brand works fine. Use full-fat buttermilk or a mix of milk and lemon juice if you’re out of buttermilk. For a gluten-free option, swap all-purpose flour with a blend of rice flour and cornstarch (though results vary slightly).
Equipment Needed

- Large mixing bowls: for marinating and dredging (glass or stainless steel preferred to avoid reaction with acidic buttermilk)
- Deep fryer or large heavy-bottomed skillet: for frying chicken (cast iron skillets work beautifully)
- Thermometer: a reliable deep-fry or candy thermometer to monitor oil temperature (crucial for crispy success)
- Tongs: for safely handling chicken pieces
- Wire cooling rack: to rest fried chicken and keep it from steaming on paper towels (this keeps it crispy longer)
- Paper towels: for initial oil absorption
If you don’t have a deep fryer, a large cast iron skillet works just as well. Just be sure to monitor oil temperature carefully. I once tried frying in a shallow pan without a thermometer and ended up with greasy chicken—lesson learned! Investing in a simple thermometer (under $15) makes all the difference.
Preparation Method
- Marinate the chicken: In a large bowl, combine the chicken pieces with buttermilk and 1 teaspoon of salt. Toss to coat completely. Cover and refrigerate for at least 2 hours, preferably overnight. This tenderizes the meat and infuses flavor. (If you’re short on time, even 30 minutes helps.)
- Prepare the seasoned flour: In another large bowl, whisk together the all-purpose flour, cornstarch, remaining salt, pepper, garlic powder, onion powder, smoked paprika, cayenne pepper (if using), and baking powder. This mix will give you that extra crispy texture.
- Dredge the chicken: Remove chicken from the buttermilk marinade, letting excess drip off. Coat each piece thoroughly in the seasoned flour mix, pressing gently so the coating sticks well. For extra crunch, dip the coated chicken back into the buttermilk briefly and dredge again in the flour mix for a double coating.
- Heat the oil: Pour oil into your fryer or skillet to about 2 inches depth. Heat to 350°F (175°C). Use your thermometer to keep the temperature steady — too hot and the crust burns, too low and the chicken absorbs oil and gets soggy.
- Fry the chicken: Carefully lower the chicken pieces into the hot oil, working in batches to avoid overcrowding. Fry for 12-15 minutes, turning halfway through, until golden brown and internal temperature reaches 165°F (74°C). Drain on a wire rack over paper towels.
Pro tip: Don’t rush the frying. Keeping the temperature consistent is key. If you don’t have a thermometer, test with a small piece of bread—it should brown in about 60 seconds. And yes, a wire rack is your best friend here to keep that crust from steaming and going limp.
Cooking Tips & Techniques
Getting that perfect extra crispy fried chicken isn’t just about following a recipe; it’s about the little details you learn through trial and error. Here’s what I’ve picked up:
- Buttermilk soak: It’s not just for flavor—it tenderizes the chicken and helps the coating stick better. Don’t skip or rush this step.
- Double dredging: The second dip in buttermilk and flour creates a thicker crust that stays crispy longer.
- Oil temperature matters: Use a thermometer. Between 325°F and 350°F (160-175°C) is ideal. Too hot burns the crust; too cool means oily, soggy chicken.
- Don’t overcrowd the pan: Fry in batches to keep the oil temperature stable.
- Rest on a wire rack: Paper towels alone trap steam and soften the crust. The rack lets air circulate around the chicken.
- Patience is key: Resist the urge to flip or move pieces too often. Let them form a golden crust before turning.
I once tried skipping the cornstarch and baking powder, thinking flour alone would do. Big mistake—the crust was flat and soft after cooling. Adding those two was a revelation for that satisfying crunch. Also, frying the night before? Not recommended. Crispy fried chicken is best fresh but can be gently reheated in a hot oven to bring back some crisp.
Variations & Adaptations
This crispy fried chicken recipe is a great base that you can tweak to suit different tastes and dietary needs.
- Spicy version: Add extra cayenne pepper or crushed red pepper flakes to the flour mix for a fiery kick. I once made this for a game day party, and the spicy batch disappeared first.
- Gluten-free: Swap all-purpose flour with a gluten-free blend and use rice flour instead of cornstarch. The texture will be slightly different but still delicious.
- Oven-fried: For a lighter twist, bake the double-dredged chicken on a wire rack at 425°F (220°C) for about 35-40 minutes, flipping halfway. It won’t be quite as crispy as deep-fried but still satisfying.
- Herb-infused coating: Mix dried thyme, oregano, or rosemary into the flour for a fragrant, savory note.
- Dairy-free: Replace buttermilk with a mixture of almond milk and 1 tablespoon vinegar or lemon juice.
Serving & Storage Suggestions
This crispy fried chicken shines best when served fresh and hot. Plate it alongside classic sides like creamy coleslaw, buttery mashed potatoes, or even a tangy cucumber salad for balance. A cold lemonade or iced tea pairs beautifully with the rich flavors.
Leftovers? Store them in an airtight container in the refrigerator for up to 3 days. To keep that crispiness, reheat chicken on a wire rack in a 375°F (190°C) oven for 10-15 minutes rather than using the microwave, which makes it soggy.
When cooled completely, you can freeze leftover fried chicken wrapped tightly in foil and placed in a freezer bag for up to 2 months. Reheat straight from frozen in the oven to preserve texture.
Fun fact: The flavors actually meld nicely overnight, but the crunch will be less intense. That’s when reheating right becomes your secret weapon.
Nutritional Information & Benefits
Here’s a rough estimate per serving (based on 1 piece of chicken):
| Calories | 350-400 kcal |
|---|---|
| Protein | 28g |
| Fat | 22g (mostly from frying oil and skin) |
| Carbohydrates | 12g |
| Sodium | 600mg (mainly from seasoning) |
This recipe offers a good protein boost, especially if you choose dark meat like thighs and drumsticks, which also have iron and zinc. With some tweaks, like using healthier oils or baking, it can fit into various diet plans. Just a heads up: it contains gluten and dairy, so swap accordingly if you have allergies.
Personally, I think fried chicken is pure comfort food—sometimes you just need that crispy, satisfying bite. Treat it as an occasional indulgence balanced with wholesome meals throughout the week.
Conclusion
This crispy fried chicken recipe is a keeper, hands down. It’s surprisingly simple, relies on straightforward ingredients, and the results are that perfect crunch with juicy meat inside. I love how the five-step method takes away the guesswork and delivers consistent, mouthwatering results every time.
Feel free to tweak the spices or try the variations to make it your own. Honestly, once you get this right, it’ll be hard to go back to soggy fried chicken. I hope you enjoy making (and eating!) this as much as I do.
If you try this recipe, please share your experience or any twists you’ve added—I love hearing how it works out in your kitchen. Now go on, get frying and savor every crispy bite!
FAQs
How do I keep fried chicken crispy after frying?
Rest the chicken on a wire rack instead of paper towels to avoid steam buildup. Also, avoid overcrowding the pan to keep oil temperature steady.
Can I use boneless chicken for this recipe?
Yes, but cooking time will be shorter, around 8-10 minutes. Be careful not to overcook to keep it juicy.
What’s the best oil for frying chicken?
Peanut oil and vegetable oil are great choices due to their high smoke points and neutral flavor.
Can I prepare the chicken ahead of time?
You can marinate the chicken in buttermilk overnight but dredge and fry just before serving for maximum crispiness.
Why is my fried chicken soggy?
Common reasons include oil temperature being too low, overcrowding the pan, or resting chicken on paper towels which trap steam. Using a wire rack and monitoring oil temp helps a lot.
Pin This Recipe!

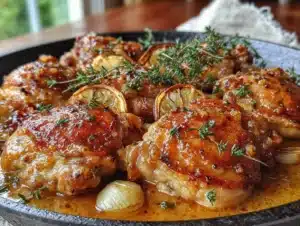
Crispy Fried Chicken Recipe Easy 5 Steps for Extra Crispy Never Soggy Chicken

This crispy fried chicken recipe delivers a perfectly crunchy, juicy coating that never turns soggy, using a simple five-step method anyone can follow for foolproof results.
- Prep Time: 10 minutes (plus 2 hours to overnight marinating)
- Cook Time: 12-15 minutes per batch
- Total Time: Approximately 2 hours 30 minutes (including marinating)
- Yield: 6-8 servings 1x
- Category: Main Course
- Cuisine: American
Ingredients
- 3 pounds bone-in, skin-on chicken thighs and drumsticks
- 2 cups buttermilk
- 2 cups all-purpose flour
- 1/2 cup cornstarch
- 2 teaspoons salt (divided)
- 1 teaspoon black pepper
- 1 teaspoon garlic powder
- 1 teaspoon onion powder
- 1/2 teaspoon smoked paprika
- 1/2 teaspoon cayenne pepper (optional)
- 1 teaspoon baking powder
- Vegetable oil or peanut oil for frying (enough to fill fryer or skillet about 2 inches deep)
Instructions
- Marinate the chicken: In a large bowl, combine chicken pieces with buttermilk and 1 teaspoon salt. Toss to coat completely. Cover and refrigerate for at least 2 hours, preferably overnight. (If short on time, even 30 minutes helps.)
- Prepare the seasoned flour: In another large bowl, whisk together all-purpose flour, cornstarch, remaining salt, black pepper, garlic powder, onion powder, smoked paprika, cayenne pepper (if using), and baking powder.
- Dredge the chicken: Remove chicken from buttermilk marinade, letting excess drip off. Coat each piece thoroughly in the seasoned flour mix, pressing gently so coating sticks well. For extra crunch, dip coated chicken back into buttermilk briefly and dredge again in flour mix for a double coating.
- Heat the oil: Pour oil into fryer or skillet to about 2 inches depth. Heat to 350°F (175°C). Use a thermometer to keep temperature steady.
- Fry the chicken: Carefully lower chicken pieces into hot oil in batches to avoid overcrowding. Fry for 12-15 minutes, turning halfway through, until golden brown and internal temperature reaches 165°F (74°C). Drain on a wire rack over paper towels.
Notes
Use a thermometer to maintain oil temperature between 325°F and 350°F for best results. Double dredging the chicken creates a thicker, extra-crispy crust. Rest fried chicken on a wire rack to prevent sogginess. For gluten-free, substitute flour with a gluten-free blend and rice flour instead of cornstarch. For dairy-free, replace buttermilk with almond milk plus vinegar or lemon juice. Reheat leftovers in a 375°F oven on a wire rack to maintain crispiness.
Nutrition
- Serving Size: 1 piece of chicken
- Calories: 350400
- Sodium: 600
- Fat: 22
- Carbohydrates: 12
- Protein: 28
Keywords: crispy fried chicken, fried chicken recipe, extra crispy chicken, buttermilk fried chicken, double dredge chicken, easy fried chicken, southern fried chicken