Love this? Save it for later!
Share the inspiration with your friends
Introduction
“The power went out halfway through my dinner prep one Friday night,” I remember, laughing to myself as I write this. I was halfway through trying to pan-sear a thick ribeye, the kind that looks beautiful but can be a nightmare if you don’t get it just right. Honestly, I thought my steak dinner was doomed—until I remembered a trick I’d overheard at a local butcher shop a few weeks earlier. It wasn’t some fancy chef’s secret but a simple method called the reverse-sear. At that moment, with only the dim glow of my phone’s flashlight, I slid the steak into my oven at low heat, then finished it off with a quick sear on the stovetop once the power returned. The result? One of the juiciest, most tender steaks I’ve ever made at home.
Maybe you’ve been there too: wanting that perfect steak experience without the guesswork or the smoke alarm going off. This reverse-sear technique feels like a little kitchen magic—low and slow first, then a fiery finish that locks in all the flavor and juices. It’s straightforward, trust me. And it’s become my go-to method for steak nights when I’m craving that restaurant-quality bite without leaving my kitchen.
Let me tell you, the beauty of this recipe is how it transforms a simple steak into something memorable, every single time. Whether you’re cooking for yourself, impressing friends, or just wanting that perfect juicy bite at home, this reverse-sear steak recipe has you covered.
Why You’ll Love This Recipe
Honestly, after trying countless steak-cooking methods, this reverse-sear approach stands out for so many reasons:
- Consistent Results: No more guessing if your steak is undercooked or overdone. The slow oven step gently brings the steak to the perfect internal temperature.
- Juicy and Tender: The gradual cooking keeps the juices locked inside, so every bite is mouthwatering.
- Perfect Crust: The quick sear at the end creates that irresistible, caramelized crust that steak lovers crave.
- Simple and Foolproof: You don’t need fancy equipment or hours of prep. Just your oven, a skillet, and patience.
- Great for Thick Cuts: This method shines with ribeyes, strip steaks, or even filet mignon that are at least 1.5 inches thick.
- Impress Without Stress: Whether it’s a weeknight dinner or a special occasion, you’ll wow guests with your perfectly cooked steak.
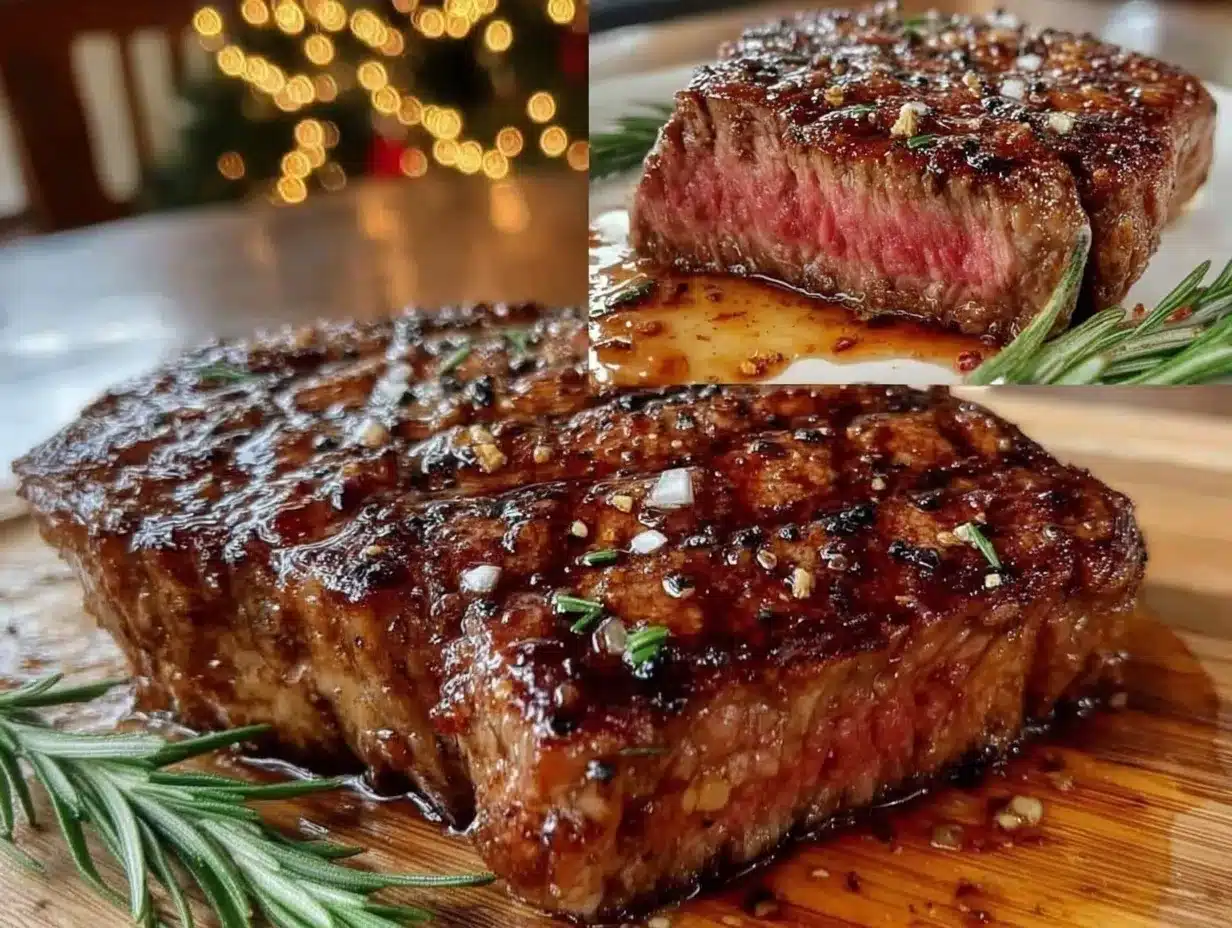
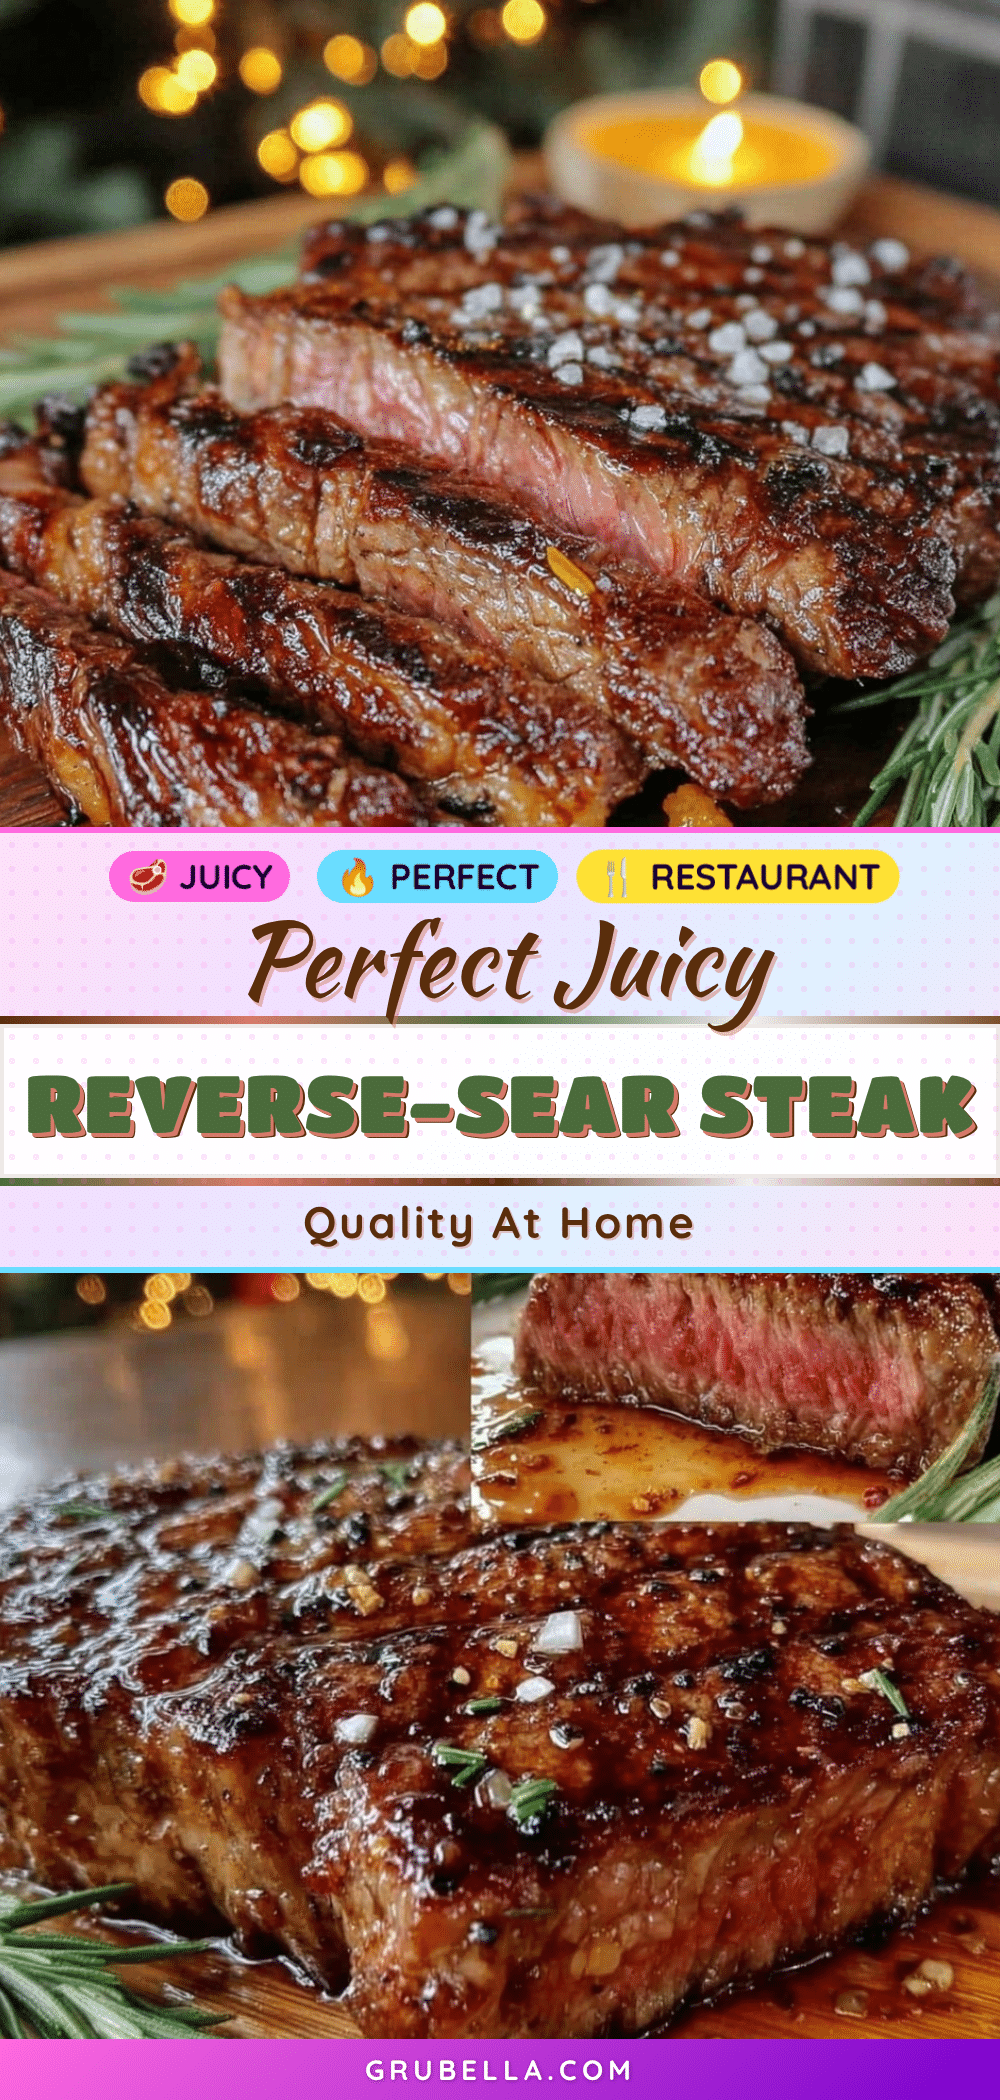
What makes this recipe different? I use a trusty cast iron skillet—there’s just no substitute for that sear it gives—and I season simply but thoughtfully, letting the steak’s natural flavor shine. Plus, I always rest the steak before slicing, which sounds basic but makes all the difference in juiciness.
So, if you want a steak that makes you close your eyes after the first bite, this recipe is the one to try. It’s comfort food with a little extra finesse, and honestly, once you nail this, you might never want to cook steak any other way.
What Ingredients You Will Need
This recipe uses straightforward, kitchen-friendly ingredients that pack big flavor. You likely have most of these on hand already.
- Steak (1 thick cut, 1.5 to 2 inches thick): Ribeye, strip, or filet mignon are perfect choices. I usually pick USDA Choice or Prime grade for the best marbling.
- Salt: Kosher salt is my go-to for seasoning. It helps create that savory crust.
- Freshly ground black pepper: Adds a subtle heat and aroma. Grind it fresh for best flavor.
- Neutral oil (like canola or grapeseed): For searing. These oils have high smoke points, which means no burnt flavor.
- Unsalted butter (2 tablespoons): Adds richness during the sear. I often toss in a sprig of fresh thyme or rosemary if I have it.
- Garlic cloves (2, smashed): Optional but recommended for a fragrant finish.
Ingredient tips: When selecting your steak, look for good marbling—those little white streaks of fat inside the meat—that guarantees juiciness. If you can, get the steak at least an hour before cooking to bring it to room temperature. This helps it cook evenly.
If you want to swap oils, avocado oil works well too. For a dairy-free version, skip the butter and use more oil or a vegan butter substitute. When fresh herbs aren’t available, dried rosemary works in a pinch, but add it earlier in the oven step to infuse flavor.
Equipment Needed
- Oven: A standard home oven works perfectly for the low-temperature cooking phase.
- Cast iron skillet: The ideal tool for searing. It retains heat like no other and creates the perfect crust. If you don’t have cast iron, a heavy stainless steel pan will do, but avoid non-stick for searing.
- Meat thermometer: Highly recommended for precise doneness. An instant-read thermometer like a ThermoWorks Thermapen is a great investment, but a budget-friendly digital one works too.
- Tongs: For flipping your steak without piercing it and losing juices.
- Wire rack and baking sheet: To cook the steak evenly in the oven and allow air circulation.
Personally, the cast iron skillet was a game-changer for me. I remember burning my first attempts in a flimsy pan, but once I switched, everything improved. Also, keeping your skillet well-seasoned helps prevent sticking and adds flavor. If you don’t own a meat thermometer yet, I can’t stress enough how much it helps avoid guesswork and overcooking.
Preparation Method
- Bring the steak to room temperature: About 30-60 minutes before cooking, take your steak out of the fridge. This helps it cook more evenly.
- Preheat your oven: Set it to 275°F (135°C). This low temperature gently cooks the steak inside.
- Season the steak: Generously sprinkle kosher salt and freshly ground black pepper on all sides. Don’t be shy—this seasoning forms the base of your crust.
- Place steak on a wire rack: Set the steak on a wire rack over a baking sheet. This setup allows air to circulate and cooks the steak evenly without steaming.
- Cook in the oven: Insert the steak into the preheated oven. Use a meat thermometer to monitor the internal temperature. For medium-rare, pull the steak out at 120°F (49°C) to 125°F (52°C). This usually takes about 20-30 minutes, depending on thickness.
- Preheat your skillet: While the steak is in the oven, heat your cast iron skillet over high heat until very hot—almost smoking.
- Sear the steak: Add a tablespoon of neutral oil to the skillet. Place the steak carefully in the pan. Sear for about 1.5 to 2 minutes per side until a deep, golden crust forms. Add butter, smashed garlic, and herbs to the pan. Spoon melted butter over the steak as it sears. This basting adds flavor and richness.
- Rest the steak: Transfer the steak to a plate and tent loosely with foil. Let it rest for 5-10 minutes. This lets the juices redistribute, making every bite juicy and tender.
- Slice and serve: Cut the steak against the grain for maximum tenderness. Serve immediately and enjoy!
Pro tip: If your steak hits the skillet and starts to smoke excessively, your pan is too hot. Lower the heat briefly or remove the pan from the burner momentarily. Also, don’t flip the steak multiple times—once per side is enough for that perfect crust.
Cooking Tips & Techniques
One lesson I learned the hard way was rushing the sear. You might be tempted to crank the heat and flip the steak repeatedly, but patience is key. Let the steak develop that crust naturally.
Using a meat thermometer removes the guesswork. I used to poke and prod, but now I just check the temp and know exactly when to pull the steak.
If your steak comes out too rare, finish it with a quick 30-second extra sear per side. Too done? Next time, pull it from the oven a few degrees earlier.
Multitasking tip: While the steak’s in the oven, prep your sides or set the table. That way, once you sear and rest the steak, everything’s ready to go.
Also, don’t skip the resting step. I know it feels tempting to slice right away, but resting is what keeps the juices inside. I learned this the hard way after slicing too early and watching the juices run onto the cutting board.
Variations & Adaptations
- Herb Butter Finish: Mix softened butter with minced garlic, parsley, and lemon zest, then melt it over the steak right after searing for an extra flavor punch.
- Spice Rub: Swap the simple salt and pepper for a blend of smoked paprika, cumin, and brown sugar for a smoky-sweet crust.
- Oven to Grill: For a smoky twist, do the oven step as usual, then finish on a hot grill instead of the skillet for a subtle charred flavor.
- Allergen-Friendly: Skip butter and use avocado oil for a dairy-free version. Use gluten-free seasoning blends to keep it allergy safe.
- Personal variation: Once, I tossed in a small splash of soy sauce during searing for an umami boost—it was surprisingly good, like a steakhouse secret.
Serving & Storage Suggestions
Serve your reverse-sear steak warm, sliced thin against the grain for tenderness. Pair it with classic sides like roasted potatoes, sautéed mushrooms, or a fresh green salad. A bold red wine or a cold craft beer complements the flavors beautifully.
If you have leftovers, wrap the steak tightly in foil or plastic wrap and refrigerate for up to 3 days. For longer storage, freeze sliced steak in airtight bags for up to 3 months.
To reheat, gently warm steak slices in a skillet over low heat with a splash of beef broth or water to avoid drying out. Avoid microwaving if you want to keep that perfect texture.
Flavors often deepen after resting overnight, so sometimes I make the steak a day ahead and reheat—it’s a surprisingly good move for busy nights.
Nutritional Information & Benefits
A typical 8-ounce (227g) ribeye steak cooked with this method contains approximately 600-700 calories, 48g of protein, 45g of fat, and minimal carbohydrates. It’s a great source of iron, zinc, and vitamin B12, which are important for energy and immune function.
Choosing grass-fed beef can increase omega-3 fatty acids and antioxidants. This recipe is naturally gluten-free and low in carbs, making it suitable for paleo and keto diets.
Remember, moderation is key with red meat, but when you do indulge, making it juicy and flavorful like this makes it worth savoring.
Conclusion
This perfect juicy reverse-sear steak recipe is a game changer for anyone wanting steakhouse-quality results at home. It’s simple, forgiving, and yields tender, flavorful steaks every time. I love how it turns a basic cut into a special meal without fuss or fancy gadgets.
Feel free to tweak the seasoning or finish to suit your taste. Maybe you’ll find your own twist that becomes a new favorite. If you try this method, I’d love to hear how it went—drop a comment below or share your variations. Happy cooking and here’s to many delicious steak nights ahead!
FAQs
What is the reverse-sear method?
The reverse-sear involves cooking the steak slowly at low temperature first, then finishing with a high-heat sear. This method ensures even doneness and a juicy interior with a crispy crust.
Can I use this method for thinner steaks?
It’s best for steaks at least 1.5 inches thick. Thinner steaks cook too quickly and won’t benefit as much from the slow oven step.
Do I need a meat thermometer?
While not mandatory, a meat thermometer makes it much easier to get perfect doneness without cutting into the steak.
How long should I rest the steak?
Rest the steak for 5 to 10 minutes after searing. This helps juices redistribute and keeps the steak tender.
Can I reverse-sear steak on a grill?
Yes! Cook the steak at low indirect heat first, then finish over direct high heat for a similar effect with a smoky flavor.
Pin This Recipe!
Perfect Juicy Reverse-Sear Steak Recipe Easy Homemade Guide

This reverse-sear steak recipe delivers a juicy, tender steak with a perfect crust by cooking low and slow in the oven, then finishing with a high-heat sear. Ideal for thick cuts like ribeye, strip, or filet mignon.
- Prep Time: 30-60 minutes (to bring steak to room temperature)
- Cook Time: 20-30 minutes (oven) + 3-4 minutes (searing)
- Total Time: Approximately 1 hour
- Yield: 1 steak serving 1x
- Category: Main Course
- Cuisine: American
Ingredients
- 1 thick cut steak (1.5 to 2 inches thick; ribeye, strip, or filet mignon)
- Kosher salt
- Freshly ground black pepper
- Neutral oil (canola, grapeseed, or avocado oil)
- 2 tablespoons unsalted butter
- 2 garlic cloves, smashed (optional)
- Fresh thyme or rosemary sprig (optional)
Instructions
- Bring the steak to room temperature about 30-60 minutes before cooking.
- Preheat your oven to 275°F (135°C).
- Generously season the steak with kosher salt and freshly ground black pepper on all sides.
- Place the steak on a wire rack over a baking sheet to allow air circulation.
- Cook the steak in the oven until it reaches an internal temperature of 120°F to 125°F (49°C to 52°C) for medium-rare, about 20-30 minutes depending on thickness.
- While the steak is in the oven, heat a cast iron skillet over high heat until very hot.
- Add a tablespoon of neutral oil to the skillet and sear the steak for 1.5 to 2 minutes per side until a deep golden crust forms.
- Add butter, smashed garlic, and herbs to the pan and baste the steak with melted butter during searing.
- Transfer the steak to a plate, tent loosely with foil, and rest for 5-10 minutes to allow juices to redistribute.
- Slice the steak against the grain and serve immediately.
Notes
Use a meat thermometer for precise doneness. Rest steak 5-10 minutes after searing to keep juices inside. Avoid flipping steak multiple times during sear. If pan smokes excessively, reduce heat briefly. For dairy-free, omit butter and use more oil or vegan butter substitute.
Nutrition
- Serving Size: 1 steak (approximate
- Calories: 650
- Sodium: 600
- Fat: 45
- Saturated Fat: 18
- Protein: 48
Keywords: reverse sear, steak recipe, ribeye, filet mignon, strip steak, juicy steak, cast iron skillet, steak crust, medium rare steak