Love this? Save it for later!
Share the inspiration with your friends
“The clock struck noon, and the backyard was already buzzing with chatter and laughter,” I remember thinking as I hurried around, setting out platters for the perfect graduation open house food table for 50 guests. Honestly, I wasn’t expecting it to feel this chaotic, but hey, that’s part of the charm, right? Just the day before, I had jotted down last-minute ideas on the back of a grocery receipt at the corner store, fueled by a mix of excitement and mild panic. You know that feeling when you want to celebrate big, but also keep things simple enough so you can actually enjoy the party too?
This spread was inspired by my neighbor, Mr. Lopez, who once told me, “Feeding a crowd isn’t about fancy dishes; it’s about sharing bites that bring people together.” His words stuck with me as I crafted a menu that could easily please a big group without tying me to the kitchen all day. I mean, let’s face it—hosting 50 people is no small feat, especially when you want everything to taste fresh, look inviting, and be fuss-free.
Maybe you’ve been there, staring at an empty table wondering how to fill it with food that feels both festive and manageable. That’s where this collection of ideas comes in. It’s the kind of food table that welcomes everyone—from kids sneaking extra snacks to adults swapping stories over perfectly seasoned finger foods. I’ll share what worked, what I learned the hard way (like forgetting the cheese platter until guests arrived!), and how you can pull off a crowd-pleasing feast without breaking a sweat. Ready? Let’s get your graduation celebration table set up for success.
Why You’ll Love This Recipe
Planning for 50 guests might sound intimidating, but this perfect graduation open house food table recipe makes it surprisingly easy and fun. Having tested these ideas through multiple celebrations (and yes, a few near-disasters), I can confidently say this setup balances effort and wow factor like a pro.
- Quick & Easy: You can assemble most dishes in under 30 minutes, which means less stress and more time to mingle.
- Simple Ingredients: No need for exotic items—just regular stuff you probably have in your pantry or can grab at your local store.
- Perfect for Celebrations: Whether it’s a casual afternoon or a semi-formal gathering, these dishes fit right in with the festive vibe.
- Crowd-Pleaser: Kids, teens, and adults alike love the variety and flavors, making it an all-ages hit.
- Unbelievably Delicious: The combination of fresh veggies, savory bites, and sweet treats hits all the right notes for comfort and celebration.
This isn’t just a random collection of foods thrown together. The secret lies in balancing textures—think crispy, creamy, fresh, and savory—and flavors so every guest finds something they adore. I found that including a mix of make-ahead items with a few last-minute fresh touches keeps the table lively. Plus, there’s a little trick I picked up involving layering dips with colorful garnishes—makes everything look fancy without the fuss.
Honestly, this perfect graduation open house food table recipe has become my go-to for any big gathering. It’s the kind of spread that has folks coming back for seconds (and thirds!), and that’s why I keep making it year after year.
What Ingredients You Will Need
This graduation food table relies on simple, wholesome ingredients that bring bold flavor and satisfying texture without causing kitchen chaos. You’ll find everything here is easy to source and versatile, so substitutions are straightforward if needed.
For the Savory Bites
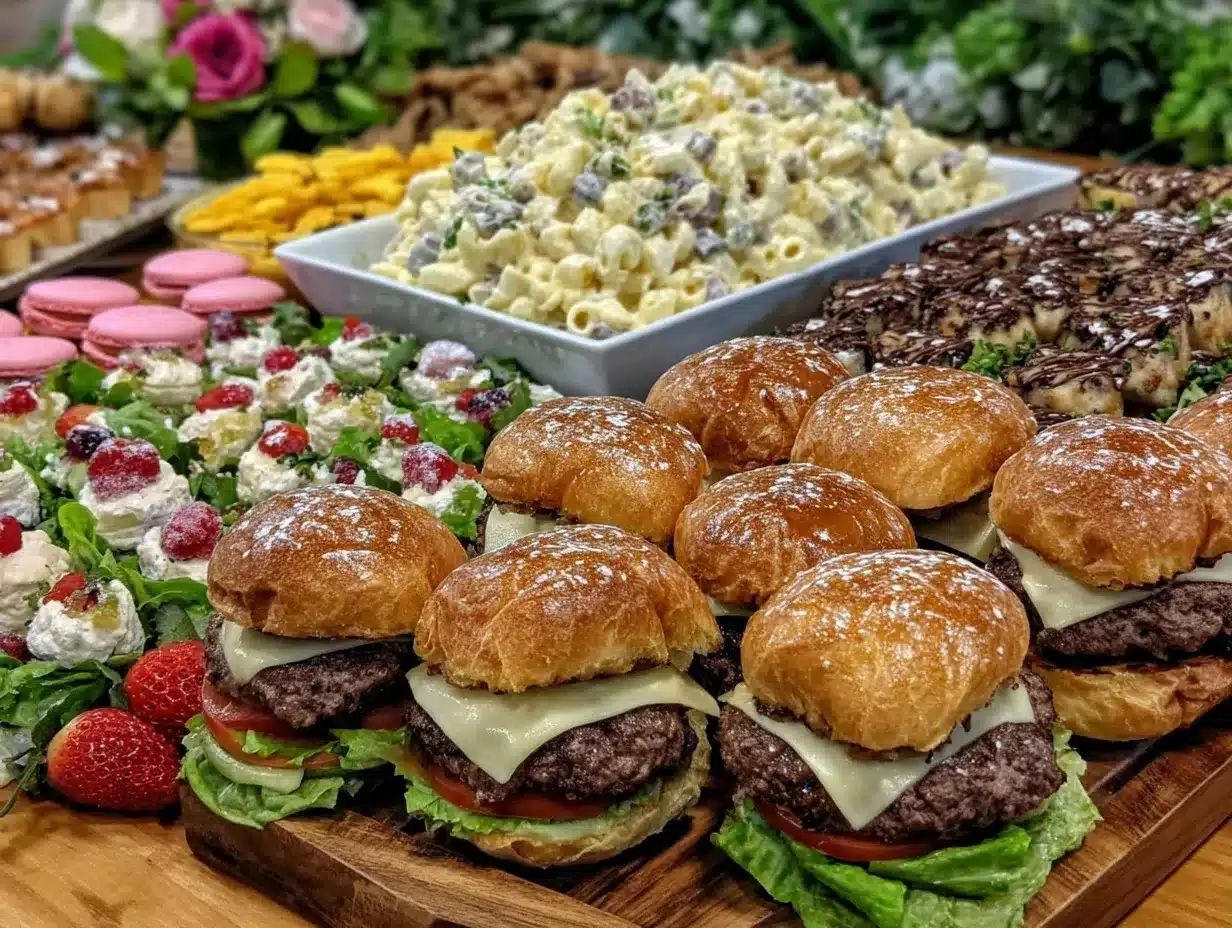
- Mini sandwich rolls (50 pieces, preferably soft but sturdy)—these are the foundation for assorted sliders
- Deli meats like turkey, ham, and roast beef (about 4 pounds total)—choose thinly sliced for easy layering
- Cheese slices such as cheddar, Swiss, and provolone (3 pounds)—look for block cheese you can slice fresh for best melt
- Leafy lettuce (2 heads, romaine or butter lettuce)—adds crunch and freshness
- Tomatoes (6 large, sliced)—ripe but firm
- Pickles and olives (2 jars)—great for snacking and garnishing
- Mayonnaise, mustard, and ranch dressing (small jars each)—for spread options
For the Veggie & Dip Platter
- Baby carrots (3 pounds)—crisp and colorful
- Celery sticks (3 bunches)—fresh and crunchy
- Cherry tomatoes (3 pints)—bursting with sweetness
- Cucumber slices (5 large cucumbers)—cool and refreshing
- Hummus (3 cups)—any flavor you like (classic or roasted red pepper recommended)
- Ranch dip (3 cups)—store-bought or homemade
For the Sweet Treats
- Assorted cookies (5 dozen)—mix of chocolate chip, sugar, and oatmeal raisin
- Fresh fruit platter (pineapple, grapes, strawberries, about 10 pounds total)—seasonal and vibrant
- Brownie bites (3 dozen)—fudgy and rich
Other Essentials
- Disposable plates, napkins, and utensils (enough for 50 guests)—I recommend durable eco-friendly options
- Beverages like iced tea, lemonade, and sparkling water
For substitutions, use gluten-free rolls or crackers if needed, swap dairy cheeses with plant-based alternatives, and try Greek yogurt-based dips for a lighter touch. I personally like using Boar’s Head deli meats for consistent quality and Sabra hummus flavors for variety. If it’s summer, fresh berries on the fruit platter are a must for that extra pop of sweetness.
Equipment Needed
- Large serving trays and platters – sturdy ones that hold a good amount without tipping
- Cutting boards and sharp knives – for slicing veggies, meats, and cheeses (I keep a separate board for produce to avoid cross-contamination)
- Serving utensils like tongs, small spoons, and spreaders – makes self-serving easier and less messy
- Chafing dishes or warming trays (optional) – if you want to keep any hot dishes warm; otherwise, room temperature works fine for most items
- Cups, plates, napkins, and disposable cutlery – I recommend picking up biodegradable options to keep things tidy and earth-friendly
- Coolers or ice buckets – to keep drinks and perishable items chilled outdoors
If you don’t have chafing dishes, no worries—you can always use insulated food carriers or even keep items in the fridge until the last minute. For large gatherings, investing in a few quality serving platters makes a huge difference in presentation. Also, I’ve found that labeling platters with small cards helps guests navigate options, especially if you include allergen info.
Preparation Method
- Prep the Sandwich Components (30 minutes): Slice deli meats and cheeses into thin layers. Wash and dry lettuce leaves and slice tomatoes thinly. Cut the mini rolls horizontally but keep the bottom intact if possible to hold fillings better.
- Assemble Mini Sandwiches (45 minutes): Spread mayonnaise, mustard, or ranch dressing on the roll bottoms. Layer meats, cheese, lettuce, and tomato. Cap with the top half of the roll. Arrange sandwiches on large platters, cover with plastic wrap, and refrigerate until serving.
- Prepare Veggie Platter (20 minutes): Wash and peel carrots and celery sticks. Slice cucumbers and halve cherry tomatoes. Arrange veggies on a platter in colorful sections. Spoon hummus and ranch dip into small bowls and place in the center.
- Fruit Platter Assembly (15 minutes): Wash and cut fruit into bite-sized pieces. Arrange artistically on a large tray, grouping by color and type to make it visually appealing.
- Cookie and Brownie Display (15 minutes): Arrange assorted cookies and brownie bites on dessert trays. If you want an extra touch, sprinkle powdered sugar over brownies shortly before serving.
- Set Up the Food Table (30 minutes before guests arrive): Place all platters on the table with serving utensils. Add beverage stations with coolers or pitchers. Don’t forget napkins and plates at the start of the line!
- Final Touches: Garnish sandwich platters with pickle spears or olives for a bit of color and tang. Double-check that dips are replenished and chilled as needed.
One tip: assemble sandwiches as close to serving time as possible to avoid sogginess. If you must do it earlier, keep ingredients separate and let guests build their own for a fun interactive twist. I learned the hard way when one batch turned soggy after sitting too long—lesson learned!
Cooking Tips & Techniques
When preparing for a big crowd like 50 guests, timing and organization are your best friends. I always recommend prepping as much as possible the day before—think slicing veggies, chopping fruits, and assembling cold dishes. This saves frantic moments on the big day.
One common mistake is overloading sandwiches with too many wet ingredients. Keep tomatoes and pickles on the side or add just before serving to avoid soggy bread. For dips, stirring them before guests arrive refreshes the texture and flavor.
Use sharp knives for clean cuts—dull blades crush and bruise delicate ingredients, which can affect presentation and taste. When arranging platters, layering colors and textures creates visual interest that invites guests to dig in.
For multitasking, consider delegating simple tasks like beverage refills or dessert plating to a trusted friend or family member. That way, you can focus on last-minute touches and greeting guests.
Lastly, keep an eye on the flow of the table. Place popular items at both ends to avoid crowding. It’s a small detail but helps keep the mood light and guests happy.
Variations & Adaptations
One of the best things about this graduation open house food table is how flexible it is. Here are a few ideas to tweak it based on your crowd or preferences:
- Dietary Adaptation: Swap regular rolls for gluten-free buns or use lettuce wraps for low-carb guests.
- Seasonal Variation: In warmer months, add grilled veggies or fruit kebabs for a refreshing twist.
- Flavor Twist: Incorporate international flavors by swapping traditional deli meats for smoked salmon, adding tzatziki sauce, or including spicy chipotle mayo.
- Cooking Method Change: Instead of cold sandwiches, prepare a warm slider station with mini burgers or pulled pork—using slow cooker recipes can ease prep.
- Personal Variation: I once added a build-your-own taco bar alongside the sandwich table. It was a hit, especially with the teens, and gave everyone a chance to customize their meal.
Feel free to mix and match ingredients and layouts to fit your theme and guests. The key is maintaining variety and balance so no one leaves hungry or overwhelmed.
Serving & Storage Suggestions
Serve the food table at room temperature for best flavors, especially for sandwiches and dips. Cold veggies and fruits are naturally refreshing, so keep them chilled until just before serving.
Complement the spread with simple beverages like iced tea, lemonade, or sparkling water. For a little extra flair, add a pitcher of fruit-infused water or a signature mocktail.
After the party, store leftovers in airtight containers. Sandwiches are best eaten within 24 hours; veggies and dips can last 2-3 days refrigerated. Freeze any extra baked goods like brownies or cookies to enjoy later.
When reheating, warm sandwiches gently in a low oven wrapped in foil to avoid drying out. Veggie platters don’t reheat, so save those fresh for next time.
Flavors actually develop nicely overnight in dips like hummus or ranch, so consider making those a day ahead. It saves time and enriches the taste.
Nutritional Information & Benefits
This food table offers a balanced mix of protein, fiber, and vitamins, making it a crowd-pleasing but relatively wholesome option. With plenty of fresh veggies and fruit, guests get a good dose of antioxidants and hydration.
Protein from deli meats and cheese supports sustained energy—perfect for a day filled with celebration and socializing. Choosing whole-grain rolls (if available) adds more fiber and nutrients.
Options like hummus bring healthy fats and plant-based protein, a nice alternative for vegetarians or those watching their meat intake. If dietary restrictions are a concern, many components can be easily swapped without sacrificing flavor or satisfaction.
Be mindful that cheese and deli meats can be higher in sodium, so balancing with fresh produce is a smart move. Overall, this spread is festive and friendly to a variety of dietary needs.
Conclusion
Planning the perfect graduation open house food table for 50 guests doesn’t have to be a stressful ordeal. With simple ingredients, a little prep, and a few thoughtful touches, you can serve a spread that’s both delicious and welcoming. I love how this menu brings people together with minimal fuss, letting me actually enjoy the celebration instead of hiding in the kitchen.
Feel free to customize based on your crowd’s tastes or dietary needs—this recipe is more a guideline than a rulebook. And hey, if you tweak it to make it your own, I’d love to hear about your creative spins!
Go ahead, give this a try for your next big gathering. Then sit back, relax, and watch the smiles as everyone digs in.
FAQs
How much food should I prepare per guest for a graduation open house?
Generally, plan for about 6-8 small bites per person if it’s a finger food-style event. This recipe is designed to comfortably feed 50 guests with a variety of options.
Can I make the food table entirely ahead of time?
Most components like sliced meats, veggies, and cookies can be prepped a day ahead. Assemble sandwiches as close to serving time as possible to keep bread fresh.
What are some good beverage options for a large crowd?
I recommend a mix of iced tea, lemonade, sparkling water, and perhaps a non-alcoholic punch. Keep drinks chilled and accessible for guests.
How do I keep the food fresh outdoors during the party?
Use coolers or ice buckets for items that need refrigeration, cover platters with lids or wraps, and replenish trays regularly from the fridge if possible.
What if some guests have allergies?
Label foods clearly, offer gluten-free and dairy-free options like gluten-free rolls or plant-based dips, and keep allergen-containing items separate to avoid cross-contact.
By following these tips and ideas, your graduation open house food table will be a hit that’s easy to pull off and hard to forget.
Pin This Recipe!

Perfect Graduation Open House Food Table Ideas for 50 Guests Easy and Delicious

A simple, crowd-pleasing food table recipe designed to feed 50 guests with easy-to-assemble savory bites, fresh veggies, dips, and sweet treats, perfect for graduation celebrations.
- Prep Time: 1 hour 30 minutes
- Cook Time: 0 minutes
- Total Time: 1 hour 30 minutes
- Yield: 50 servings 1x
- Category: Party Food, Finger Food
- Cuisine: American
Ingredients
- 50 mini sandwich rolls (soft but sturdy)
- 4 pounds deli meats (turkey, ham, roast beef, thinly sliced)
- 3 pounds cheese slices (cheddar, Swiss, provolone)
- 2 heads leafy lettuce (romaine or butter lettuce)
- 6 large tomatoes, sliced
- 2 jars pickles and olives
- Small jars mayonnaise, mustard, and ranch dressing
- 3 pounds baby carrots
- 3 bunches celery sticks
- 3 pints cherry tomatoes
- 5 large cucumbers, sliced
- 3 cups hummus (classic or roasted red pepper recommended)
- 3 cups ranch dip (store-bought or homemade)
- 5 dozen assorted cookies (chocolate chip, sugar, oatmeal raisin)
- 10 pounds fresh fruit platter (pineapple, grapes, strawberries)
- 3 dozen brownie bites
- Disposable plates, napkins, and utensils for 50 guests
- Beverages such as iced tea, lemonade, and sparkling water
Instructions
- Prep the Sandwich Components (30 minutes): Slice deli meats and cheeses into thin layers. Wash and dry lettuce leaves and slice tomatoes thinly. Cut the mini rolls horizontally but keep the bottom intact to hold fillings better.
- Assemble Mini Sandwiches (45 minutes): Spread mayonnaise, mustard, or ranch dressing on the roll bottoms. Layer meats, cheese, lettuce, and tomato. Cap with the top half of the roll. Arrange sandwiches on large platters, cover with plastic wrap, and refrigerate until serving.
- Prepare Veggie Platter (20 minutes): Wash and peel carrots and celery sticks. Slice cucumbers and halve cherry tomatoes. Arrange veggies on a platter in colorful sections. Spoon hummus and ranch dip into small bowls and place in the center.
- Fruit Platter Assembly (15 minutes): Wash and cut fruit into bite-sized pieces. Arrange artistically on a large tray, grouping by color and type to make it visually appealing.
- Cookie and Brownie Display (15 minutes): Arrange assorted cookies and brownie bites on dessert trays. Optionally sprinkle powdered sugar over brownies shortly before serving.
- Set Up the Food Table (30 minutes before guests arrive): Place all platters on the table with serving utensils. Add beverage stations with coolers or pitchers. Place napkins and plates at the start of the line.
- Final Touches: Garnish sandwich platters with pickle spears or olives for color and tang. Double-check that dips are replenished and chilled as needed.
Notes
Assemble sandwiches as close to serving time as possible to avoid sogginess. Keep tomatoes and pickles on the side or add just before serving. Prepping veggies and dips a day ahead saves time. Label platters with allergen info. Use gluten-free rolls or plant-based cheeses for dietary adaptations. Keep cold items chilled until serving.
Nutrition
- Serving Size: 1 mini sandwich, ass
- Calories: 450
- Sugar: 12
- Sodium: 700
- Fat: 18
- Saturated Fat: 7
- Carbohydrates: 50
- Fiber: 6
- Protein: 22
Keywords: graduation party food, open house food table, crowd-pleasing recipes, finger foods, easy party recipes, sandwich platter, veggie platter, dessert platter