Love this? Save it for later!
Share the inspiration with your friends
“You know that moment when you walk into a friend’s house on a lazy Sunday morning and the smell of fresh pastries mixed with something salty just pulls you right in? That was me last fall, wandering into my neighbor Linda’s kitchen, where she was casually assembling what she called her ‘sweet and savory brunch charcuterie board.’ Honestly, I thought it was just another fancy snack tray, but let me tell you—it was a whole vibe.”
Linda wasn’t the type to fuss over complicated recipes. She had this effortless way of making everything look like an art piece while tasting like a dream. I remember she was juggling her cat on one hip and a cup of coffee in the other hand, barely paying attention as she slapped down slices of aged cheddar next to honey-drizzled figs and crispy bacon strips. I tried not to stare too much, but the cracked ceramic bowl of mixed nuts called my name.
That morning, I didn’t just get a lesson in assembling a brunch spread—I got a new favorite recipe that’s surprisingly easy and endlessly flexible. Maybe you’ve been there, wanting to impress guests or just treat yourself without sweating over the stove for hours. This sweet and savory brunch charcuterie board is exactly the kind of recipe that feels fancy but is totally doable. The best part? It’s perfect for those mornings when you want a little bit of everything: fruit, cheese, something crunchy, and a touch of indulgence.
Since that day, I’ve put my own spin on Linda’s idea, adding some seasonal twists and a few secret touches that keep people coming back for more. Honestly, every time I make it, it sparks the same warm, cozy feeling—the kind that makes you want to linger over coffee and good conversation. So, if you’re ready to wow your brunch crowd or just treat yourself to a spread that hits all the right notes, this recipe’s got you covered.
Why You’ll Love This Recipe
This sweet and savory brunch charcuterie board has quickly become a staple in my weekend routine, and here’s why it might just become yours too:
- Quick & Easy: You can pull this together in under 30 minutes, making it perfect for those busy mornings or last-minute guests.
- Simple Ingredients: No need for any exotic items. Most of what you need is probably already in your pantry or local grocery store.
- Perfect for Entertaining: Whether it’s a casual brunch, a holiday morning, or a potluck, this board is always a crowd-pleaser.
- Crowd-Pleaser: Kids, adults, picky eaters—everyone finds something to love on this board.
- Unbelievably Delicious: The way the salty and sweet flavors play off each other creates a taste experience that’s both complex and comforting.
What sets this charcuterie board apart? It’s all about balance and a few smart twists. For example, I like to add a drizzle of balsamic glaze on fresh strawberries for a tangy kick that pairs beautifully with creamy goat cheese. Plus, swapping in some smoked almonds instead of regular nuts adds a subtle smoky depth that surprises guests every time.
This isn’t just a throw-together platter; it’s a thoughtfully crafted board that feels indulgent but is surprisingly healthy and fresh. It’s the kind of recipe that makes your weekend mornings feel special without stress or a ton of cleanup. Honestly, once you try this, you might find yourself planning your whole day around it!
What Ingredients You Will Need
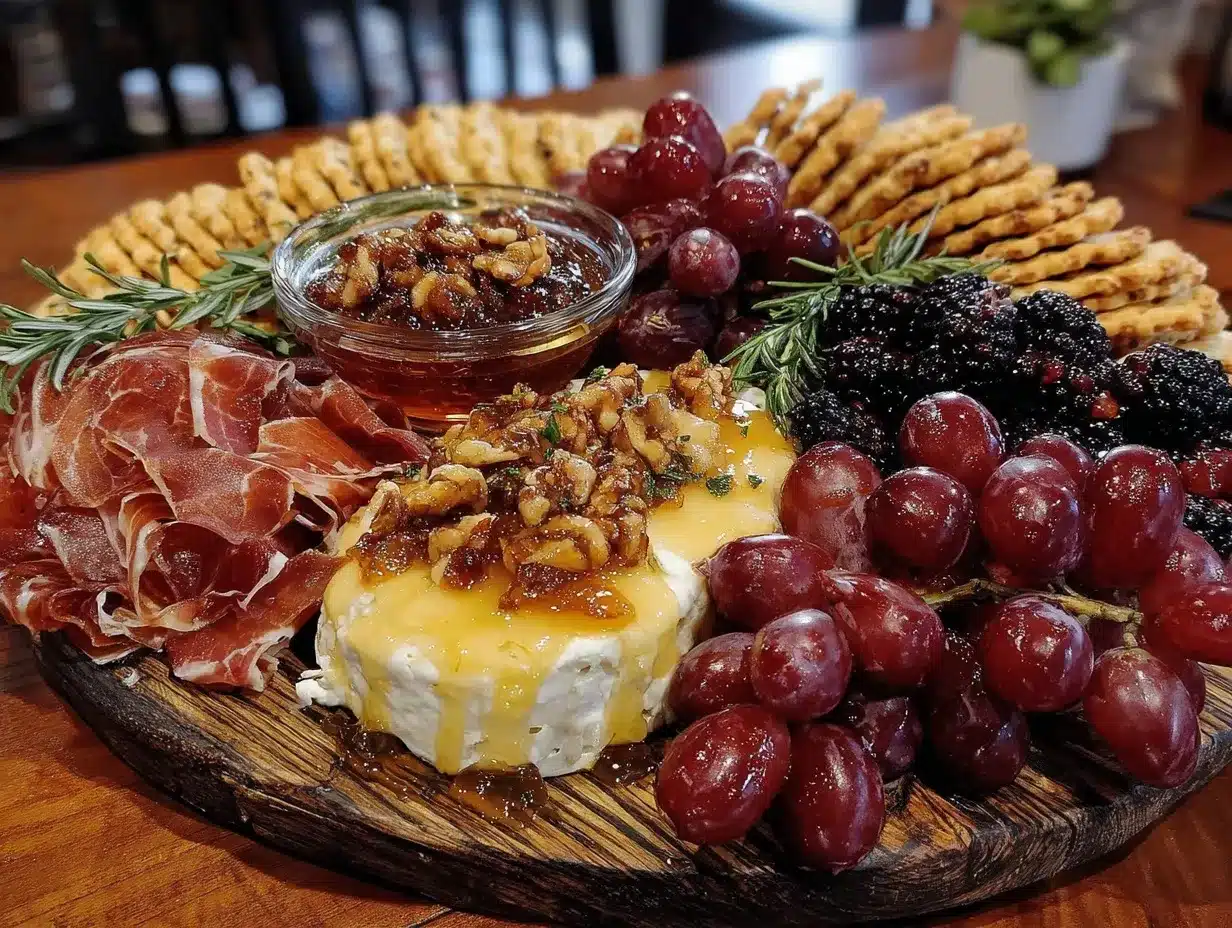
This sweet and savory brunch charcuterie board uses simple, wholesome ingredients to deliver bold flavor and satisfying texture without the fuss. Most items are pantry staples or easy to find fresh at your local market.
- Cured Meats: Prosciutto slices, spicy chorizo rounds, or honey-glazed ham (choose your favorites or mix it up)
- Cheeses:
- Soft cheese like goat cheese or brie (adds creaminess)
- Firm cheese such as aged cheddar or gouda (great for slicing)
- Blue cheese crumbles (optional, for a bold touch)
- Fresh Fruits: Strawberries, grapes, figs, or sliced apples (seasonal swaps work wonderfully)
- Dried Fruits & Nuts: Apricots, dates, smoked almonds, walnuts (adds chew and crunch)
- Bread & Crackers: Rustic baguette slices, water crackers, or seeded crackers (choose sturdy options that hold toppings well)
- Sweet Touches: Honey or balsamic glaze for drizzling, fruit preserves like fig jam (balances savory flavors)
- Extras: Olives, cornichons, fresh herbs like rosemary or thyme for garnish
When I shop for these ingredients, I prefer brands like Président for cheese and La Quercia for prosciutto—they give me reliable quality and fantastic flavor every time. If you’re aiming for a gluten-free version, simply swap the crackers for gluten-free options or crisp veggies like cucumber slices.
Seasonal ingredient tip: In summer, fresh berries make a gorgeous and juicy addition, while autumn calls for figs and apple slices. Feel free to swap nuts based on what you have—pecans, hazelnuts, or even pistachios work beautifully too.
Equipment Needed
- Large wooden or marble board: The bigger, the better! It gives you plenty of space to create a stunning layout. If you don’t have one, a large cutting board or serving platter works fine.
- Small bowls or ramekins: For olives, nuts, and dips—helps keep things tidy and organized.
- Cheese knives and spreaders: Essential for slicing and spreading soft cheeses without making a mess.
- Sharp knife: For slicing fruits, bread, and meats with precision.
- Tongs or small forks: Great for guests to pick up items hygienically.
I once tried assembling a charcuterie board on a regular dinner plate (not my brightest moment), and ended up with a big mess. Trust me, having the right board and tools makes the whole experience smoother and more fun. If you’re on a budget, thrift shops often have beautiful wooden boards or platters that add a rustic charm.
Preparation Method
- Prepare your ingredients (10 minutes): Wash and dry all fresh fruits. Slice strawberries, apples, and figs if using. Cut the baguette into thin slices and lightly toast if desired for extra crunch.
- Arrange the cheeses (5 minutes): Place your soft cheeses like goat cheese or brie first, spacing them evenly around the board. Slice firm cheeses into bite-sized pieces or chunks and add next. If you’re using blue cheese, sprinkle crumbles last to avoid overpowering other flavors.
- Add cured meats (5 minutes): Fold or roll slices of prosciutto and chorizo to create volume. Position them near the cheeses for easy pairing. Avoid overcrowding; a bit of breathing room keeps the board inviting.
- Fill in with fruits, nuts, and extras (10 minutes): Scatter grapes, figs, and dried fruits around the board. Nestle small bowls filled with olives, nuts, and preserves strategically for balance. Drizzle honey or balsamic glaze over fruit clusters—this little touch makes a big difference.
- Final touches and garnish (5 minutes): Add fresh herbs like rosemary sprigs or thyme for color and aroma. Place crackers or baguette slices last so they stay crisp. Step back and adjust spacing for visual appeal.
Tip: If you’re prepping ahead, keep moist items like cheese and fruit covered separately in the fridge and assemble the board just before serving to maintain freshness. You’ll know you’re on the right track when the colors pop and the aromas mix in the air—it’s a feast for all senses.
Cooking Tips & Techniques
One of the trickiest parts of putting together a sweet and savory brunch charcuterie board is balancing flavors without overwhelming the palate. Here’s what I’ve learned the hard way:
- Don’t overcrowd: Less is more. Giving each item some space makes the board look intentional and inviting.
- Mix textures: Combine creamy cheeses with crunchy nuts and crisp fruits—this contrast keeps every bite interesting.
- Use fresh herbs wisely: Rosemary or thyme sprigs add freshness but don’t go overboard or they’ll compete with the main flavors.
- Prep ingredients in advance: Slice fruits and toast bread the night before, but assemble the board just before serving to keep everything vibrant.
- Handle cheeses gently: Let soft cheeses come to room temperature for about 20 minutes before serving to bring out their full flavor.
One time, I tried drizzling honey before placing the fruit and ended up with sticky fingers everywhere—lesson learned: drizzle at the end! Also, I recommend chopping nuts coarsely rather than finely; the bigger pieces add a satisfying crunch. Multitasking can help here—while bread toasts, you can prep fruits and set out bowls.
Variations & Adaptations
This recipe is super flexible, so feel free to make it your own. Here are some ways I’ve played with it:
- Dietary swaps: Use dairy-free cheese and gluten-free crackers to accommodate allergies or preferences.
- Seasonal changes: Swap figs for pomegranate seeds in winter or fresh peaches in summer for a fresh twist.
- Flavor twists: Add a spicy element like pickled jalapeños or a smoky paprika sprinkle on nuts for extra zing.
- Cooking method: Try warming up slices of brie with a quick broil to add a melty, indulgent touch—great for colder days.
- My favorite personal variation: I once added a small dish of whipped ricotta mixed with lemon zest and honey—guests couldn’t get enough of that creamy, tangy combo.
Serving & Storage Suggestions
Serve your sweet and savory brunch charcuterie board at room temperature to let all the flavors shine through. The cheeses especially taste better when not cold straight from the fridge. Arrange the board on a large table where everyone can help themselves, and pair with freshly brewed coffee, mimosas, or a crisp white wine for a complete brunch experience.
If you have leftovers, cover the board tightly with plastic wrap and store in the refrigerator. Most items will keep well for up to 2 days, but avoid drizzling honey or balsamic glaze until serving again to prevent sogginess. To reheat toasted bread slices, pop them briefly in the oven or toaster.
Over time, the flavors on the board can meld beautifully, especially if you prepare it a little ahead. Just be mindful of fruits that brown quickly, like apples—toss them in lemon juice to keep them fresh-looking.
Nutritional Information & Benefits
This sweet and savory brunch charcuterie board offers a balanced mix of nutrients thanks to its varied ingredients. You get protein from the cured meats and cheeses, fiber and vitamins from fresh and dried fruits, and healthy fats from nuts. It’s a satisfying option that can fit into many dietary lifestyles, including low-carb or gluten-free with simple swaps.
Keep in mind that cured meats and cheeses can be high in sodium, so pair with plenty of fresh fruit and nuts to balance. The antioxidants in fruits like grapes and figs add a nice health boost, while the nuts provide heart-healthy fats. Personally, I find this board to be a nourishing treat that feels indulgent but is far from heavy—perfect for a mindful weekend brunch.
Conclusion
This sweet and savory brunch charcuterie board is a no-fail way to impress your guests or just treat yourself without the fuss of a complicated recipe. It’s a versatile, delicious spread that brings together the best of both worlds—sweet and savory—in a way that’s approachable and fun to make.
Feel free to customize it with your favorite ingredients or seasonal finds to keep it fresh every time you make it. I love how it turns any morning into a special occasion, whether it’s a quiet weekend or a lively gathering.
Give it a try and let me know how you put your own spin on it! I’d love to hear what combinations you come up with, so drop a comment or share your photos. Here’s to many cozy, flavorful brunches ahead!
FAQs
What meats work best on a sweet and savory brunch charcuterie board?
Prosciutto, chorizo, and honey-glazed ham are some of my favorites because they offer a nice balance of saltiness and texture, but feel free to use any cured meats you enjoy.
Can I make the charcuterie board ahead of time?
You can prep most ingredients the day before, but it’s best to assemble the board just before serving to keep everything fresh and visually appealing.
What are good gluten-free options for this board?
Gluten-free crackers or crisp raw veggies like cucumber and bell pepper slices work great as alternatives to bread and crackers.
How can I keep fruits from browning on the board?
Coat sliced fruits like apples or pears lightly with lemon juice to prevent browning and keep them looking fresh.
What drinks pair well with a brunch charcuterie board?
Freshly brewed coffee, mimosas, sparkling water with citrus, or a crisp white wine all complement the flavors nicely and enhance the brunch experience.
Pin This Recipe!
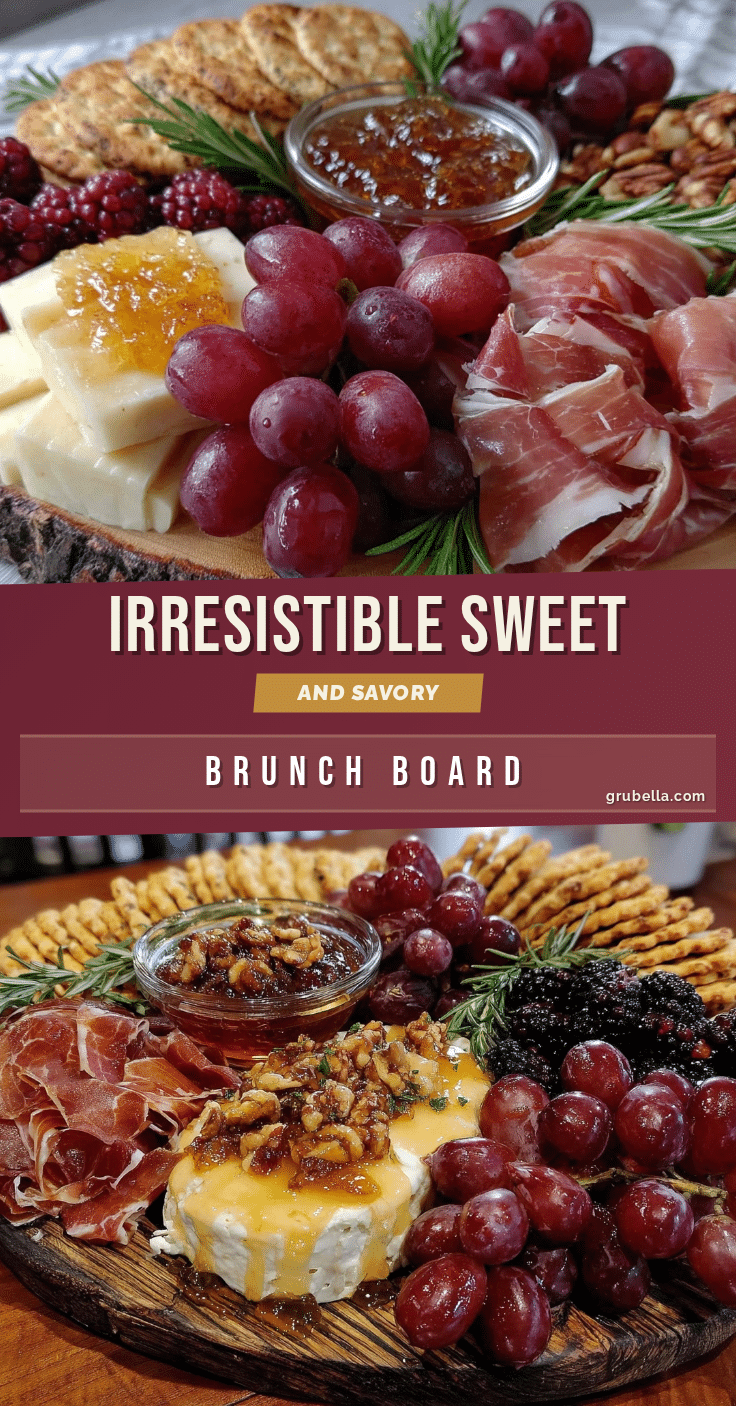
Sweet and Savory Brunch Charcuterie Board

A quick and easy brunch charcuterie board combining sweet and savory flavors with simple, wholesome ingredients. Perfect for entertaining or a cozy weekend treat.
- Prep Time: 15 minutes
- Cook Time: 5 minutes
- Total Time: 20 minutes
- Yield: 4 servings
- Category: Brunch
- Cuisine: American
Ingredients
- Prosciutto slices, spicy chorizo rounds, or honey-glazed ham (choose your favorites or mix it up)
- Soft cheese like goat cheese or brie
- Firm cheese such as aged cheddar or gouda
- Blue cheese crumbles (optional)
- Fresh fruits: strawberries, grapes, figs, or sliced apples (seasonal swaps work wonderfully)
- Dried fruits & nuts: apricots, dates, smoked almonds, walnuts
- Bread & crackers: rustic baguette slices, water crackers, or seeded crackers
- Honey or balsamic glaze for drizzling
- Fruit preserves like fig jam
- Extras: olives, cornichons, fresh herbs like rosemary or thyme for garnish
Instructions
- Prepare your ingredients (10 minutes): Wash and dry all fresh fruits. Slice strawberries, apples, and figs if using. Cut the baguette into thin slices and lightly toast if desired for extra crunch.
- Arrange the cheeses (5 minutes): Place your soft cheeses like goat cheese or brie first, spacing them evenly around the board. Slice firm cheeses into bite-sized pieces or chunks and add next. If using blue cheese, sprinkle crumbles last to avoid overpowering other flavors.
- Add cured meats (5 minutes): Fold or roll slices of prosciutto and chorizo to create volume. Position them near the cheeses for easy pairing. Avoid overcrowding; a bit of breathing room keeps the board inviting.
- Fill in with fruits, nuts, and extras (10 minutes): Scatter grapes, figs, and dried fruits around the board. Nestle small bowls filled with olives, nuts, and preserves strategically for balance. Drizzle honey or balsamic glaze over fruit clusters.
- Final touches and garnish (5 minutes): Add fresh herbs like rosemary sprigs or thyme for color and aroma. Place crackers or baguette slices last so they stay crisp. Adjust spacing for visual appeal.
Notes
Keep moist items like cheese and fruit covered separately in the fridge and assemble the board just before serving to maintain freshness. Drizzle honey or balsamic glaze at the end to avoid stickiness. For gluten-free, swap crackers with gluten-free options or crisp veggies. Let soft cheeses come to room temperature before serving for best flavor.
Nutrition
- Serving Size: Approximately 1/4 of
- Calories: 350
- Sugar: 10
- Sodium: 600
- Fat: 25
- Saturated Fat: 8
- Carbohydrates: 15
- Fiber: 3
- Protein: 12
Keywords: brunch, charcuterie board, sweet and savory, easy brunch, entertaining, cheese board, cured meats, fruit, nuts