Love this? Save it for later!
Share the inspiration with your friends
“I wasn’t expecting to learn the secret to the best quesabirria tacos from a street vendor in a sleepy corner of Los Angeles,” I confessed to my friend as I recounted the day. It was a sweltering Thursday afternoon, and I had just ducked away from the usual tourist-packed spots, craving something real, something honest. There, behind a modest cart with a faded umbrella, the sizzle of meat hitting a hot griddle and the aroma of melted cheese wrapped in tortillas caught me off guard.
The vendor, a cheerful gentleman named Marco, shared his grandmother’s recipe while flipping those golden, crispy tacos, dipping them expertly into a bowl of deeply flavorful consommé. I was skeptical at first—how could something so simple be so addictive? But when I took that first bite, with the crispy tortilla, tender stewed beef, and oozy cheese melding together, dipped just right into the rich broth, it was a revelation.
Honestly, I made a mess trying to replicate it at home the first time—cheese everywhere, consommé splashed across the counter—but that’s part of the fun, right? Maybe you’ve been there, fumbling in the kitchen, chasing a flavor memory. This Crispy Quesabirria Tacos recipe with Rich Consommé is my kitchen-tested attempt to bring that exact magic to your table. It’s not just about filling a taco; it’s about savoring a tradition, bite by crispy, cheesy, savory bite.
Why You’ll Love This Crispy Quesabirria Tacos Recipe
Let me tell you, this recipe isn’t just another taco hack—it’s a game changer. From my countless kitchen trials and tweaks (and a few near disasters), here’s what makes this recipe stand out:
- Quick & Easy: From simmer to plate in under 2 hours, perfect for those weekends when you want something special without all the fuss.
- Simple Ingredients: No need for exotic items; most of these are pantry staples or easy to find at your local market.
- Perfect for Casual Gatherings: Whether it’s a laid-back movie night or an impromptu taco party, these tacos always steal the show.
- Crowd-Pleaser: Kids and adults alike love the crispy texture combined with rich, comforting flavors.
- Unbelievably Delicious: The crispy tortilla with melty cheese and tender beef, dipped in that luscious consommé, is just next-level comfort food.
This version adds a twist by slow-cooking the beef until it’s fall-apart tender, then pan-frying the assembled tacos for that perfect crunch. Plus, the consommé is simmered long enough to develop a deep, savory richness that makes every dip worth it. Honestly, this isn’t just food—it’s a hug in taco form, one that I keep coming back to and tweaking, hoping you’ll love it as much as I do.
What Ingredients You Will Need for Crispy Quesabirria Tacos
This recipe uses straightforward ingredients that come together beautifully to create bold, satisfying flavors and textures. Most are pantry staples or easy to find in your grocery store’s meat and produce section.
- For the Beef Stew:
- 3 lbs beef chuck roast, cut into large chunks (well-marbled for flavor)
- 4 dried guajillo chilies, stemmed and seeded (for deep smoky heat)
- 2 dried ancho chilies, stemmed and seeded (adds mild sweetness)
- 1 large white onion, quartered
- 4 garlic cloves, peeled
- 2 bay leaves
- 1 tsp cumin seeds
- 1 tsp dried oregano
- Salt and freshly ground black pepper, to taste
- 4 cups beef broth (I like Swanson for a rich flavor)
- 2 tbsp apple cider vinegar (brightens the stew)
- For the Tacos:
- 12 corn tortillas (fresh, preferably handmade or from a trusted brand like El Milagro)
- 2 cups Oaxaca cheese or mozzarella, shredded (for that gooey melt)
- Vegetable oil or lard, for frying (lard adds authentic flavor, but vegetable oil works great)
- Optional Garnishes:
- Chopped white onion
- Fresh cilantro leaves
- Fresh lime wedges
- Radish slices
If you want a gluten-free option, the corn tortillas keep it naturally gluten-free. For a dairy-free twist, try vegan cheese alternatives, though the flavor won’t be quite the same. In summer, I sometimes swap dried chilies with fresh roasted ones for a different depth of flavor.
Equipment Needed
- Large heavy-bottomed pot or Dutch oven (for slow-cooking the beef; I prefer cast iron for even heat)
- Blender or food processor (to puree the chili sauce smoothly)
- Large skillet or nonstick pan (for frying the tacos crisp)
- Slotted spoon (to transfer beef and tortillas without excess liquid)
- Metal or wooden tongs (for flipping tacos safely)
- Fine mesh strainer (to strain the consommé for a clear broth)
- Sharp knife and cutting board (for prep)
If you don’t have a Dutch oven, a heavy saucepan with a tight-fitting lid works fine, just keep an eye on the liquid level while simmering. For frying, a cast iron skillet really helps get that perfect crispiness, but a sturdy nonstick pan is a good budget-friendly option. Always make sure your tools are clean and dry to avoid splattering when frying.
Preparation Method
- Prepare the Chili Sauce (20 minutes): Toast the dried guajillo and ancho chilies in a dry pan over medium heat for 2-3 minutes until fragrant. Soak them in hot water for 15 minutes until softened. Drain and transfer to a blender along with the quartered onion, garlic cloves, cumin seeds, oregano, and a pinch of salt. Blend until smooth, adding a splash of beef broth to help it along. Set aside.
- Cook the Beef (2 hours): Season the beef chunks generously with salt and pepper. Heat a tablespoon of oil in your Dutch oven over medium-high heat and brown the beef in batches to create a deep crust—about 4 minutes per side. Remove and set aside. Pour the chili sauce into the pot, scraping up browned bits from the bottom. Add the beef back in along with bay leaves, beef broth, and apple cider vinegar. Bring to a simmer, cover, and cook on low heat for 2 hours until the beef is tender and shreddable. Stir occasionally and check liquid levels; add water if needed.
- Strain and Reserve Consommé: Remove the beef and bay leaves. Strain the cooking liquid through a fine mesh sieve into a bowl or pot. This consommé is your dipping sauce—rich, spicy, and flavorful.
- Shred Beef: Using two forks, shred the beef into bite-sized pieces. Mix some of the reserved consommé back into the shredded meat for extra juiciness.
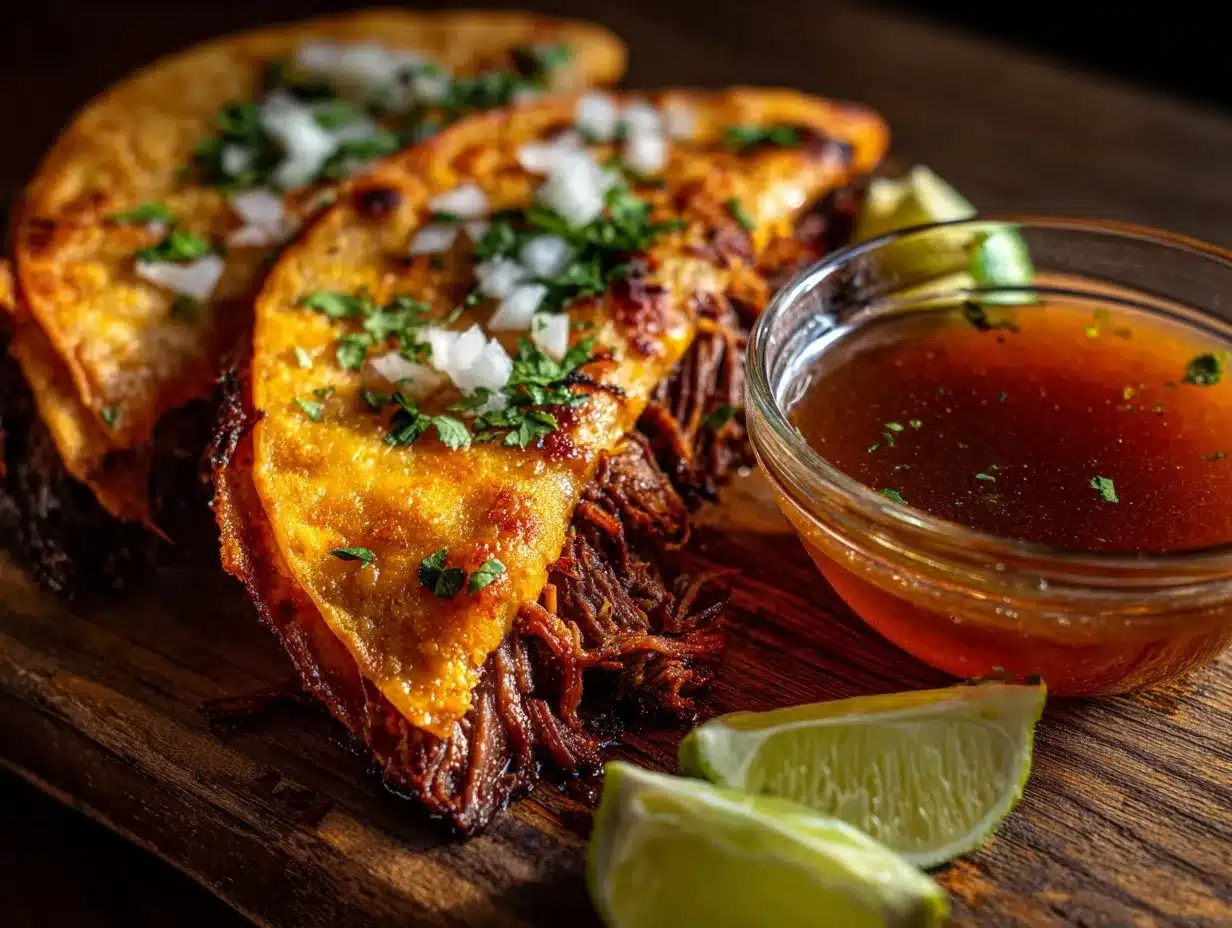
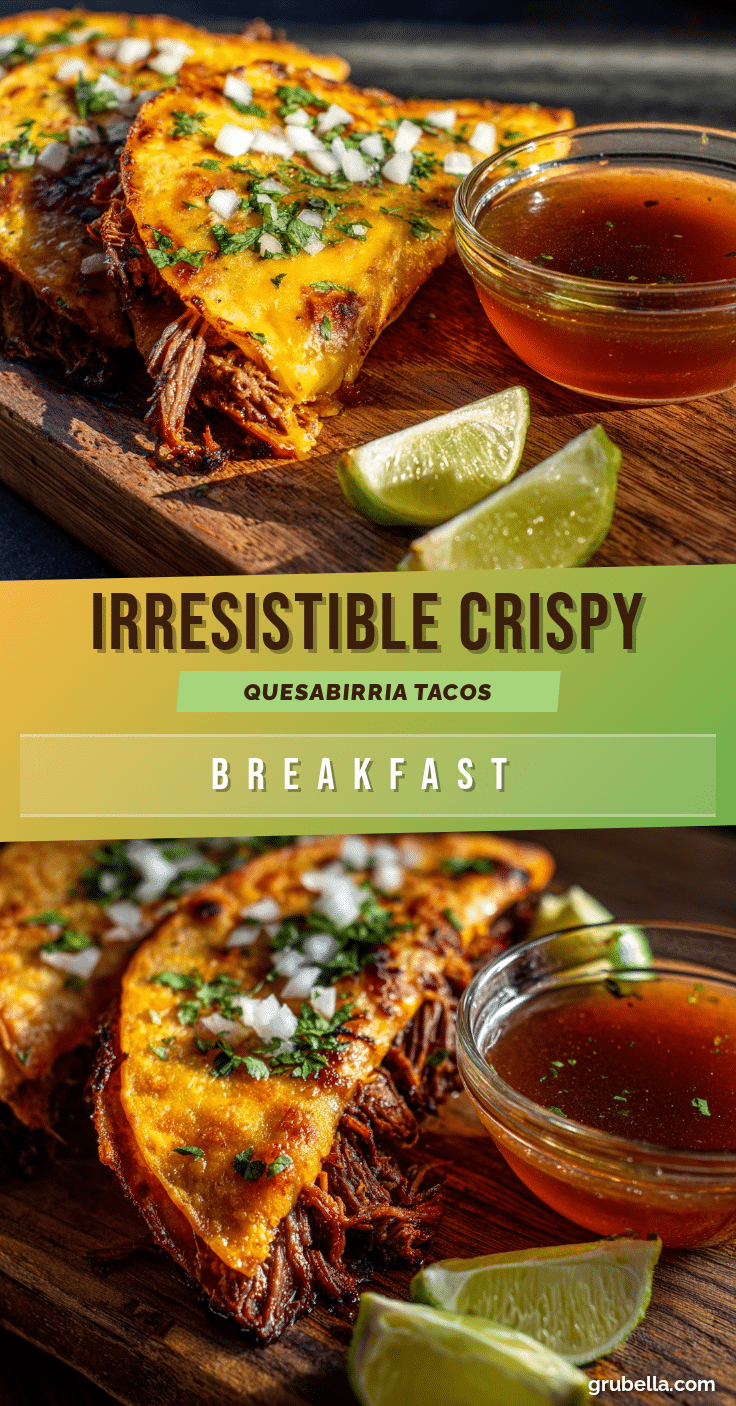
- Assemble Tacos: Heat a large skillet over medium heat and add a small amount of oil. Dip a corn tortilla briefly into the consommé (about 1 second per side), then place it in the skillet. Sprinkle a generous handful of shredded Oaxaca cheese evenly over the tortilla. Add a layer of the shredded beef on top. Top with a little more cheese, then place another dipped tortilla over the filling to form a taco.
- Cook Tacos (5-7 minutes): Cook each side for 3-4 minutes until the tortillas are crisp and golden, and the cheese inside is melted. Use tongs to flip carefully. Transfer cooked tacos to a plate lined with paper towels to drain excess oil.
- Serve: Serve immediately with warm consommé in small bowls for dipping. Garnish tacos with chopped onion, cilantro, and a squeeze of fresh lime if desired.
Pro tip: Keep the consommé warm on low while frying tacos to maintain that cozy dipping temperature. If your consommé gets too thick, stir in a splash of beef broth or water to loosen it. And don’t rush the browning step—it’s key for flavor depth.
Cooking Tips & Techniques for Perfect Quesabirria
One thing I learned the hard way is that dry tortillas won’t crisp up nicely without a little dip in the consommé first. Trust me, it’s worth the extra step—it keeps the tacos juicy inside but crispy outside.
When browning the beef, don’t overcrowd the pot. This lets the meat sear properly instead of steaming, which makes a big difference in flavor.
Low and slow is the mantra for tender meat. I once tried cranking up the heat to save time, and, well, the beef was dry and tough. Patience pays off here.
Using a cast iron skillet for frying helps achieve that even golden crust, but if your pan isn’t quite up to the task, don’t fret—just watch closely and flip carefully.
Multitasking tip: While the beef simmers, prep your garnishes and shred your cheese. It saves time and keeps everything fresh and ready when the tacos come off the pan.
Variations & Adaptations for Your Crispy Quesabirria Tacos
- Vegetarian Version: Swap beef for jackfruit or mushrooms, simmered in the same chili sauce for rich flavor and texture.
- Spicy Kick: Add chopped chipotle peppers in adobo to the chili sauce for a smoky heat that wakes up your taste buds.
- Different Cheeses: Use a blend of mozzarella and Monterey Jack if Oaxaca cheese isn’t available—you’ll still get that melty goodness.
- Slow Cooker Adaptation: Prepare the beef stew in a slow cooker on low for 6-8 hours for effortless hands-off cooking.
- Gluten-Free Friendly: Stick to corn tortillas and double-check your broth and seasonings for hidden gluten.
Personally, I tried adding a splash of cinnamon to the chili sauce once for a subtle warmth—it was unexpected but really wonderful. Feel free to experiment with your favorite spices to make this recipe your own.
Serving & Storage Suggestions
Serve your quesabirria tacos hot and fresh, right off the skillet, alongside warm consommé for dipping. A squeeze of fresh lime and a sprinkle of chopped onions and cilantro add brightness that balances the richness.
These tacos pair beautifully with a simple Mexican street corn salad or a crisp cabbage slaw for some crunch contrast. A cold Mexican beer or a tangy agua fresca makes a great beverage partner.
Leftover beef and consommé keep well in the refrigerator for up to 3 days. Store them separately to keep the tortillas from getting soggy. Reheat the consommé gently on the stove, and crisp up leftover tacos in a hot skillet or oven to regain their crunch.
Flavors often deepen after resting overnight, so don’t hesitate to make the beef stew a day ahead for an even richer consommé.
Nutritional Information & Benefits
Each serving of these crispy quesabirria tacos offers a hearty dose of protein from the beef, essential for muscle repair and energy. The dried chilies and spices bring antioxidants and anti-inflammatory benefits, while the cheese provides calcium and vitamin D.
This recipe is naturally gluten-free when using corn tortillas. Keep in mind the fat content from the cheese and frying oil, so portion control is key if you’re watching calories.
From a wellness perspective, the slow-cooked beef is easier to digest, and the consommé can be soothing and hydrating, especially on cooler evenings.
Conclusion
These Crispy Quesabirria Tacos with Rich Consommé are a delicious way to bring a little street food magic into your own kitchen. I love how they combine crispy, melty, tender textures with bold, comforting flavors that make every bite memorable.
Feel free to tweak the spice level, cheese choice, or cooking method to suit your taste and lifestyle. I hope this recipe sparks your own kitchen adventures and becomes a go-to for taco nights and casual gatherings.
Don’t be shy—drop a comment below if you try this recipe or have your own twist to share. Let’s keep the taco love going strong!
Happy cooking and taco eating!
Frequently Asked Questions About Crispy Quesabirria Tacos
What cut of beef is best for quesabirria tacos?
Beef chuck roast is ideal because it becomes tender and flavorful after slow cooking. Its marbling keeps the meat juicy and rich.
Can I use flour tortillas instead of corn?
Yes, but corn tortillas are traditional and crisp up better for this recipe. Flour tortillas will be softer and less authentic but still tasty.
How do I store leftover consommé?
Keep consommé in an airtight container in the fridge for up to 3 days. Reheat gently on the stove before serving.
Is there a vegetarian alternative for quesabirria?
Absolutely! Jackfruit or mushrooms simmered in the chili sauce make a great plant-based filling with similar texture and flavor.
Can I make the consommé and beef ahead of time?
Yes! Making the beef stew and consommé a day ahead actually improves the flavor. Just reheat before assembling your tacos.
Pin This Recipe!
Crispy Quesabirria Tacos Recipe with Rich Consommé

A delicious recipe for crispy quesabirria tacos featuring slow-cooked beef, melty cheese, and a rich consommé for dipping. Perfect for casual gatherings and taco nights.
- Prep Time: 20 minutes
- Cook Time: 2 hours 10 minutes
- Total Time: 2 hours 30 minutes
- Yield: 12 tacos (about 6 servings) 1x
- Category: Main Course
- Cuisine: Mexican
Ingredients
- 3 lbs beef chuck roast, cut into large chunks
- 4 dried guajillo chilies, stemmed and seeded
- 2 dried ancho chilies, stemmed and seeded
- 1 large white onion, quartered
- 4 garlic cloves, peeled
- 2 bay leaves
- 1 tsp cumin seeds
- 1 tsp dried oregano
- Salt and freshly ground black pepper, to taste
- 4 cups beef broth
- 2 tbsp apple cider vinegar
- 12 corn tortillas
- 2 cups Oaxaca cheese or mozzarella, shredded
- Vegetable oil or lard, for frying
- Optional garnishes: chopped white onion, fresh cilantro leaves, fresh lime wedges, radish slices
Instructions
- Prepare the Chili Sauce: Toast the dried guajillo and ancho chilies in a dry pan over medium heat for 2-3 minutes until fragrant. Soak them in hot water for 15 minutes until softened. Drain and transfer to a blender along with the quartered onion, garlic cloves, cumin seeds, oregano, and a pinch of salt. Blend until smooth, adding a splash of beef broth to help it along. Set aside.
- Cook the Beef: Season the beef chunks generously with salt and pepper. Heat a tablespoon of oil in your Dutch oven over medium-high heat and brown the beef in batches to create a deep crust—about 4 minutes per side. Remove and set aside. Pour the chili sauce into the pot, scraping up browned bits from the bottom. Add the beef back in along with bay leaves, beef broth, and apple cider vinegar. Bring to a simmer, cover, and cook on low heat for 2 hours until the beef is tender and shreddable. Stir…
- Strain and Reserve Consommé: Remove the beef and bay leaves. Strain the cooking liquid through a fine mesh sieve into a bowl or pot. This consommé is your dipping sauce—rich, spicy, and flavorful.
- Shred Beef: Using two forks, shred the beef into bite-sized pieces. Mix some of the reserved consommé back into the shredded meat for extra juiciness.
- Assemble Tacos: Heat a large skillet over medium heat and add a small amount of oil. Dip a corn tortilla briefly into the consommé (about 1 second per side), then place it in the skillet. Sprinkle a generous handful of shredded Oaxaca cheese evenly over the tortilla. Add a layer of the shredded beef on top. Top with a little more cheese, then place another dipped tortilla over the filling to form a taco.
- Cook Tacos: Cook each side for 3-4 minutes until the tortillas are crisp and golden, and the cheese inside is melted. Use tongs to flip carefully. Transfer cooked tacos to a plate lined with paper towels to drain excess oil.
- Serve: Serve immediately with warm consommé in small bowls for dipping. Garnish tacos with chopped onion, cilantro, and a squeeze of fresh lime if desired.
Notes
Keep the consommé warm on low heat while frying tacos to maintain dipping temperature. If consommé thickens, stir in beef broth or water to loosen. Do not overcrowd the pot when browning beef to ensure proper searing. Use cast iron skillet for best crispiness. Dip tortillas briefly in consommé before frying to keep tacos juicy inside and crispy outside.
Nutrition
- Serving Size: 2 tacos per serving
- Calories: 450
- Sugar: 3
- Sodium: 700
- Fat: 28
- Saturated Fat: 12
- Carbohydrates: 28
- Fiber: 4
- Protein: 30
Keywords: quesabirria tacos, crispy tacos, consommé, beef tacos, Mexican street food, slow-cooked beef, cheesy tacos